Ubuntu Help & Advice Pages

|
This page is intended for those who have now successfully installed and optimized an Ubuntu system--using, we hope, the methods set out in prior pages here. Every system, no matter the OS, the hardware, the apps, needs--or at least really should have--certain kinds of attention paid to it on a continuing basis, and this addresses some of those issues for a Ubuntu system. |
|
|
|
||
On other pages:
Master Index to all Pages
Pre-Installation Considerations
Installation Procedures
Post-Installation Considerations
Miscellaneous Matters
On this page:
Maintenance Considerations and Methods
Updates
Receiving Updates
About Kernel Updates
Upgrades
Backups
General considerations
Backup scripts
Storing and using backup scripts
Rsync scripts in general
Various particular methods
Using a thumb drive
Using a second hard drive
Using a second computer on your local network
Backing up to an offsite location
Thumbnails
Browser Privacy
Killing "Flash Cookies"
Selectively Clearing Standard Cookies
Handling Third-Party Monitoring
Blocking Ads
Maintenance Considerations and Methods
Updates
Ubuntu is a "Debian Linux" operating system. One of the big advantage of that kind of system is the remarkable ease with which software can be installed, upgraded, or removed, as we have already seen. Ubuntu makes it very easy for you to keep your system fully up to date. The Update Manager component of Ubuntu--assuming you set it as we suggested earlier--checks all the Ubuntu repositories on a daily basis, and will detect any newer versions of anything on your system. If it finds any, it will signal you, up in your toolbar's "Notification Area", that upgrades are available for installation. Note that "available" is a euphemism: many upgrades are important, occasionally vital security or other critical-nature fixes. You should always, absent any very definite and particular reason not to, install all updates as soon as they become available.
Receiving Updates
The method is very simple: click on the "updates available" notification icon and Update Manager will open. It will show you what it has waiting for you, and ask you to approve the installs. All this will be simple and obvious as to both the informing and the installing (click on the Install button, duh).
If you want to be extra-sure you're up to the very minute, you can first click the Check button to have Update Manager check right now to see if there yet further pending updates. That is supererogation, but harmless, and will appeal to the finicky (including us).
Quite often, an update will require you to reboot your system for the updates to take effect; in such cases, there will be a "reboot" icon in your Notifications-Area tray, plus the Update Manager will expressly tell you so. For super-safety, individually close down all your open apps before rebooting, though Ubuntu normally does a superb job of cleanly closing them down for you when you ask for a reboot.
You can, at any time, check manually on available updates. You can either invoke Upgrade Manager (do Administration - Update Manager), or you can just open Synaptic and do a Reload - Mark All Upgrades - Apply sequence. The effect is the same.
About Kernel Updates
Something you should be aware of: when Ubuntu installs an updated Linux "kernel" (the very core of the operating system) fileset, it does not erase any old sets. In time, as updates accumulate, you will have more and more old kernels stored on your system. Normally, that wouldn't matter ("disk space is cheap"), but kernels are stored in our deliberately rather small /boot partition, and eventually that can get so filled that update installs of the latest kernel will fail (for lack of space). The problem is exacerbated by Ubuntu's switch to the glossy new "Plymouth" login screen, which no longer shows you the menu of kernels you can boot into (all of those old kernels remain functional, and can be used instead of more recent ones); you are thus no longer reminded of any old kernel sets you may have lying about.
Standard good practice on a Linux system is to keep the latest kernel set plus the one just previous to it. The just-previous is kept as a safety measure, lest some serious problem with the latest show up a ways downstream: one can then always boot back into the prior kernel. (That is somewhere from rare to super-rare, but caution never hurts.) That is exactly why new kernel installs do not erase older kernels.
Here is how to discover how many and which kernels you have installed:
- Open Synaptic.
- Click on Search or press Ctrl-F.
- In the pop Search-entry window, type linux-image- (note the trailing hyphen) and click that window's Search button.
- The list window will now contain some number of packages all of whose names start with linux-image- followed by a number sequence (which identifies the kernel) and perhaps some tags after that. The ones actually
installed on your system will have the tickboxes (at the left) colored in green.
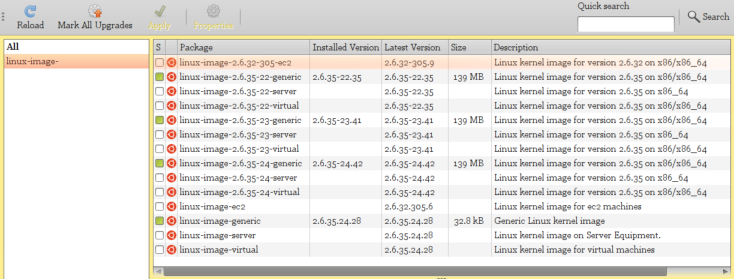
- Close Synaptic (unless you want to remove one or more kernal sets).
Note that we refer to kernel "filesets". A kernel is made up of three key packages; they will be named something like (where the version numbers will vary):
- linux-headers-2.6.35-22
- linux-headers-2.6.35-22-generic
- linux-image-2.6.35-22-generic
You can verify that by doing another Synaptic search, this time on 2.6.35-22 (or, of course, whatever exact kernel version you actually want to check on). You will see a number of packages related to that kernel, but those three types will always be greened among them.
A kernel fileset occupies something in the vicinity of 18 MiB in the /boot directory, so even though we made that a rather small directory, around 500 MiB, you can see that even a couple dozen kernals can be accomodated before things might get squeezed (the non-kernel overhead in /boot is trivial, 2 or 3 MiB). Still, it's one of those things you should keep in mind down the road, as the kernels accumutate. (Also keep in mind that we're only dealing here with squeeze in the /boot partition--kernels carry a lot of other baggage, stored in other lockers at the station: a full kernel package takes around 110 MB of drive space.)
Removing older kernels is no big deal, save that you have to be very careful that with all those long, complex names you are deleting what you really want to delete, and nothing else. First off, make absolutely, positively sure you know what kernel you're actually running on right now:
- Open a terminal.
- Execute uname -a
- The terminal will report your current kernel version: make a note of it.
- Close the terminal.
As we said, it is considered sound practice to also retain at least the kernel one prior to what you are currently running on. Normally, that will mean one whose last number is one lower than what you are running (that is, if you're running 2.6.35-24, the one prior would be 2.6.35-23). It is always possible, however, that your latest kernel was a major revision; if the last number is 1, look at the third number as well. It does no great harm to keep several kernels, but when you get to as many as half a dozen, some housecleaning is in order.
Using Synaptic as we described above (that is, search for linux-image-), identify all the kernels you have installed. Decide how many to delete, always leaving at least the very latest two. Verify, as described above, your current kernel and make sure that is one that you are not going to try to remove. Start with the oldest kernel you want to back out; it will have a version number of the form A.B.C.D, as we have seen. Use Synaptic to search for that number pattern (say 2.6.35-22). From the result, find the three file types listed above (the two header files and the image file) that include that version number. Mark all three for complete removal (no point in removing them if we don't erase their files to get the free space). And just do it. There: wasn't that easy? Repeat as desired till you have scrubbed all the oldies you choose to. Last (and don't forget to do this), open a root terminal and execute update-grub, so the login menu can be updated to account for which kernels are and aren't there now.
You can also do some of the discovering from the command line in a terminal session. The command dpkg -l | grep linux-image-* will show you all the installed versions (ignore the one without a version number in its name) and the same command with header substituted for image will show you all the corresponding header files. You can even do the deletion from there, but we recommend sticking with Synaptic.
Upgrades
An upgrade differs materially from an update. The latter, as we discussed above, is an incremental step in the software evolution of one or several installed packages. An upgrade is a semi-annual event in which the entire Ubuntu system gets a fairly major overhaul. In upgrades, the Ubuntu version number changes--the version 10.10 that is current as we write this will, in April of 2011, be replaced by version 11.04. (The nicknames for versions progress through the alphabet, and always have the form of Adjective Animal in some supposedly cutesy form, from Lucid Lynx to Maverick Meerkat to, coming up, Natty Narwhal; they are always known just by the adjective.)
Canonical, Ltd., who maintain Ubuntu, regularly issue such upgrades to schedule (more or less) in April and October of every year, hence the .04 and .10 subnumbers after the major version number. Every couple of years or so, a new release will be tagged "LTS", for "long-term support", meaning that even if you don't upgrade from that version later, Canonical has promised to keep maintaining the software in it (meaning issuing updates for that software as required) for at least three years; non-LTS versions are only guaranteed 18 months. (You can read much more about it all at the Ubuntu Wiki release-info page.)
You do not have to accept any given upgrade. You can keep plugging merrily along with whatever version you have for as long as you're comfortable with it. You will, eventually, find that support disappears, manifested by the official repositories for your version disappearing, but if it's working, it's not likely to stop working. Still, it rather obviously makes sense to upgrade periodically.
But what many feel is wise is to not jump on the upgrade wagon the day it rolls out of the barn. Major new changes to things always have bugs, and it pays to wait a month or two after release for the initial major bug-swatting to be done. Then, when you accept the upgrade, you'll be getting later, bug-swatted versions of everything.
Your Update Manager will start nagging you about available upgrades as soon as they are out. When you feel it is time to accept one, carve out a segment of your day for it, because it usually takes a while. Starting it is simple: just tell Update Manager to install it. Then the seemingly never-ending downloads start, followed by the seemingly endless installs of the downloads. But eventually it burps and licks its lips and tells you to rebbot into your wonderful new version. When you do that, at once do at least gross checks that everyting important to you still seems to be working as expected. You will probably find a number of things look a little different--the designers like to fiddle the curtains and carpets when they do an update, so you can see that the elves have been busy--but everything should work as least as well as it used to; in some cases, it may work a lot better: features are often added at this time, as well as wholly new toys. Google around to learn about "what's new in" your new version.
Take note that "in place" upgrades--those done to an existing system--can only follow a straight progression: that is, from version J you can only update to version K; to get to M, you'd have to do successive upgrades to K, L, and only then to M. Since versions do go out of support, that can leave a very conservative non-upgrader with no upgrade path. You can always, of course, do a total fresh install (as we have been documenting) instead of one or more in-place upgrades. Indeed, some--including us--believe that it is wise to do a total fresh install every few versions or so, lest small, naggy problems from not-quite-perfect in-place upgrades accumulate. Maybe that's superstition, but it's just a nice feeling to know that your system is "fresh". If you back up properly--that is, thoroughly and regularly--a total fresh install is perhaps one full day's work, if that (most of which is getting your apps back also fresh, and re-customizing them.)
Backups
General considerations
The wise user knows that there is no such thing as too much backing up. Even with an Uninterruptible Power Supply, physical disasters can occur: hard drives don't last forever, accidents happen, sad to say buildings burn down. In our own case, our primary system is quadruply backed up: to a second hard drive in the same computer; to a thumb drive; to a separate laptop computer; and at the remote facilities of our web host. If our premises burn down, we still have a preserved backup; if this half of the country slides into the sea, we still have a preserved backup. Indeed, no matter how many on-site backups you have, they are just that: on-site. Lose the site, lose the backup. It is wise for the careful user to have a regularly updated backup offsite--as far off as geography conveniently allows.
While losing your system completely would mean going through an entire reinstall from scratch--something you have just done--that's only a little time and aggravation. What would be fatal is to lose the personal data stored in your home directory, and that's what wants major backing up. (There are also ways to back up your entire install to a bootable thumb drive--not a duplicate of the original Ubuntu install CD/DVD, which is what a lot of schemes on the web describe, but a full-blown, up-to-date copy of your actual system, but we'll not cover that yet--maybe we'll add it later.) Before you can go about backing up your home directory, you need some idea of how much storage space must be available (particularly important if you're sizing a thumb drive for the task). That's easy: open a file browser, go to the /home directory and right-click on the folder there that is your home; from the sub-menu, select Properties. On the popup window, at the first (default-display) tab, look at the entry Contents; that will answer your question (if you have a gazillion files, it may take a second or three for that line to finalize). If you have avoided the dread Thunderbird bloat (as we instructed you to do earlier), you may be surprised at how modest the size of your whole shebang is. In truth, the only things that really blow up directory-size totals are (as a rule) videos. If you don't store a lot of long videos in your directories, you'll find that a fairly modest-sized thumb drive will suffice. Naturally, you want to leave plenty of room for growth, but chances are that an 8-GiB thumb drive will hold you for the useful life of the drive (thumb drives are not forever, you know).
One last note: while almost everything that is personal to your use of your system is stored in your home directory, there is at least one notable exception: game scores. While to some that is minor or trivial, to others it is not. Some games make their own folders (directories) within your home directory, but not a few--especially the "standard" little games--use a system directory for their scores, the /var/games/ directory. Those wanting to preserve those high-score files need to also back up that directory. (Remember that to restore any such files from a backup back to their home directory will require root privileges; copying them for a backup, however, will not.) The various backup shell scripts given below do not back up thoat game-scores directory; you should be able, if you want to, to add it in by obvious parallel with the rest of the scripts' contents.
Backup scripts
Storing and using backup scripts
Let's make this easy. In your home directory, make a new folder and name it backup. Within it, make another folder named output_messages. In this new backup directory, you will store shell scripts to implement your backing up. Those that perform backup to places always available--such as a second hard drive in the same computer or your off-site web host--can and should be set to go daily by making an appropriate entry in your system's scheduler. The backup scripts--which we will supply below, as appropriate for each target--are very simple, owing to the remarkable power of the wonderful rsync command, which you can read more about at that link. It doesn't merely copy: it neatly, cleanly, and above all economically adjusts any target directory to exactly match a source directory, with a minimum of traffic flowing between the source and target.
Now, it's about time (ho ho) that we looked at the scheduler, which is childishly simple to use. Let's schedule a daily offsite backup to run at 4:00 a.m. local time, and assume that the script to accomplish that backup is named Offsite and is stored in your new backup directory. (You might as well go ahead and actually do this, because you can just delete the scheduling right after.)
- Do Applications - System Tools - Scheduler. The initial window will be blank, because you haven't scheduled anything.
- In the Scheduler toolbar, click on New
- At the next window, click on A task that launches recurrently (as you see, you can also schedule one-time events).
- At the next window, fill in the required data, most of which is blindingly obvious. But to be sure:
- for "Description", use something simple and appropriate, like "Offsite backup"
- for "Command", use ~/backup/Offsite
- leave "Default behavior" alone
- tick the "Advanced" button
- for the settings under "Advanced", just put 4 in the Hour line and leave everything else as is (an asterisk signifies "every").
- When it's done, click the Add button
- You will now see it displayed in the jobs window. You're done.
- Close the Scheduler window
You can re-open the window and then select and Delete the job you just added. When you are really ready to run it, re-add it (using whatever time seems best to you--try for a the time you're least likely to be using the system.
As we said, we will give you scripts you can use as we discuss individual backup targets. Take note: for all these scripts, or any script using the rsync command, you can do a "dry run" that simulates the real thing but does not alter any files on the backup target, by inserting -t right after the command rsync (naturally, set that insert off with blank spaces on either side). The output text logfiles will show you what would have gone forth on a real run--and they will include a notice that they were logging a "dry run".
Rsync scripts in general
This is not a general tutorial on rsync: there are plenty of those available. It is just a brief rundown of some "how-to" stuff for the particular use of rsync in backing up a directory to some other location. In it, we assume that you have already set up SSH communications with that location, as described rather earlier in these pages.
The general form of an rsync command in our uses is this, with the components broken out here in colors to make discussion simpler:
rsync -vvaz --delete --exclude ".gvfs/" /home/myname/ /media/XYdesktop/XYdesktop_folder/
The rsync is just the command itself.
The -vvaz is a set of options for rsync; they tell rsync: to (vv) be highly verbose in generating its output (which we will capture to a log file); to (a) use "archive" mode, which causes rsync to store all directories and files in and below the source specified (as rsync's Man page puts it, "It is a quick way of saying you want recursion and want to preserve everything"); and to (z) compress the data flow between the source and the target (rsync is very good at minimizing the sheer bulk of bytes that need to flow back and forth in its workings). That combination is pretty well standard for most backing up (except that the z is meaningless and ignored when communicating with devices on the same system, such as a second hard drive).
The --delete signfies that you want files and directories on the backup target that no longer exist on the source to be excised: that way, you don't just add to your backup, you keep it in actual sync with what is being backed up. As the Man page says, "If the sending side detects any IO errors then the deletion of any files at the destination will be automatically disabled. This is to prevent temporary filesystem failures (such as NFS errors) on the sending side causing a massive deletion of files on the destination."
The --exclude ".gvfs/" is a particular use of the --exclude option, which tells rsync to, yes, exclude the specified directory from the backing up--rsync just skips over it (and everything below it). That is handy if, say, you don't want to back up your desktop-search indices (because they're bulky and in any event can be recreated very quickly by the indexer), or, as in this case, if there's a troublesome directory that would interfere with the process (the permissions on your .gvfs directory are nightmarish, and it needs to be avoided in backups or in search-indexing). Take careful note that the --exclude option only takes one specification; if you want to exclude multiple directories, each needs its own separate --exclude statement in the rsync command string.
The /home/myname/ is (as determined by its position in the command-line sequence) the source topmost directory for the backup. In this example, it is your home directory (where, in this example, myname is your username and thus the name of your home directory). The trailing slash is absolutely vital--omit it and you will get very bizarre results.
And finally, as you would expect, /media/XYdesktop/XYdesktop_folder/ is the target directory for the backup. This specification is the one that will really vary from one backup medium to another. If you are using a drive attached--permanently or temporarily--to your system, such as a second hard drive or a USB "thumb drive", then the form will be as shown: the components of it are /media/, which is where in your filesystem all devices are mounted by the system; XYdesktop, which is the topmost partition on the backup device; and XYdesktop_folder, which is the name of the folder within that partition in which your backup is to be stored (it functions as the equivalent of your /home/myname directory). The /media/ part is unchanging for all attached devices, but the other two depend entirely on how you set up the device (which we discuss below in detail for some representative devices)--if you replace "XY" with your initials, you have reasonable names to use. Again, the trailing slash is absolutely vital--omit it and you will get very bizarre results.
Understand that if XYdesktop_folder is not in the topmost level of partition XYdesktop, then it is to be considered the full path specification of the target folder.
If the backup target is not a device attached to your system but rather is on another system altogether, the general form of the target specification is instead myremoteusername@server:/home/myremoteusername/folder_name Most of that is obvious, but server needs comment: if the location is offsite, server will have the general form servername.hostname.com (or .org or .net or whatever); if your account is on server qx57j3 at "Honest Big Joe's ISP Site"--honestbigjoe.com--the spec would probably be just qx57j3.honestbigjoe.com. If, on the other hand, the other system is a part of your LAN, you can just use that computer's name on your LAN (as specified in the config file you made when you set up SSH services, as described on another page of these documents) for the server component of the spec.
One final point: to capture the output of the rsync command (remember that we asked it to be "verbose"), for later checking that everything worked right or to peruse any problems, we tag on to the command this output redirection--
1>>/home/myname/backup/output_messages/usbstick.out 2>/home/myname/backup/output_messages/usbstick.error
--where, as before, myname is your actual username. That makes two output files: one that describes the processing, and one that separately logs any actual errors in the backing up; normally, that second will end up as a zero-length file, but if there are problems, it isolates them for you.
Below, we will show you some representative scripts that you can use "as is" for the kinds of devices described. Each also includes an echo command to put a starting and ending line into the logfile, showing the date and time of the start and end of the process.
Various particular methods
Using a thumb drive
When you get a new thumb drive for use with Ubuntu's backup storage, you should, after plugging it in for the first time, use Administration - Disk Utility to format it. Be super-cautious here! The Disk Utility is an extremely powerful tool, and careless misuse can trash your entire hard drive. All you need to do is go very slow and make sure at every step that you know exactly what you're doing. When you plugged the thumb drive in, a Nautilus window for it will have popped up a few seconds later; close that window before beginning. In the Disk Utility window, there will be a window pane at the left listing all the "drive" devices attached to your system, as well as the adaptors that control them. The thumb drive should be down at or near the bottom of the list; it will probably be identified by the maker's brand name and some long ID code. Click on that drive listing. That will bring up, in the right-hand pane of the window, a nice, fully informative screen about the drive. Expand the Disk Utility window till there are no hidden parts and everything shows at once. Verify that you have indeed selected the correct drive: that is super-important! (One big clue will be that the horizontal display bar representing the drive's filesystems will total 8.0 GB, or whatever the nominal size of the thumb drive is; if it's materially more, you have somehow selected the wrong drive: pick again from the left-hand pane. If you're really unsure at this point, exit the Utility without doing anything--better safe than sorry.
If you're quite comfortable that you have the right drive on the screen, click in that horizontal display bar (which will then turn red, to show you that you are working with it). First, click on Unmount Volume--you can't work on a volume while it's mounted into the system. Next, click on Format Volume. At the popup entry screen that follows, take care to get everything right: select, for the "Type", Ext2 (not the default offering of Ext4--this is a backup drive, and doesn't want or need journalling).
For the "Name", select a brief meaningful name that signifies what this is a backup of--something like XYdesktop (where "XY" are your initials). Your choice is important--remember it--because you'll need to use that name later in the script that does the actual backing up.
Make sure that "Take ownership of filesystem" is checked (that's the default) and that "Encrypt underlying device" is not (that, too, is default). When you're sure everything is right, click the Format button. You will, quite appropriately, get a popup scare warning; as Davy Crockett supposedly said, "Make sure you're right, then go ahead."
If you get an instantaneous error message, you probably left the device mounted: click Unmount Volume, then re-set-up the formatting.
The format will take a while, but probably not a long while. There will be a little "spinner" in the lower right of the bar display, to show you that formatting is proceeding. When that stops, the formatting is done and the drive is ready for use. Close the Disk Utility window, unplug the drive, count to three, then re-insert it; once again, Nautilus will again pop open a window for the drive, this time showing a single folder named lost+found (leave it alone).
Use Nautilus to create a new folder; we recommend using the same name as you gave the drive itself, say XYbackup (or whatever you really used).
You are now ready to remove and store the drive till such time as you can run a backup.
| Do not ever just unplug a thumb drive. |
When you have a thumb drive mounted, to remove it, right-click on the icon for the drive that will have appeared somewhere on your desktop (probably in the upper left corner); select Safely remove drive and always wait for the icon to disappear before unplugging the drive. Sometimes, if you have been reading or writing extensively to the drive, a warning window will pop open letting you know that delayed reading or writing to the drive is still in progress; always wait for any such activity to complete before removing the drive!
The backup script for a thumb drive is this (this is exactly 5 lines long, including interior blank lines, so be sure your web-browser is wide enough that you're not "folding" lines in your view. Better yet, considering the complexity of the commands and the possibility of omitting blank spaces, just copy-and-paste the thing into your editor, then make the customization changes described below (which we have color-coded for clarity).
|
#!/bin/bash echo "Starting XYdesktop USBstick rsync backup, `date`." > /home/myname/backup/output_messages/usbstick.out rsync -vvaz --delete --exclude ".gvfs/" /home/myname/ /media/XYdesktop/XYdesktop_folder/ 1>>/home/myname/backup/output_messages/usbstick.out 2>/home/myname/backup/output_messages/usbstick.error echo "XYdesktop USBstick rsync backup finished, `date`." >> /home/myname/backup/output_messages/usbstick.out |
You need to globally change three things in that script to set it up for your system:
- change XYdesktop to the name of your thumb drive (given as we described above under formatting the drive for use)
- change myname to the name of your home directory
- change XYdesktop_folder to the name of the folder you made on the thumb drive (given as we described above under formatting the drive for use)
We advised you to name the folder the same as the drive, so XYdesktop and XYdesktop_folder should have--in your system--the same name; but if you named the folder something different, this distinguishes which is what in the script. Naturally, you save this script to the backup directory under some simple name--such as USBhomeXY--which is the "Command" name you will use in the Scheduler. After saving the file, in a file-browser window, right-click on it, select Properties, then select the "Permissions" tab of Properties, and click the box allowing the script to be executable.
As the script runs, it outputs its messages to two text files, stored in the output_messages subdirectory of your backup directory: usbstick.out, which shows you everything the backup did, and usbstick.error, which will normally end up as a zero-size file; if it is not, inspect it to see what problems there might be.
Using a second hard drive
If you have a spare older drive, set aside because it's small-ish (say 80 or 100 GB), or don't mind buying a new (or used) drive of that capacity range--they're very cheap--you can implement an especially nice backing-up: seven separate backups, each made on a given day of the week. That is superlatively handy if you find on Tuesday that last Thursday you made a terrible error in some file, or accidentally deleted a whole file or bunch of files, but didn't notice till now--voila! You still have it or them. Remember that backups preserve your data as it is at the moment of backing up. That means that errors are immortalized in your backups. If your data to be backed up isn't over about 10% of the size of the spare drive (that leaves some room for growth), you've got it made.
You should clean and reformat the drive, much as you did for the thumb drive above. Use Ext2 again. Again give the drive some meaningful name you will remember, for use in scripts. And make, instead of one folder, seven folders, each named by a day of the week (spelled out, with initial caps: Sunday, Monday, &c.).
The backup script for such a second drive is this (this is exactly 7 lines long, including interior blank lines, so be sure your web-browser is wide enough that you're not "folding" lines in your view. Better yet, considering the complexity of the commands and the possibility of omitting blank spaces, just copy-and-paste the thing into your editor, then make the customization changes described below (which we have color-coded for clarity).
|
#!/bin/bash # Puts backup in day-named folder, so we always have a full week's worth at hand, day by day. echo "Starting XYdesktop Second-Drive `date +%A` rsync backup, `date`." > /home/myname/backup/output_messages/`date +%A`.out rsync -vvaz --delete --exclude ".gvfs/" /home/myname/ /media/drive_name/`date +%A`/ 1>>/home/myname/backup/output_messages/`date +%A`.out 2>/home/myname/backup/output_messages/`date +%A`.error echo "XYdesktop Second-Drive `date +%A` rsync backup finished, `date`." >> /home/myname/backup/output_messages/`date +%A`.out |
You need to globally change three things in that script to set it up for your system:
- change XYdesktop to a name signifying what is being backed up--we suggest the same name you would use for a backup thumb drive
- change myname to the name of your home directory
- change drive_name to the name of your second drive (given as we described above under formatting the drive for use)
Naturally, you save this script to the backup directory under some simple name--such as Onsite--which is the "Command" name you will use in the Scheduler. After saving the file, in a file-browser window, right-click on it, select Properties, then select the "Permissions" tab of Properties, and click the box allowing the script to be executable.
As the script runs, it outputs its messages to two text files, stored in the output_messages subdirectory of your backup directory: Day.out, which shows you everything the backup did, and Day.error, which will normally end up as a zero-size file; if it is not, inspect it to see what problems there might be. Of course, Day in each file name will be the name of the actual day of the week on which the job was run.
Using a second computer on your local network
If there is spare space on another computer that is part of your local network--say a laptop--you can also store a backup there. (The more backups, the better). For this case, to show better how the scripts work, we won't back up your whole home directory; instead, we will just back up your DATA folder (and its subfolders) and your Thunderbird Mail folder, assuming those to be the most critical parts of your personal data. Here is the sort of script needed (this is exactly 16 lines long, including interior blank lines, so be sure your web-browser is wide enough that you're not "folding" lines in your view. Better yet, considering the complexity of the commands and the possibility of omitting blank spaces, just copy-and-paste the thing into your editor, then make the customization changes described below (which we have color-coded for clarity).
|
#!/bin/bash # Sync up the ~/DATA folders: echo "Starting Laptop rsync DATA-folder synchronization, `date`." > /home/myname/backup/output_messages/laptop.out rsync -e ssh -vaz --delete /home/myname/DATA/ laptop:/home/myname/DATA/ 1>>/home/myname/backup/output_messages/laptop.out 2>/home/myname/backup/output_messages/laptop.error echo "OffSite rsync backup DATA-folder finished, `date`." >> /home/myname/backup/output_messages/laptop.out # Now sync up the Thunderbird eMail folders: echo "Starting Laptop rsync eMail-folder synchronization, `date`." > /home/myname/backup/output_messages/eMail.out rsync -e ssh -vaz --delete /home/myname/.thunderbird/jnsh6t70.default/Mail/ laptop:/home/myname/.thunderbird/scramble.default/Mail/ 1>>/home/myname/backup/output_messages/eMail.out 2>/home/myname/backup/output_messages/eMail.error echo "OffSite rsync backup eMail-folder finished, `date`." >> /home/myname/backup/output_messages/eMail.out # Note that two separate sets of output files are generated. |
You need to globally change four things in that script to set it up for your system:
- change Laptop to a name for the second computer; you can just use the value of the laptop parameter (below), or something more picturesque if you prefer
- change myname to the name of your home directory
- change laptop to the actual name (as set in your SSH config file) of your networked second computer
- change scramble to the actual coding of your Thunderbird profiles folder (the .default extension is already provided)
Naturally, you save this script to the backup directory under some simple name--such as Laptop--which is the "Command" name you will use in the Scheduler. After saving the file, in a file-browser window, right-click on it, select Properties, then select the "Permissions" tab of Properties, and click the box allowing the script to be executable.
As the script runs, it outputs its messages to four text files, as twp pairs, all stored in the output_messages subdirectory of your backup directory. The first pair is drive_name.out and drive_name.error, and the second pair is Email.out and Email.error; that way, you have separate track of the two separate processes.
You can expand (or contract) this script by adding more directories to back up (or subtracting some). If the second system is one you keep more or less in sync with the one you are backing up (as, for example, a laptop might be matched to a desktop), you could back up your entire Firefox and Thunderbird profile folders, forcing the second system to match the first for those two apps. Use your head.
Backing up to an offsite location
This is presumed to be a server accessible over the internet, which recognizes SFTP (the SSH FTP protocol), which almost all do, and which implements the rsync command. While rsync originated in Unix, it has been ported to all major operating systems, and should be available on any non-trashy commercial server. Let us again put an oar in for Pair networks, which is a well-respected and, in our experience, highly satisfactory web host.
(If you are hosted, or getting ISP services, from an entity not using some 'nix operating system--BSD is most common--you deserve what you get. In any event, our scripts as supplied here won't work on servers that don't have rsync implemented, and any that don't are a sorry lot.)
All you need here is a suitable script, and this is it (this is exactly 7 lines long, including interior blank lines, so be sure your web-browser is wide enough that you're not "folding" lines in your view. Better yet, considering the complexity of the commands and the possibility of omitting blank spaces, just copy-and-paste the thing into your editor, then make the customization changes described below (which we have color-coded for clarity).
|
#!/bin/bash # Synchronize the remote (NetName) backup folder (folder_name) with local home/myname folder: echo "Starting OffSite rsync backup, `date`." > /home/myname/backup/output_messages/offsite.out rsync -e ssh -vaz --delete --exclude ".gvfs/" /home/myname/ myremoteusername@server:/home/owlcroft/folder_name/ 1>>/home/myname/backup/output_messages/offsite.out 2>/home/myname/backup/output_messages/offsite.error echo "OffSite rsync backup finished, `date`." >> /home/myname/backup/output_messages/offsite.out |
You need to globally change five things in that script to set it up for your system:
- change NetName to some convenient name for the offsite locale (such as the hosting company's name)
- change myname to the name of your home directory
- change myremoteusername to the name you use to log onto the remote server
- change server to the actual server URL: that should be something of the general form serverid.hostname.com
- change folder_name to the name of the backup-storage folder on the remote server
Naturally, you save this script to the backup directory under some simple name--such as Offsite--which is the "Command" name you will use in the Scheduler. After saving the file, in a file-browser window, right-click on it, select Properties, then select the "Permissions" tab of Properties, and click the box allowing the script to be executable.
As the script runs, it outputs its messages to two text files, both stored in the output_messages subdirectory of your backup directory. The first is offsite.out and the second is Offsite.error, which should end up as a zero-byte file.
Thumbnails
You may run across some recommendations on the web for cleaning up your hidden .thumbnails directory. Ignore them: they are out of date. The thumbnails are now auto-cleaned by the system.
Browser Privacy
Here, we will adress only the issue of cookie management--but that includes something that may be a surprise to many. That surprise is what is sometimes called "Flash cookies". You may have thought that if you simply cleared all your cookies from Firefox's cookie cache, your privacy was all in order: wrong. There is another class of cookie altogether, one that is often much larger (and thus more informative to the third parties who read these things) and which cannot be gotten rid of except by expressly erasing it in your file system--but most users don't even know these exist, much less where they are stored or what to do about them.
Meanwhile, even ordinary cookies can be highly annoying, because if you just wipe them all regularly (for example, many users elect to auto-wipe them all every time they close their browsers) you lose both preference settings at many sites and persistent logins at your favorites. The ideal would be to wipe all cookies periodically except those from sites you trust and that are important to your use of those sites. As an example, if we wipe all cookies, the bank we use online will insist on our answering a series of verification questions before it will let us log into our account; that is because it finds no cookies on our browser to tell us that yes, we have dealt with this browser before (that is a now-common extra layer of security beyond merely logging in with a username and password--it is a good idea, but can be very tedious in practice.)
Moreover, there are, on a large fraction of web pages these days, various little bits of information sent to the page owners and, usually, several third parties every time you land on one of those pages. You may or may not want to block some (or all) of those, but at least you should know what a given page is telling people about you.
And above and beyond all that, there is the sheer annoyance of the huge number of ads that pepper so many pages these days (and we are not exempt, though we try to keep ours to a modest minimum). It would be nice to be able to turn those off.
All of the issues above can be handled by a set of Firefox extensions; there is at least one outstanding extension for each of the problems discussed above, and sometimes several. Here are the ones we recommend, and--important--some tips on how to use them.
Killing "Flash Cookies"
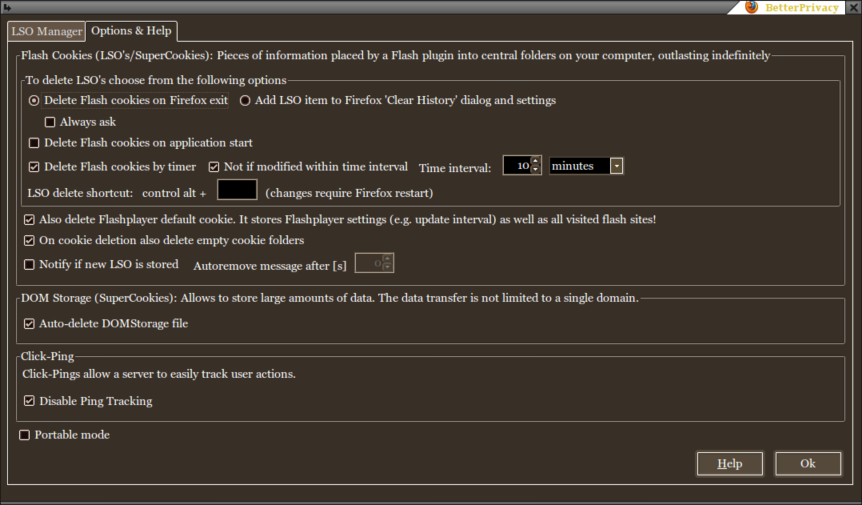
The tool for this job is BetterPrivacy. The page at the link explains things well enough; the settings we recommend are most easily just shown:
Selectively Clearing Standard Cookies
The tool for this job is CookieCuller. The page at the link explains the basic ideas, but here's how to make this thing work best for you. The crux is identifying which cookies you want to preserve from wiping: you don't want to lose your persistent logins (what lets you stay logged in to certain sites even when you leave the site for some time) or your preference settings, but you do want to lose everything else. Here it all is as a procedure; it's much easier than the length of the steps suggests.
Make a list of all sites requiring logins that you visit frequently enough to want to stay "permanently" logged into (and of your username and password for those sites).
Make a list of all sites you visit on which there are preferences or options you have set--on that site--for your use of that site (and, of course, of what those settings are).
In Firefox, do Edit - Preferences and select the Privacy tab.
On the privacy tab, under Accept cookies from sites (which should be ticked for Yes), set Keep Until to they expire.
(Whether to accept third-party cookies is up to you, but many sites will not work properly if Yes is not enabled for that option.)
Still on the privacy tab, click the Show Cookies button.
In the resultant popup window, click the Remove All Cookies button.
Close the Cookies popup window.
Close the Preferences window.
In Firefox, do Tools - CookieCuller. Verify that the resultant window is empty of cookies.
Close the CookieCuller window.
- You are now going to do a series of by-site cookie protections. Here is an example template of how to do each:
- Send your browser to one of your listed sites--we will use http://www.google.com/ in this example.
- Assuming you have a Google signin, log in with it.
- Click (in this case, in the upper right corner) on "Settings".
- Proceed to personalize all available settings of concern--for example, in Search Settings, you might turn off Google Instant and set replies per page to 100.
- When you have personalized every available setting as you want it, in Firefox's toolbar do Tools - CookieCuller
- You will see there a number of cookies from Google; some may be from google.com while others are from www.google.com but that's immaterial: Google is Google.
- Mark all the Google cookies; you mark one by clicking on it, and you can mark a bunch at once by holding down <Ctrl> while you click each.
- With all the Google cookies marked, click the Protect Cookie button.
- Verify that all the Google cookies are indeed now listed as "protected".
- If you find any non-Google cookies, mark them all--taking care to mark no protected Google cookies--then click the Remove Cookie button.
- Close the CookieCuller window.
- Repeat that sort of procedure for each site on your list: login (if necessary--and select "stay logged in" when doing so), set up all preferences, then protect whatever cookies that site has set.
To see the effect, browse around to some sites not on your lists--visit some news sites, of general-info sites, or whatever you please. After a while, go back and--using CookieCuller--look at your list of cookies. You may be amazed at how many you have picked up. Now just shut down Firefox, count to 5 (a weird Firefox glitch--it sometimes takes a few seconds to "realize" it's been closed), and restart it. Now look at your cookies list: everything you protected is there, and all the unwanted scum has been washed away. You can prove it by going to some site you processed that requires login and has options settings: you should be returned, without login, as if you had never left, and all your settings should still be in force.
A word of final advice: try to keep your list of "protected" sites to a minimum. Certainly never leave any critical site like a financial institution "open": always explicitly log out of any site handling sensitive data when you are through there. (That will kill per-session cookies from the site's end, but keep any persistent "settings/options" cookies in place). If you don't visit a given site several times a week, it's no great strain to log on anew when you do visit. Use common sense.
Handling Third-Party Monitoring
For this, we use Ghostery. Again, the linked page will give you tons of information. Ghostery has a "setup wizard" you can use, but your real decision is simply whether to use it for monitoring who's watching and reporting your internet use, or whether to block the reporting. The choice is not so obvious as it might seem, because often without those "reports" being sent, some sites won't work the way you expect (shopping sites, for example). Or you can experiment with blocking on a site-by-site basis and see what works and what doesn't.
On the setup "Look and Feel" tab, we suggest putting the popup alert bubble where you can see it--upper left or upper right--but keeping its display time down to 2 or 3 or at most 4 seconds (unless you're a very slow reader). Get used to reading the log, to see who's done what where in your web travels. You can block them all, then let a selected few through via the "whitelist". You can look each up off the clickable list on the "Blocking" tab of the ghostery window. Explore and play, then protect your privacy.
Blocking Ads
Unsurprisingly, the wanted tool is named AdBlock, and it is one of the best-known tools on the web. The thing is highly configurable--it can be turned on or off on a pagewide or sitewide basis if you happen to want to always see the ads on a given page or site (such as, for example, your own). Its options are largely self-explanatory, except perhaps for a word about the "filters" available. For most people, a "subscription" to a single general-purpose filter will suffice; you can find more information on this neat Getting Started With AdBlock page.
After using AdBlock for a while--say, a few weeks--just for fun, turn it off and surf a little. You will probably be appalled to see how much visual trash you have become accustomed to no longer seeing.
And that's all she wrote.
|
Comments? Criticisms? Questions? Please, e-mail us by clicking here. All content copyright 2010 Owlcroft House |
|
This web page is strictly compliant with the W3C (World Wide Web Consortium) Extensible HyperText Markup Language (XHTML) Protocol v1.0 (Transitional). Click on the logo below to test us! You loaded this page on Tuesday, 28 July 2026, at 10:26 EDT.; it was last modified on Thursday, 6 January 2011, at 01:59 EST. |
---=== end of page ===---