Ubuntu Help & Advice Pages

|
This page is intended for use by folk who have just completed a total fresh, clean install of 64-bit Ubuntu v. 10.10 ("Maverick") desktop edition, and who now want to clean up, fix, tweak, augment, and generally optimize their new toy. It will, we think, also be of use to those who may have been running Maverick for a while, but it assumes initially a right-from-the-install system. You can find elsewhere our thoughts on Ubuntu pre-installation issues (which still have some relevance for installed systems) and even actual Ubuntu installation instructions (which may also hold some interest) at the corresponding links in this sentence. As we have said earlier in this sequence of pages, this is not a catchall encyclopedia of "tips & tricks": it is a purposeful sequence of instructions: for example, later procedures assume familiarity with general techniques learned in earlier ones. We strenuously urge you to read and, if you will, follow it with that firmly in mind. |
|
|
|
||
On other pages:
Master Index to all Pages
Pre-Installation Considerations
Installation Procedures
Maintenance Considerations and Methods
Miscellaneous Matters
On this page:
Post-Installation Considerations
First Things
Adjust the mouse travel
Turn off visual effects
Root tools
Move window buttons from the left back to the right
Fix system swappiness
Symlink some directories
Set the screensaver and power controls
Set the screensaver controls
Set the power controls
Turn off power management
Stop cache clutter
Refresh the initially installed software
Reboot for phase 2
Phase 2
Set up SSH
Add Repositories
Nautilus Augmentations
Add Extra Fonts
Add Multimedia Packages
Phase 3
Software Packages to Add
The Synaptic Packages
The Annotated Essentials List
The Annotated Extras List
Outside Synaptic
Firefox Flash Plugin, 64-Bit
Actually Install Google Earth
Time Synchronization
Activate the Nautilus Sound-Convert Script
Set Your System Gamma
Customize the Startup-Apps Menu
Get Desktop Search
About Desktop Search
Installing Recoll
Get a Clipboard Manager
Get a Temperature Monitor
Restore shutdown system sound
Reboot
Phase 4
Toolbar Applets and Launchers
Some introductory comments
Choosing applets
Customizing your applets
Adding menus
The Taskbar
Phase 5
Customizing the System
Administrative Customization
Preference Customization
Customizing the Applications
Nautilus
Terminal
Text Editor
"Macro" Text-Editor Plugin
"Line Edit" Text-Editor Plugin
TextWrap Toggle-Linewrap Text-Editor Plugin
Firefox
Restoring backed-up stuff
General Firefox stuff
Firefox Add-ons
Thunderbird
Restoring backed-up Thunderbird stuff
A crucial Thunderbird setting
Phase 6
Your directories
Your hardware
Restore "Kill X"
Terminal aliases
Scanner fixes
Installing printers
Supported printers
Unsupported printers
Tidying the main menus
Tidying your packages lists
System sounds
Selecting screensavers
Replacing Network Manager
Customizing Bootup/Shutdown Screens
Plymouth Problems
Customizing the Default Screen
Minimal Plymouth Screens
Alternative Plymouth Screens
Augmenting Synaptic
New Custom Filters
Using "Quick Search" Properly
Post-Installation Considerations
As we noted above, we are assuming that you begin here with a just completed fresh installation of Ubuntu v. 10.10 ("Maverick Meercat"), desktop edition; we will address our remarks mainly to 64-bit-version considerations, but with a mention of 32-bit where it matters.
Throughout, we will assume that you know at least a few basic things about computer operation, but for utter newbies, here are a few points to keep in mind.
The toolbar refers to the thin strip that runs across the very top of your screen; in it right after install are, at the far left, the words Applications Places System, followed by a Firefox-browser icon (and other things to the right of those).
The taskbar refers to the thin strip that runs across the very bottom of your screen; at its extreme left is a little box you can click on at any time to minimize all open windows (and thus get you back to your desktop), and at the far right are--from right to left--a trashcan logo that accesses your "Trash" directory and a series of little boxes that access your "Workspaces" (more on those things later).
(In Ubuntuspeak, both the toolbar and the taskbar are "panels", and in fact what you can put in one you can put in the other; but traditionally the top panel is used as the toolbar and the bottom panel as the taskbar--which it is only because it contains the "Window List" applet.)
The bare phrase "click on" means use your mouse (or, better, trackball) to place the screen cursor over the target in question and single-click the left mouse/trackball button; the phrase "double-click" means the same except that you click the button twice in rapid succession; the phrase "right-click" means that you click (once) with the right mouse/trackball button.
A "terminal" is a window in which you can issue text commands and receive responses back. When we say to issue a command in a terminal, it goes without saying that after typing in the full command, you are to press the <Enter> key to execute that command. Also remember that you can scroll through previously entered commands with the cursor Up and Down keys, which is handy when entering a series of only slightly different commands.
For now (later there will be a simpler way), you open a terminal window this way:
- Click on the word Applications in the toolbar.
- A menu will pop up; hover your cursor over the word Accessories in that menu (you need not click it).
- When your cursor is over Accessories a yet further submenu will appear; slide your cursor over to it and click the word Terminal. Don't let the cursor off the first submenu as you move it or the second one will pop back out of existence.
Likewise, when we say something like "do System - Preferences - Mouse" we mean the same sort of set of steps: in the toolbar click System, at the submenu hover over Preferences, and at the second submenu that appears, click on Mouse. We will be doing a lot of that sort of thing as we go.
Again: please take careful note that the things-to-do described below are not a sort of encyclopedia of "tips & tricks": they are a sequence, and whether you do them all or not, you should at least read them through in order. Often, some one thing depends on some others having been done before it. Moreover, there is a tutorial aspect to all this: each step is something of a learning procedure--the instructions are very detailed at the outset, but progressively less so as we go along, because you will have learnt how to do certain routine things.
There is a "sticky" (persistent) thread on the Ubuntu forums titled Known Maverick Meerkat issues/bugs with workarounds, and it is a superb resource. Much of it is specific to certain particular items of hardware or software, so we have included little of it here, but if you have issues not covered in this document, try looking there. If you can't get satisfaction from there either, go to the main forums and search for your problem, using terms as general as you can come up with. If you are pretty sure your issue hasn't been discussed, start a new inquiry thread; be sure to select the appropriate sub-forum for your inquiry, and be sure to include as much information as possible, so that those answering know the details.
First Things
These are a number of tweaks small and large that ought to be done at once after an install is done. They will make life easier as we go on with the more substantial changes.
Adjust the mouse travel
This is a small, almost trivial thing, but we put it in here because, at least in our experience, it can be a disproportionate nuisance if not attended to at once.
What we address is the amount by which the on-screen cursor travels for a given amount of mouse (or, in our marked preference, trackball) movement. The default install setting seems--to us, anyway--horribly sluggish, especially if you have a big monitor screen, so moving the cursor from place to place becomes quite tedious. The fix is simple enough:
- Do System - Preferences - Mouse.
- In the resultant popup window, under the heading Pointer Speed, are two available adjustments--Acceleration and Sensitivity--which interact markedly. Experiment with various combinations of settings (they act as soon as set, you can just swirl the cursor around the screen to see how you're doing).
- When you find a settings pair that satisfies you (we end up with high Acceleration and middling Sensitivity), you can play with the rest if it pleases you. Only the double-click interval is likely to be worth fiddling, and even that is no big deal. (We like the time short, so you really have to mean double-click to cause a result.)
- When you are finished, obviously you close that Mouse-settings window. The buttons are (for now, anyway) at the upper left of the window (many new to Ubuntu will expect them to be at the upper right, and later we'll show you how to put them back there.)
Turn off visual effects
Ubuntu includes a very jazzy desktop-appearance manager called "compiz". At least to start with, we strongly advise turning it off. All it provides are all sorts of dazzling (and often rather goofy) special visual effects--but there have been just altogether too many reports of problems, some severe, owing to interactions of other software with the rather complex innards of compiz. If you want games, play games on your computer: don't turn your computer itself into a game. If, after you have everything else settled down and running satisfactorily for some while, you then want to experiment with using it, that is always your choice; but we certainly wouldn't start out with notorious extra complications running in the background.
- Do System - Preferences - Appearance.
- In the resultant popup window, click on the Visual Effects tab.
- Click the None button.
- Close the popup window.
Root tools
|
This is probably a good place for an aside on "root" and "sudo". Unix and its variants--collectively often referred to as 'nix systems, a class that includes Ubuntu--are inherently multi-user: they are designed to accomodate many different persons using the same system, sometimes all at once. Any given user only has authority--"privileges"--within the part of the filesystem that is his or hers: you, for example, cannot make any system-wide changes on your Ubuntu computer even if it is your personal and private at-home desktop unit. Every 'nix system has, however, a "total owner" who has privileges for everywhere and everything, and that owner is, always, root, which is not (save very rarely, and ill-advisedly) any actual user, but rather a role that someone with the appropriate passwords can temporarily assume. On Ubuntu, anyone can become "root" for particular purposes by use of the sudo command (or, for graphical work, the gksu command), where the "su" signifies "super-user". By placing sudo or, as appropriate, gksu, before a command, including a command to start a given application, you assume root authority for that command, or for whatever you do with that application. Whenever you invoke sudo (or gksu), the system asks you for your password before it allows the action. That is obviously rather weak protection; but all it is meant to do is keep you from accidentally and casually making hideous system-crippling mistakes. Always and ever, be super-careful what you do when you are using root authority! As a convenience, when you issue a sudo (or gksu) and successfully give your password, you can issue further such commands for up to 15 minutes after without having to reconfirm your password with every further use of sudo or gksu. |
On an active system, one needs to do certain chores as "root" so often that using the Terminal to launch an app--an editor or file browser, or another terminal--with root privileges gets to be a nuisance. We will thus create a set of tools for direct launching of such things--click-on app starters that automatically invoke sudo (or gksu)--but you still, of course, need to give a password when you invoke these tools. This will also give us an opportunity to learn how to customize the menus themselves.
Do System - Preferences - Main Menu
A window will open in which you can edit the menus for Applications, System Preferences, and System Administration; for now, we will do only a few simple additions, but later on we will do some extensive editing.
By default, the selector will be on Applications, which is where we happen to want it. Just to see what's what, try clicking on some other lines in the left-hand window pane, but finish up back on Applications
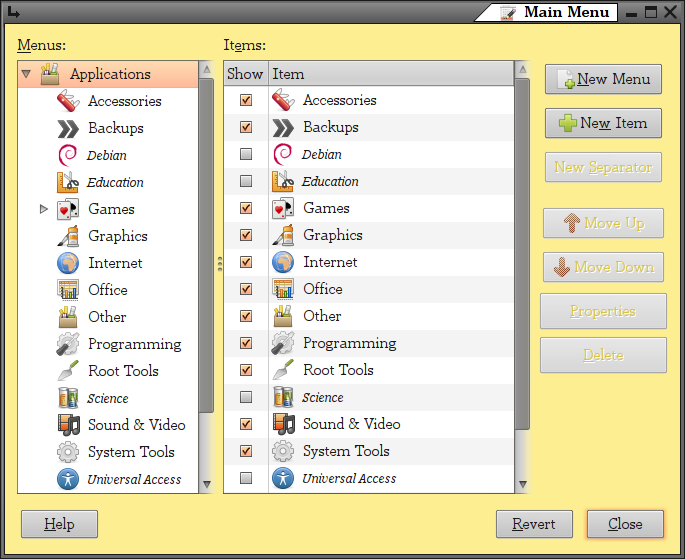
Click on the New Menu bar on the right
- At the window that now pops up:
- For Name, type in Root Tools
- For Comment, type in Tools with root privilege
- Click on the icon; at the selector window that pops up, find and select
/usr/share/icons/Humanity/categories/48/applications-development.svg
- Click the OK button
There will now be a new menu item in the left-hand window panel, the Root Tools menu you just created; select it.
Now click the New Item button on the right
- You will get another item-definition popup box; enter the data as follows:
Name: Root Browser
Command: gksu dbus-launch nautilus
Comment: Nautilus browser with root privileges
use icon at: /usr/share/icons/hicolor/scalable/apps/nautilus.svg Click the OK button
- Repeat that procedure with these data:
Name: Root Editor
Command: gksu gedit
Comment: Text editor with root privileges
use icon at: /usr/share/icons/Humanity/apps/48/gedit-logo.svg Click the OK button
- Repeat that procedure with these data:
Name: Root Terminal
Command: gksu /usr/bin/x-terminal-emulator
Comment: Open a terminal as root
use icon at: /usr/share/icons/Humanity/apps/48/terminal.svg Click the OK button
Close the Main menu window.
Move window buttons from the left back to the right
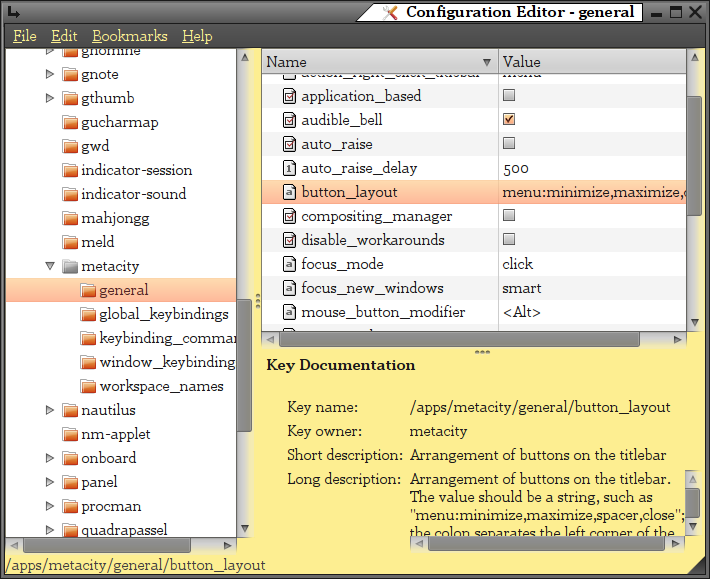
Many users were discomfited, not to say shocked, when the latest Ubuntu moved the window-control button set (minimize/maximize/close) from the upper right corner to the upper left. There is nothing intrinsically superior about one corner over the other, but for most people it's a matter of deeply ingrained habit, and buttons on the left is like a doorway that's a little too low: no matter how well you know about it, you keep bumping your head on it. If you would like your window buttons back on the right, here's how you get them there.
- Open a terminal.
- Execute the command gconf-editor
- An application window will open. In it, navigate successively (by double-clicking on these options in the left-hand pane) to apps then metacity then general.
- In the right-hand pane, double-click on the table entry button_layout.
- A text line will be revealed. By rearranging its contents, you change the button layout. To get, in the upper-right corner, arranged left to right, minimize/maximize/close, edit the line to:
:minimize,maximize,close
- Click the OK button.
- Close the window.
- Close the terminal.
The scheme is fairly obvious if you want something different, now or later: the colon determines which side the buttons are on (colon at left, buttons on right; colon on right, butons on left), and the order of the words determines the order of the buttons. Easy peasy.
Fix system swappiness
"Swappiness" is a setting that determines how cautiously or aggressively the system uses disk-space swapping. The default setting is way too high, and results in much needless use of disk swapping, with various minor but nontrivial consequences for performance. It's easy to redo the setting to a level generally considered appropriate:
- Open a terminal.
- Execute gksu gedit /etc/sysctl.conf
(Or you can use the new Root Tools menu you made and select Root Editor, then, from within it, open the file/etc/sysctl.conf) - The system will ask for your sudo password: enter the password you set during your installation, then press the <Enter> key.
- A text-editor application window will open; in it will be a document which you will now edit--take care to make only the exact changes described here.
- At the very tail of the document, add these three lines, all flush left:
# Decrease swap usage to a workable level
vm.swappiness=10
# - Click the "Save" icon, or select and click on Save from the File menu of the editor.
- Close the editor window.
- Close the terminal (if that's what you used to open the editor).
Symlink some directories
A "symlink" is a sort of alias. When the system, or an app acting through the system, addresses the original name, it is instead pointed at the new alias. That can have many uses; a common one is to acomodate older software that expects things to be in places where they are no longer kept. Think of it by analogy to mail: it's like having a forwarding address on file at the Post Office. These are a couple of symlinks that probably don't matter but might be useful for some older apps that still want to use directories now deprecated, or at least little-used.
- Do Applications - Root Tools - Root Terminal
- Execute:
ln -s /usr/local /opt
- Execute:
ln -s /var/tmp /tmp
- Close the terminal.
This sets calls to the /opt directory to be pointed at the /usr/local directory, and calls to the /var/tmp directory to go to the /tmp directory. (For those who know and care.)
Set the screensaver and power controls
These settings control whether a screensaver kicks in, if so after how long an idle period, whether the system should then be locked, and if and whether monitor or CPU should be "greened down". We want to address them now so your screen doesn't get annoyingly blanked out and locked while you're reading some further instructions.
Set the screensaver controls
Do System - Preferences - Screensavers. That will open up the screensaver control window.
Opinions vary on screensaver use. Obviously, if you have a laptop running on battery, that's one thing, while a home desktop in an area where electricity is cheap (and clean) is another, plus there are personal preferences. Your basic choices are these:
- Do you want something to happen when your system has been idle (no keypress or mouse movement) for some set period of time?
- If so, do you want a blank screen or a screensaver?
- If a screensaver (or blank), do you just want the screensaving (or blanking), or do you also want a password-protected lockout state to be entered?
- If you want a screensaver, which one? Or would you prefer a random selection that changes periodically?
- If you want action taken, do you also want to put either the monitor or the CPU "to sleep" at that time if on AC (mains) power? (On battery, there are other controls that operate.)
The ways to set those various options are pretty obvious in the screensaver window, and need little discussion here. What we recommend for systems not in a public place is to deactivate (uncheck) the Lock screen option, set the timeout to 10 minutes, and select Random for the screensaver. (Later we'll tell you how to get lots more screensavers, and then pick and choose from among them all as to which will be on the list.) Note that the Preview button gives you a chance to see a a full-screen display of whatever screensaver is currently running in the little demo window, for a better look; you drop back from that by clicking in the upper right of the fullscreen saver display (you'll see where).
Set the power controls
On the screensaver page, click the Power Management button there and go on to that window. It has either two or three tabs--the middle On Battery Power tab only shows up if the system detects battery capability--whose self-descriptive titles are On AC Power, On Battery Power (when relevant), and General.
At the On AC Power tab, we set both On AC Power options to Never, but do as you will if you have profound "green" urges. (And, though it shouldn't matter, also click the box for Spin down hard disks when possible, as a safety move.)
The On Battery Power settings we leave to you, with a whispered hint that "Suspend" and "Hibernate" modes have a reputation for being problematic. On our battery equipment, we put the system to sleep "Never" (that's why God made Power buttons), and when the lid is closed, we "Shutdown" (actually, by habit, we shut down manually before closing the lid); we also "Shut down" when the battery is dangerously low (it gives you advance warnings: it doesn't just drop like an axe). We don't, though, mind having the display be put to sleep at the 10-minute point: it's what tends to eat battery power most greedily. One also always ticks the Spin down hard disks when possible.
The options on the General tab are largely self-explanatory, but obviously a system that has no battery considerations needs an icon display Never.
After adjusting all three power-management tab settings as needed, click Make default (on any of the three tabs), then close the window.
Turn off power management
|
If your system is a laptop or other battery-powered hardware, think twice about changing power-management settings. The settings suggested below are for "on-mains" (AC-powered) systems; DPMS can be left alone on battery-powered systems. |
You might think, from the above, that if you set the AC-power options to "Never" your system would just cruise along till you shut it down; not so. For reasons best known to themselves, the designers left a "hidden" power-control option set at 10 minutes, so that no matter what, your monitor gets powered down at the 10-minute point of idle. (The subsystem is called DPMS, for "Display Power Management Signaling".) That unwanted and unexpected shutting-down has confounded a lot of users who rather like the look of their screensavers as they wander by doing other things while their systems are idle. It can be fixed, easily on most hardware.
- Open a terminal.
- Execute:
xset -dmps
- Close the terminal.
If you want to see all the settings, and check that you accomplished what you wanted to--turn off DPMS--repeat the procedure above only using xset -q as the command.
That will usually handle the problem, but on some systems it may not. If you still find your monitor mysteriously de-powering after 10 minutes of system-input idleness, use Google to hunt out more specialized fixes using the xset command.
What some sources have suggested is also (besides DPMS off) using both of these two commands:xset s offSince we have never needed anything but the DPMS "off" command, we cannot say if those will work properly, but you could try--you can always undo them again.
xset s noblank
Note well that this is not a permanent fix: every time you reboot, DPMS will be turned back on. It's all very silly, but later we'll give you a little fix that will automatically turn off DPMS at every bootup, so you don't have to be reminded about it by your monitor's unexpectedly turning off.
Stop cache clutter
By default, the Synaptic package manager saves every new and upgraded package it downloads, but those are not needed after they've been installed. While--as we keep saying--drive space is cheap, that mode is just a useless space eater, and we want to stop it before it starts.
Open the Synaptic package-manager application: do System - Administration - Synaptic Package Manager. You will get a popup window asking for your password: enter it and carry on. That will open up the Synaptic window. Maximize the window, because it's a cluttered one (it will "remember" and open maximized next time you need it, which is pleasant, because many apps' windows do not have such memory.)
In Synaptic, click in the Synaptic toolbar on Settings, then, in the resultant dropdown menu, on Preferences. A new window will pop up, with several tabs; click on the Files tab. Then, on that tab, click the choice Delete downloaded packages after installation, then click in turn the Apply and OK buttons to dismiss the popup. Leave the Synaptic window open, as we are about to use it again.
Refresh the initially installed software
The Ubuntu system, and the applications that run in it, are continually being upgraded. The versions on the install disk are, however, frozen at some moment. Thus, what you have installed is, in many cases, not the very latest version. We are next going to update everything we already have installed; fortunately, under Ubuntu (and other members of the "Debian" family of Linux distributions) that is a very easy thing to do. We are now going to use the power of the Synaptic update application (with which many of you will already be full well acquainted).
(If you have closed Synaptic since the step above, re-open it.)
In the Synaptic window, click on the Reload at the upper left of the screen. That will force Synaptic to update its lists of all software currently available, so it will know which items on your system have newer versions available; that is a process that may, depending on your internet connection speed and the load at the Ubuntu "repositories", take anywhere from a couple of seconds to a minute or so--but there's a nice display that shows you exactly what is happening as it happens. Wait till the reload is finished. (Don't be disconcerted if you see the target total of lists going up as you watch--some lists invoke others.)
|
There is a known problem that might crop up at this point--it usually doesn't, but it can--but it is nothing to worry about. If you get a message popup something like (but not exactly the same as) this-- No public key available:--make a careful note of the exact alphanumeric string in that third line. Then: Open a terminal and type in: sudo apt-key adv --keyserver keyserver.ubuntu.com --recv-keys XXXXXXXXXXXXXXXX--using for all those X's the string copied from the message; then press the <Enter> key; if you are asked for your password, give it. Then retry the Synaptic Reload and all should be well. |
When the reload is done, click on Mark All Upgrades, next to the Reload button you just used. You will then get a popup window asking you whether you want to use "smart" or "traditional" marking; at this time, we have no fixed opinion on which way is better, and the very offering of a choice suggests that the Ubuntu community doesn't either. We'd say go with the "Smart" option, but don't set it as the automatic choice for the future (an option you're offered).
After you make your choice about method, you will almost surely get another popup window asking you Mark additional required changes? That happens because some updates require consequent upgrades in otherwise-unaffected packages, owing to interactions between the two in operation. At this point, accept whatever the system wants here (click the Mark button).
We're by no means done yet. Now that we have the wanted/needed changes marked, we have to effectuate them. To do that, we click on the Apply button in Synaptic's toolbar. And no, that still doesn't do it: as a sort of "suspenders and belt" super-safety caution, Synaptic now pops up yet another window in which it deigns to tell us exactly what we have asked it to do, and wants yet further reassurance that Yes, we really want to do all that. So click the Apply on that popup window. Now, finally, Synaptic will really go to work for us.
You will get a new popup window that shows the progress of activity. Because this is a massive amount of upgrading, the files list will probably be huge, and take quite some time to download even with a high-speed connection. Possess your soul in patience (as the Victorians used to put it). If you're a glutton for detail, you can click on the "show individual files" arrow and get a dropdown list of the individual files as they load; it may help pass the time (though the main progress bar really suffices). Also, make your life easy now and forever by ticking the box that says Close when installation is complete: no need to keep staring at the download box when the thing is done.
After the actual downloading is done, there is another passage of time during which Synaptic actually installs on your computer all the upgrades it has just downloaded. Because, again, this is an unusually dense amount of upgrades, that, too, can take quite a while. Eventually, though, it will be complete.
Now, besides being up to date (so far), you have also learnt--if perchance you didn't already know--how to use Synaptic to get upgrades. Later we'll use it to get wholly new packages to add to the system.
Reboot for phase 2
The system will almost certainly insist that you reboot now, but even if it didn't that would be a good idea. In the toolbar, click on the standard "power" logo icon in the extreme upper right of your screen, then, from the resultant dropdown menu, click on Restart to complete update... and verify by clicking on Restart when asked again. Your system will do just that: shut down then reboot. When it is back up again, we are ready to proceed to Phase 2 of your post-install optimization.
Phase 2
In this phase, we're going to do a little more basic setting-up, then add bunches of extras to the system. We'll describe everything that's being done, so you don't have to feel you're proceeding blindly on someone else's say-so.
Set up SSH
SSH (Secure Shell) is a secure communications method for conveying data from one place to another. You'll want it for communicating with your remote files on your ISP or other host, with other computers in your household or office network, and even such things as plugin drives ("thumb drives" or "flash drives"). It takes a one-time setup, then a brief additional setup for each other place or thing you'll want to communicate with. Here's how to do the initial setup (which is also a sort of "template" for how to install software using Synaptic):
- Use Synaptic to install the ssh package:
- Open Synaptic (as you did before).
- In the far upper right of the Synaptic window is a Search icon (a magnifying glass). Click on that; be careful not to use the "Quick Search", which is is for something else (as described considerably farther below). Alternatively, you can use the keyboard combination Ctrl-F to the same end (Ctrl-F is a common app key combo for "Find").
- A little search-term-entry window will pop open. Type in ssh and click that window's Search button.
- In a few seconds, the main-screen line-by-line display will change. Scroll down till you find the line headed (at the left) with just ssh, and on which the description says secure shell client and server (metapackage). Right-click on that line.
- Your right-click will pop up a menu box. Click on Mark for installation. If Synaptic--here, or for any package you ever add--requires "additional" packages to also be downloaded, you should glance at the additionals, but 99.9% of the time you will want to just accept them (they will be something needed by the package you marked for installation).
- Now click on the Apply button in the top toolbar.
- From here on, things proceed as they did before when you were upgrading: the same sequence of windows and requests for your approval. As Nike says, "Just do it."
- When Synaptic has downloaded and installed the ssh package, exit Synaptic.
- Make your "local keys":
- Open a terminal.
- Execute there:
ssh-keygen -t rsa
- The terminal window will now offer you a suggested location for the key files; acccept it by pressing <Enter>
- The window will next ask you to choose and enter a password, or leave it blank: do not enter anything! Instead, just press <Enter> to accept "none".
- The window will then ask you to confirm that (blank) password: again, do not enter anything! Just again press the <Enter> key.
- Close the terminal.
You are now ready to establish SSH-based communications with other places. For each other computer with which you expect to communicate, you need to know:
- the computer's "name" (what it calls itself--the same sort of thing you entered for yours during the install process)
- the computer's IP address
- the username of the user there
- that user's logon password
As you see, you cannot establish communications unless you are given sensitive data by the owner of the remote system (at your ISP or host, that will be the part of their filesystem that you have rights in, so you are the owner of it). Within your own household or office, that ought not to be a problem. (Or, in an office environment, the administrator might be required, for security, in which case you don't need to be thinking about any of this stuff anyway.)
You can verify your own computer's local IP address by opening a terminal and using the ifconfig command. If the other computers are running any sort of 'nix OS, that should work on them, too. For computers running operating systems other than some flavor of 'nix, you're on your own. ("Friends don't let friends use Windows.") The ifconfig command will display some blocks of data, one block per local connection; you are probably looking at eth0 (the first ethernet connection) for your data. In the second line of that block will appear (besides other stuff) something looking like inet addr:192.168.200.100 Whatever the string after the colon says (the four sets of numbers separated by periods) is your computer's local IP address. You can use that same command at each other 'nix computer on your network to get its IP address (again: in non-'nix OS'es, you're on your own.)
The next step is to make an SSH configuration file for the other points on your local network that you need to reach; naturally, if there are no other computers you need to reach, you can skip this part, but read it through for the info on using the file browser (if you're a Linux newbie, anyway).
This configuration file is not strictly necessary, in the same way that a conventional web address--such as google.com--is not strictly necessary if you know and are happy to use the actual "dot address". For example, instead of "google.com" you could use "72.14.213.104". But that's a colossal pain, to remember and to type in, which is why the internet is serviced by "name servers", that read conventional entries and return, invisible to the user, the corresponding true dot addresses to your system. This SSH config file is effectively a local "name server" for the computers on your local network: it converts the computer's name to its local "dot form" IP address.
- Do Places - Home Folder; that will open up Ubuntu's file browser, known as "Nautilus", a tool you will be making much use of (as with Terminal).
- The Nautilus window will open, showing, as specified, your personal home directory.
- In the Nautilus toolbar, click on View
- In the resultant dropdown menu, click the box that says Show hidden files--or press the key combo Ctrl-H (in Linux, file or directory names that begin with a period are "hidden" on file displays, a trick used for stuff that the user is not normally expected to have much, or anything, to do with); the directories and files displayed by Nautilus for your home directory will now hugely expand.
- Scroll the display down till you see the directory .ssh, then double-click on it to open it.
- In the Nautilus toolbar, click on File
- In the resultant dropdown menu, click on Create document, then at the new submenu select Empty file (your only option at this time).
- A new file will appear in the Nautilus display, with your cursor placed in the filename area; type in config and press <Enter>
- Double-click that new config file--that will open it in the system text editor (gedit).
- Type in as many entries, each like the sample below, as are needed to list all the local-network computers with which you might need to communicate:
Host laptop
The indenting is not critical--it's just for your convenience in reading the file (that is, blank lines and "white space" are ignored). In the sample entry above, laptop is the name of a particular computer, and the 192.168.200.101 is that computer's actual IP "dot address", while algernon is the actual username of someone entitled to be logged on to that computer (remember that a given computer can have any number of different users, each with his or her own unique username).
HostName 192.168.200.101
User algernon - When your entries are complete (and carefully proofread), click Save in the editor's toolbar, then close the editor window.
- Close the Nautilus window.
Next we need to give each of those remote computers a copy of our SSH key, so they can "handshake" with our computer when it attempts to adress them. Open a terminal, and for each other computer/user pair you mentioned in your SSH config file, execute the following command--
ssh-copy-id -i ~/.ssh/id_rsa.pub algernon@laptop
--except that where it says algernon, substitute the actual username for the user on that computer whose files you need to communicate with; and where it says laptop, substitute the actual name of the computer in question. And yes, you need a separate entry in the config file and a separate command here for each different user on the same computer that you might need to address. On most home networks, there will be only one user per computer, but that is by no means always the case, and each username@computername is a separate entity for SSH purposes. (And so is root.)
For each such command, SSH will ask you for the needed password for that user on that computer, and you need to enter that password to validate your sending of your key.
Finally, when all that is complete, you will want to add each user/computer pair to your system "Places" menu. Here is how you do that (we will now start using shorter descriptions, on the theory that you have seen enough to understand what is needed):
- Go to Places and select Connect to server
- Choose SSH as the "service type" from the dropdown list
- For "server" enter the name you used for that computer in your SSH config file
- Leave the port and folder blank (unless you know you always want to start at some particular location on the other computer, in which case enter that for folder)
- Click to Bookmark (and name) the connection; pick an appropriate short, simple identifying name (this is what will show up in your file-browser menu), something like Algie's Laptop
- Click OK
- You may get a message about "keys" on first-time connection; if so, just OK it.
- You will next be asked for the username and password of the user of the other machine. Put them in and choose Always remember
- A Nautilus instance will now open with the folder on the other machine (or, by default, in the root directory); you can now unmount that machine (and close Nautilus) till you need access.
Clarification: when a 'nix system accesses anything--its own file system, a local hard drive, an external drive, another computer, whatever--it is said to "mount" that entity, meaning it attaches it to its own file system. As someone once said, the key to 'nix is that everything is a file, and "mounting" is, as we said, attaching something to the existing file system. Devices and locations can be mounted and left mounted forever (so long as the device remains physically connected, like a "thumb drive" that must be plugged in), but we, at least, feel more comfortable unmounting devices and remote locations we aren't actively using.
You can now access each added remote computer direct from any instance of your Nautilus file browser with nothing more than a click on the bookmarked place name: all the magic will take place "under the hood", and you will have access to the remote computer just as if it were an extension of your own. This seems to us--who are admittedly not experts--to be vastly simpler and more convenient than complicated headaches like Samba (needed to communicate with Windows-based remote computers, which one hopes you will never have to do) or NFS (Network File Sharing).
Add Repositories
Ubuntu software, whether integral system files or added utilities or applications, ideally comes from what are called "repositories", which are on-line supply stations. You can certainly also add software (or updates) in the old-fashioned way of importing files direct into your system, but (except for mere data files, like texts, images, web pages, spreadsheets, and suchlike) that is a very, very bad idea, because if you do that, your system's "package manager" will be unaware of what software you have added, and chances are it will all end in tears before bedtime.
All proper additions to your system come in the form of "Debian packages", files with the extension .deb; these are so constructed as to be self-installing, and to, in the process of installation, notify the package-manager susbsystem of what they are putting where (which can be a lot of stuff in many diverse places), so that the manager can then neatly and thoroughly uninstall them if ever you choose to remove them. By getting your packages from repositories, you gain the extra advantage of having the package manager be able to remain in touch with the package makers (through the repository's lists), and so be aware of updates, which it can then install for you. But some packages are just not in any repository, and are available only as a bare .deb file. Taking them that way is acceptable use--though you'll never be notified of any updates--but should be considered a last resort; download .deb packages direct only when you are sure you want or need the package and that it is not available from some repository.
Repositories come in several flavors, which we can loosely class "official", "semi-official", and (obviously) "unofficial". The official ones are maintained by Canonical, Ltd., the makers and maintainers of Ubuntu. Everything from an official repository has been vetted by Canonical and found to be harmless and properly packaged for automated installation. The semi-official class comprises a few repositories that are not truly official but that have such status and stature that the entire Ubuntu community trusts them to be doing a good job of vetting everything that they carry. The unofficial repositories are run by individuals or groups who have made one or more products for use under or with Ubuntu, but products whose reliability--and even basic safety--are attested to by no one but the makers and whatever community of users and supporters they may have gathered. It is wise to be quite leery about adding to Synaptic any repositories from the "unofficial" world; that doesn't by a long chalk mean that they are all, or even mostly, untrustworthy, but it does mean that you shouldn't pile them on higgeldy-piggeldy. Have a good reason for adding any particular repository, and be sure you have done some homework on any product you intend to get from such a repository. (You can read more about repositories in the official Ubuntu documentation repositories page.)
(To clarify, there is essentially zero malicious software in the 'nix world, unlike the case with That Other OS, but there are often well-meaning individuals who proudly submit to the community some wonderful little--or big--toy whose inner defects, unknown to and unsuspected by the author, don't manifest till a ways down the line, when they corrupt files on your system, or crash it, or some such thing. One cannot say more than the ancients did: caveat emptor--even when the "purchase" is free.
There is more than one way to add a repository into your package-management system. The easiest is by using the Synaptic tool; another is by commands entered in a terminal session. We will here use both to add some particular repositories (which we will describe, so you can further check on them if you like). Let's start with Synaptic:
We will here, for the first time in this document, require you to use your web browser, which by install default is Firefox. Presumably no one today requires instruction in at least the basic use of a web browser: all you need to know is that you launch Firefox by clicking on its icon in the toolbar, and that you can get to the enter-URL line by the keyboard combo Ctrl-L as well as by just sticking the cursor there. Do take note that as installed, Firefox defaults to putting anything you ask it to save or download into your Downloads directory, and will not ask you for a choice; later, you can alter that if you like, when you customize Firefox.)
- Open Synaptic
- Click on Settings
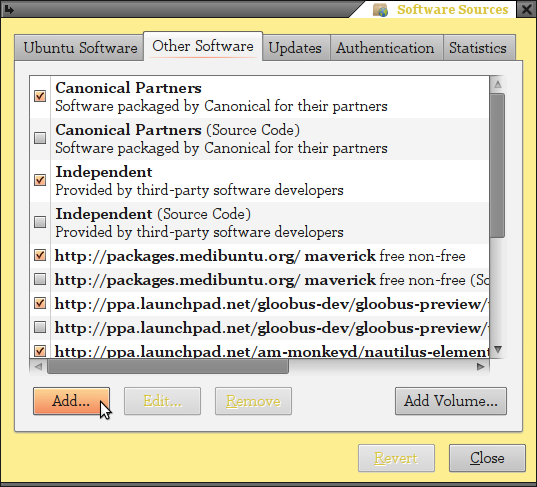
- From the sub-menu, select Repositories; a popup window will open.
- Verify that on the default Ubuntu Software tab, the first four of the five boxes are all ticked, but not the fifth; if not, make it so.
Also verify that the default "Download from" server is appropriate for your locale (and again, if not, make it so) - Click on the Other Software tab.
- Check-tick-enable the bare Canonical Partners and Independent repositories; disable the "Source Code" boxes unless you know what you are likely to need and why.
- If you find something called "Extras" present (at this writing it's not implemented yet), enable that, too.
- Add the important semi-official repository "medibuntu":
- open a browser page at http://packages.medibuntu.org/medibuntu-key.gpg - it will look like a page of gibberish.
- use Firefox's "save page" facility to save the entire page, under its name as given (as noted above, the the Downloads directory will be used as the target).
- When the download completes (it should be almost instantaneous), dismiss that annoying "downloads history" Firefox window, then minimize Firefox (you might as well leave it permanently open).
- back in Synaptic, click the Add button at the lower left of the repositories window (which you should still have open).
- for the "APT line" in the new popup window you get, type in--
deb http://packages.medibuntu.org/ maverick free non-free
--and click the Add Source button (make very sure you have typed the entry correctly, or just cut-and-paste it from here). - switch over to the Authentication tab of the repositories popup window.
- click on Import Key File...
- using the popup file-select window, find and select the .gpg file you just saved with your browser (in the Downloads directory).
- As noted above, we prefer to uncheck the "Source Code" line for repositories as unneeded and potentially dangerous, but maybe that's just us; if you agree, remember to untick that line for medibuntu.
- close the Repositories popup window (and you can now delete that .gpg file--it's no longer needed).
- click the Reload button in the Synaptic toolbar to add the listings from the newly added medibuntu repository.
(Should Synaptic hiccough at the Reload, just wait a few seconds and click again.)
app-install-data-medibuntu - shows medibuntu apps in the Ubuntu "Software Center" lists: harmless and useful
You add each in the fashion we already saw for adding the SSH package: find the item on the main list in the Synaptic window, right-click it, select Mark for installation, click Apply, and answer everything that follows with "Yes" or "Accept" or whatever. As before, you make finding an item vastly easier by first using the Search (not "Quick search") facility to greatly narrow down the choices to scroll through. To get the Search window, you can also just use Ctrl-F instead of clicking on the Search icon.
apport-hooks-medibuntu - allows generating crash reports against Medibuntu packages and submitting them to the Medibuntu bugtracker : also harmless and useful
(A note on deleting files: The Ubuntu Nautilus file browser lets you right-click on displayed files or directories and select actions to perform. Curiously, as installed those actions do not include "Delete"--all you can do is a "Move to Trash" operation. Later we'll customize Nautilus to allow true deletion, but for now put stuff you don't want in Trash, but remember to empty the Trash once in a while.)
So you have now added the important "Partners" and "Medibuntu" repositories. We are now going to add a few others in anticipation of the time a little farther on when we will be adding in some particular items of software available from these repositories. So that you can evaluate for yourself the products and repositories involved, here is a list:
- the DeadBeef repository: DeadBeef is an audio-file player that many feel is superior to any others in the Ubuntu world.
- the gThumb repository: gThumb is available from the standard repositories, but the version is an outdated, unstable one; this accesses the latest release.
- the rec-applet repository: rec-applet is a little Ubuntu toolbar add-on that allows capturing to a file of any audio your system may be playing; its especial virtue is the ease and quickness with which capture can be started (so you don't have to fumfer around with sub-menus and miss parts of what you wanted to get).
- the gloobus-preview repository: Gloobus preview is an add-on for your Nautilus file browser that allows fast previewing of virtually any kind of file--a sort of Swiss army knife of file viewers especially tuned for use within Nautilus.
- the nautilus-elementary repository: Nautilus Elementary is another Nautilus add-on, a usage and look-and-feel augmentation. Some day, Nautilus itself may be superseded by Marlin--perhaps by as soon as Ubuntu 11.04--but for now Nautilus plus this extension is the best available.
(Note that the minor glitch rec-applet had with Maverick is now reported as fixed; we say that lest you find older references to such a glitch.)
If each of those is something you might at least like to try, and feel comfortable about getting from its maker or makers, you can just execute each of the commands listed below. If you have any repugnance to any of them, just omit that command (it will be obvious which command is for what repository). Let's be clear: adding the repository does nothing--it's only later, when you add things from that repository that anything happens. Omit a repository here only if you actively fear ever getting anything from it. (Which seems silly, but we don't want to force anything on anyone.)
To add the needed repositories (which does not install any software in and of itself), be sure Synaptic is closed, then open a root terminal and execute, in turn, these commands:
add-apt-repository ppa:alexey-smirnov/deadbeef
add-apt-repository ppa:webupd8team/gthumb
add-apt-repository ppa:osmoma/rec-applet
add-apt-repository ppa:gloobus-dev/gloobus-preview
add-apt-repository ppa:am-monkeyd/nautilus-elementary-ppa
Leave the terminal open for the next step.
Nautilus Augmentations
Unlike the packages from the other repositories mentioned above, nautilus-elementary is treated as an upgrade to nautilus, rather than a standalone; it thus installs differently. It is not installed per se, but rather by invoking upgrading once its PPA has been added into the package-manager lists.
If you didn't leave the root terminal open, open one now; then execute these commands:
apt-get update
apt-get dist-upgrade
The first will update the package-manager lists with the contents of the newly added repositories. The second should download and install the nautilus-elementary addon (and do any other outstanding required updates, of which there will almost certainly be none just now, as we just ran an update). Close the terminal.
A few words about the dist-upgrade apt-get commmand: it can be slightly dangerous, and here's how and why. The ordinary upgrade apt-get command is harmless; but the dist-upgrade apt-get commmand (unlike simple upgrade) upgrades all installed packages including removing or installing some others, as its so-called "smart upgrade" rules tell it to. (Those side packages will be "dependencies" of a package being updated--that is, ancillary packages it needs to function, if it now needs new ones, or no longer needs some it once did need.) That sort of fiddling about can create conflicts when different packages have different needs for certain versions of a given dependency; the "smart upgrade" system will attempt to upgrade more "important" packages at the expense of less important ones if necessary (whereas simple upgrade will not upgrade a package if that requires removing an installed package or installing a new one). This foofaraw can get especially messy if some minor repository that handles a package you want to upgrade also has some other package on it that is treated as an "upgrade" to some existing package, as, for example, nautilus-elementary is; you want to install or add in Package A, but the repository also considers Package B an "upgrade" to something, and so installs it willy-nilly, to your eventual surprise and perhaps consternation. For that reason, it is most comfortable to deal with extra, minor repositories that are "dedicated" to some single package: you always know what you are getting. When Joe Blow's personal repository hosts several of his wonderful little toys, you can't always--at least without meticulous checking--be sure what you're going to get. The AptGetHowTo from the Ubuntu documentation is important reading, though it's only a start on this sometimes-complicted matter. As the aptitude Man page says about dist-upgrade, "This command is less conservative than upgrade and thus more likely to perform unwanted actions. Users are advised to either use upgrade instead or to carefully inspect the list of packages to be installed and removed." [emphasis added] As one source has noted, "This makes it also clear why you should not use dist-upgrade by default unless you make sure to check scheduled actions very closely." So using apt-get dist-upgrade requires some caution. (Also note that despite the form of the command name, it does not accomplish upgrades from one version of Ubuntu to another--as from, say, Maverick to Natty.)
Add Extra Fonts
Later on, we will add a major package of extra fonts. On our own system, we have quite a few neat items not included with any of the standard or extras packages, but--as we no longer recall where we got most--we don't put any of them up for download here owing to ignorance of their licenses (though we are license-fastidious about what we get and use, that doesn't mean we are free to pass it on to others). But there is one extra you should pick up, because many, including us, think it about the nicest of all fixed-width sans-serif fonts out there (and its serif component excellent, too). It is called Bitstream Vera (and includes "Sans", "Sans Mono", and "Serif"), and it's available from the repositories. In Synaptic, get ttf-bitstream-vera.
The Bitstream Vera fonts should now be available to the system and all applications. We will make use of at least one of them later.
There are quite a few fonts available for use in Ubuntu as shown, for example, in this web page (or just search font in Synaptic). If you are looking for extra fonts--but don't go looking till after we've added in the "extras" packages later--what you need is for the font package to satisfy two requirements: it is a "TrueType" font, and it is legally and morally available. There are lots of font packages floating about that are, more or less literally, stolen goods. Make sure that any you look for are indeed properly licensed for free distribution. You install a font (if you elect to obtain one outside acakage manager, not usually a good idea) by simply creating a named subdirectory in the same/usr/share/fonts/truetypedirectory we just visited and putting the font-package contents there; you can put multiple packages in a single subdirectory, but if you do a lot of adding, that can get confusing if you ever want to remove any, so it might be best to make a folder for each. Again: keep well in mind that it is not ideal practice to add fonts not obtained through the package-manager system, or at least as a Debian .deb installable package.
Add Multimedia Packages
Base Ubuntu comes with a nice selection of multimedia software to begin with, but there's no harm and some good to be had from adding some excellent others. There is an ongoing debate in the user community over which is the "best" multimedia player, with vlc and totem and mplayer and many more, each extolled by its partisans. As we say, disk space is cheap: have them all at hand, and use the best tool for the job at hand--determing "best" by experiment if you prefer.
We add almost all of these the straightforward way, through Synaptic. You should by now recall the drill: open Synaptic, use Search followed by scrolling to find the wanted package, right-click and chose Mark for installation, click Apply, supply all the "Yes" and "OK" answers asked for, and wait. Note that you by no means need to do only one item at a time: Synaptic will add as many packages at a time as you care to ask it for. You can thus mark the whole shebang below at one swoop, then install them all. That does, though, often make it a pain to remember what you have already marked, so you may prefer, at the cost of a little extra cumbersomeness, to do these one at a time: it's all a matter of taste. In each case below, the name shown is the exact name of the package. The envelope, please:
- ubuntu-restricted-extras (this adds a tone of stuff, including extra fonts for which you have to click-agree to Microsoft's license agreement, which you should do when it comes up)
- vlc
- smplayer
- libdvdcss2
- w64codecs (that is for a 64-bit Ubuntu install--if you did a 32-bit version, get w32codecs)
- non-free-codecs
- deadbeef
When all those are done, execute the following command in a terminal:
sudo /usr/share/doc/libdvdread4/install-css.sh
We have one more item to get, the Moonlight Firefox-browser plugin for playing Microsoft-format "Silverlight" files. Be aware that this baby is prone to occcasional hiccoughs, which can crash your Firefox browser, because it's still in development--but it's the only way for Ubuntu users to see videos in the proprietary Miscosoft Silverlight format; few sites use them much yet, but that will doubtless change soon, as Microsoft scuttles to establish its position in the online-video world (they're chasing Adobe's Flash), and to get their foothold before everyone gives up on all proprietary formats and goes to HTML5 instead. There are two sources for this package: the Moonlight home web site, and the Ubuntu repositories. If you are conservative, use Synaptic to get package moonlight-plugin-mozilla; otherwise, get it direct from the site (which will, at any given moment, usually have a significantly more recent version--and this is a moving target).
The ultra-fastidious concerning licensing and open-source software should be aware that Moonlight is developed in the "Mono" framework. You can get some idea of what that does, or does not, signify from this section of the Wikipedia article on Mono. We feel the fuss is needless, but you should decide for yourself.
Here's the how-to for getting it direct from the Moonlight web site:
- Open Synaptic and make sure there is no moonlight-plugin-mozilla already installed; there shouldn't be, but if there is, uninstall it (right-click and choose Mark for complete removal).
- Either way, make sure Synaptic is closed before proceeding to the next steps.
- Maximize (or re-open) Firefox.
")
- Go to the web page at http://www.go-mono.com/moonlight/ and click their big, fat Install button.
- At the ensuing "Download" page, at Step 2, make sure 64-bit is selected (assuming, of course, that you opted for the 64-bit Ubuntu).
- At Step 3, click on the Linux/x86_64 button.
- If Firefox then nags you about the installing, click the Allow button it places in the upper right of the browser screen (view at right).
- Close Firefox, count to 5, then re-open it. (If you try to re-open it too soon, it sometimes hasn't yet realized that it was closed, and stutters.)
- Open the web page at http://www.silverlight.net/showcase/ (wait a few seconds for the display to complete); these are sample Silverlight videos.
- Install the necessary codecs for the Moonlight player by right-clicking on any one of the available videos; when you get a popup submenu, choose Install Microsoft Media Pack. When Microsoft pops up a window asking you to accept their EULA ("End User License Agreement"), read it and accept it (assuming you have no grave quarrel with it) or the install won't complete.
Some Silverlight videos play fine, some don't, some actually crash Firefox; that is a matter of Moonlight trying to play catch-up with the rapidly evolving Silverlight standards. Live with it (like you have a choice). One particular demo that seemed to work tolerably, and may thus be used as a test, was this mosaic from Delhi TechnoGrads.
Next, we move on to adding in applications, utilities, and other useful things.
Phase 3
In this phase, we're going to add in--but not yet customize, that comes later--lots and lots of extra useful software. Again, we'll describe everything, so you don't have to feel you're proceeding blindly on someone else's say-so.
First, though, let's use Synaptic to get rid of some things we may have but don't want. Search on acroread and, if you find it installed (you shouldn't, unless you're using these instructions on an installation since tinkered with), right-click the line and click Mark for Complete Removal and click Apply and answer all Synaptic's nags favorably and you're done. But double-check that the package evince is installed--it should be, but if it's not, install that. (Open-source Evince replaces the proprietary Adobe Acrobat PDF reader.) Next, search for and similarly remove the package tomboy (which we will replace in a moment with a virtual duplicate, gNote--check the annotations below).
In Synaptic, Mark for complete removal means the program is not just to be disabled, but will also have all its now-needless files removed.
Software Packages to Add
We'll begin by just adding everything in, then afterwards sort out "tips & tricks" customization and the like. You can add these in any order (unless otherwise noted), and can do them individually, or all at once, or in chunks, as you find convenient: Synaptic doesn't care. As before, the listings include the exact package names, to make searching them out easy. We have segregated them into packages to be added via Synaptic, and all others.
The Synaptic Packages
For all these listings, the package is to be added in via Synaptic, in the method you should by now be familiar with. You can, of course, omit any whose description leads you to believe you don't need or want them. Note that installing any given package may also entail installing one or many others, but Synaptic will automagically mark all the rest for you.
For convenience we have broken our original all-in-one list into two sub-lists: those things that are essential or close to it, and those "extras" that will appeal to some but not necessarily others. The latter category could, obviously, be extended hugely, but we have restricted ourselves to a few notably useful or notably pleasing apps.
The Annotated Essentials List
We're slightly stretching the word "essential" here, in that not everyone needs each of these (for example, not everyone needs fax capability, or has an APC UPS). But they are important addins to your system's basic functionality for those who have a use for them.
- The APC UPS Monitor Package: this combination of subpackages is virtually mandatory for those with an APC-brand UPS (Uninterruptible
Power Supply) powering the system. (And if you don't have a UPS, you really, really, really ought to get one, and APC is as good a name as any.) If you don't have a UPS, or you have one of another brand, skip this package set;
otherwise, get:
apcupsd
apcupsd-doc
apcupsd-cgi
gapcmon build-essential (just get it--it allows you to "build" Linux packages, something you may eventually want or need to do).
Cheese: a little webcam utility, very handy for checking webcam functionality, and able to record webcam snapshots and videos--very helpful. For Synaptic, just cheese
deborphan - just get it: it's needed for Synaptic to locate "orphaned" packages.
dkms - just get it (Dynamic Kernel Module Support Framework): it's needed by some programs to function properly.
Efax-gtk: your computer can be a fully functional fax machine, with no scanner needed--apps can just "print" to the fax and it will convert the output (text or images) to a fax ready to send, and even auto-send it if you like; and, of course, it receives faxes, too. You do need a fax/modem plugin card in your computer, but those, especially used ones, are plentiful and fairly cheap. (But if you're buying one, make absolutely, positively sure that it is a fully functional "real" modem, not one of those trashy "Winmodems" that rely on software to do everything the onboard chip ought to; if the fax card doesn't have an onboard 16550 or similar chip, forget it.) This is a very handy thing for those with home offices who still need to deal with people who don't understand transmitting paper as scanned-in attachments to email. It's very, very easy to set up if your modem is simply mounted to a system serial port (Ubuntu should auto-detect any such card at installation). For Synaptic, it's efax-gtk
FileZilla: nearly essential--a dedicated FTP file-transfer application with all the bells and whistles. You can transfer files to and from remote computers with plain old Nautilus, but having a real ftp package makes it a lot easier and more reliable. In Synaptic, it's just filezilla
gEdit extra plugins: several highly useful functionality extenders for the basic system text editor. For Synaptic, it's gedit-plugins
Extra Icons: self-descriptive, and you can never have too many icons to pick from. In Synaptic, it's gnome-extra-icons
gnome-schedule: an absolute must-have, this is a graphic interface to the simple but powerful scheduler built into all Linux systems; you can set programs to run without intervention on a one-time or repeating basis, and this toy makes setting it up childishly easy. Why this is not an inherent part of the Ubuntu package is most unclear. For Synaptic, it's gnome-schedule
Gloobus preview: an add-on for your Nautilus file browser that allows fast previewing of virtually any kind of file--a sort of Swiss army knife of file viewers especially tuned for use within Nautilus. In Synaptic as just gloobus-preview
gNote: this is a one-up replacement for the default Ubuntu "notes" applet called TomBoy, which we removed a little earlier. Its functionality and interface is essentially identical, but there are reasons to prefer it, including its probable future development. For Synaptic, it's just gnote
gThumb: this used to be the standard Ubuntu image viewer/editor, and why they removed it is beyond us; it is simple, clean, and effective. The simplistic image viewer the default Ubuntu installation provides is adequate for mere viewing (as are many other tools, such as the above-mentoned gloobus), but if you want to do some basic image manipulations, such as resizing, format conversion, or cropping (among others) without firing up a major graphics application, gThumb is a convenient answer. In Synaptic, it's simply gthumb
GhostView: GhostView is part of a larger system including GhostScript and GSview. The lot deal with files in PostScript format, and GhostView is used by some other apps that have to deal with such files (such as, for one, the fax app cited above). It's a good thing to have on any Linux system. In Synaptic, it's the terse gv
hardinfo: a most useful little GUI app for getting and reporting data about your system hardware. The Linux command lshw is good, but this greatly expands on its capabilities, including generating benchmarks. Small, simple, sweet, a near must-have. In Synaptic, it's just hardinfo
hwinfo: another useful microapp for getting and reporting data about your system hardware; use it from the command line. (It can, for example, list your available screenbuffer resolutions.) In Synaptic, it's just hwinfo
libnotify-bin: this small "library" file enables sending nice, neat little popup messages to the desktop, which can be very handy for background processes and shell scripts.
libpng3: this small "library" file is useful for certain older bits of software (notably Linux drivers for Canon printers), and should be added as an "in case"; the title is its Synaptic name.
lsscsi: this is virtually essential if you have any SCSI devices in your system (we, for example, have an older SCSI scanner and plugin card.) ; but it also reports on SATA drives and other external devices, making it a generally useful little tool. Like all the other Linux ls-type commands, it gives much information about its target devices. In Synaptic as itself, lsscsi
Meld: this is a must-have utility that compares two, or even three, text files to see exactly where--if at all--they differ. No more tedious and error-prone eyeballing of endless lines of highly similar material: let the app do it for you. It can even help you merge or patch differences. In Synaptic as just meld
Nautilus Scripts Manager: a highly useful add-on for the Nautilus file manager, it allows right-clicking on a file displayed in Nautilus and then running of a script against that file; suitable prepared scripts are available for doing all sorts of useful things (such as, for example, converting the file format of an audio file). Find it in Synaptic as nautilus-scripts-manager, and don't confuse it with nautilus-script-manager (one has that s and the other doesn't).
Nautilus Script: audio convert: a script for the Nautilus add-on described immediately above. If you ever work with audio files (and, soon or late, most of us do, even if just to cusomize system sounds), this is invaluable. Ubuntu wants audio files in the .ogg for its system sounds; with this script, you can take that old .wav file of the sonic-screwdriver noise and make it a system sound. In Synaptic as nautilus-script-audio-convert Be sure to also look out for other Nautilus scripts that might be of use to you.
Netspeed: a monitor applet for your Ubuntu toolbar, it tracks and sisplays your current connection upload and download speeds. This is as close to essential as a monitor toy gets. In Synaptic, it's just netspeed
numlockx: another "just get it", this one makes sure that when you reboot the "NumLock" setting is always "On" (meaning your numeric keypad is indeed numeric). This should be integral to the base Ubuntu package. It is just numlockx in Synaptic
Pan: too many people think that "the internet" means email and the web. There is also Usenet, which is similar in general form to web-based forums, but which constitutes a plethora of dedicated, informed (usually) posters on rather narrowly defined interests. Though Google has an interface to Usenet, it is unspeakably awful; also, the Thunderbird mail app can handle Usenet, but it, too, has limitations. The ideal tool is a dedicated "news reader"; for Linux, Pan is nearly Hobson's choice (there's now also XMP, but it's not fully mature yet), but fortunately it's a perfectly satisfactory choice (though also still evolving). In Synaptic it is--of course--just pan
- PHP: PHP is an immensely powerful but remarkably easy scripting language. While it is normally used server-side on web srevers, it also has
many neat uses on desktop (and laptop) systems, especially for chores needing little or no user interface. It is almost essential; even if you do no programming at all now, some day you might want to, and PHP is easier to learn
and use in most ways than other languages, including 'nix shell scripting. For use on a non-server, you'll want the following PHP packages from Synaptic:
php5-cli
There are plenty more PHP5-associated packages for more specialized uses: as you find you need them, fetch them.
php5-common
php5-curl
php5-tidy rec-applet: a little Ubuntu toolbar add-on that allows capturing to a file of any audio your system may be playing; its especial virtue is the ease and quickness with which capture can be started (so you don't have to fumfer around with sub-menus and miss parts of what you wanted to get). In Synaptic as simply rec-applet
regionset: a simple but essential little utility for setting or re-setting the "Region" setting of a CD/DVD drive. As drives come from the factory, they are unset; Ubuntu, with the various supplementary files you have already downloaded, can play DVDs from any region (which, if you care, is not legal in some parts of the world), but as a rule the drive must be set to some region, not "unset". Use this to set a region. In Synaptic as simply regionset
- Extra Screensavers: As we told you earlier on in all this documentation, you will be adding lots and lots more screensavers than came with the base package. Don't feel this is an excess, because
later we'll show you how to cull the mass down to a manageable few of your real favorites--but many of those favorites are likely to be in these "extras" packages. The ones you need to get are:
rss-glx
xscreensaver-data-extra
xscreensaver-gl-extra sox: this is a little terminal app for dealing with sudio files; as a lot of other apps lean on it for doing their work, it is a very good thing to have on board. Naturally, its Synaptic designation is just sox
Thunderbird: Why in Heavens Ubuntu comes with anything but Thunderbird for an email client is hard to say-- probably history and the notorious difficulty in turning a battleship (the default as installed is Evolution); presumably that will change any old day now. Meanwhile, you have to download TBird manually; at Synaptic, it's simply Thunderbird -- if you happen to be in a non-English-speaking locale, you can also download the appropriate TBird language extension, and Synaptic will show you them all. We'll deal later with how to transfer or import your current email files to TBird.
Vorbis Tools: a library used by, among others, the audio-format converter cited above for use with Nautilus scripts. Get it from Synaptic as vorbis-tools
Moreover--at least on a laptop--you should also add some sort of temperature monitor/alarm applet. We discuss thermal monitoring as a seperate topic later.
The Annotated Extras List
BitPim: if you have a cell phone--and who today does not?--this wonderful toy will let your computer speak to your cell phone direct, so you can both download and upload data such as photos, calendars, call lists, and pretty much whatever else your phone can hold. (Be aware that you will need to have or purchase a special cable for your phone, which plugs into a USB port, and you need to be 100% sure you get the right cable for your particular phone--but these are not terribly expensive). The Synaptic package name is simply bitpim
- Calibre: this is a top-notch ebook reader, with the added power of being able to convert ebooks of pretty much any format to copies in
pretty much any other format. If you have any ebooks, this is a must-have. The Synaptic package name is just calibre (and note that free ebooks, some of them rather good stuff, are available all over the web).
See also this note about Calibre.
Celestia: this is pure fun, and beautiful fun at that--a full-fledged planetarium on your computer, and not just a toy: it has amazing capabilities. The Synaptic name is just celestia (There is another great astronomy program in Ubuntu, and we list it farther down in its alphabetical order, but the two don't overlap that much, and are both worth having.)
DosBox: a toy that allows running old native-DOS applications within Ubuntu--even some pretty complex apps. If you have any legacy DOS stuff around (including some semi-forgotten old game diskettes), this is a must-have. For Synaptic, just dosbox.
Gnome Specimen: a toy that lets you see all the fonts available on your system, at whatever size, and displaying whatever sample text, you like; not essential, but sometimes handy, especially for comparing similar fonts. For Synaptic, just gnome-specimen.
- Google Earth: is there anyone who doesn't know about Google Earth? You probably have no use for it, but it's a ton of fun. Right
now, installing it on Ubuntu Maverick is not as simple as it should be (and doubtless soon will be, perhaps by the time you read this), but it's not awful, either. To begin with, you need to use Synaptic to install the
preliminary package named simply googleearth-package but there'll be more to do later. But you also need to install a couple of other little packages for Google Earth to install and work; those are:
lsb-core
lib32nss-mdns Grace: if you will ever need to construct graphs from numerical data, this is a good choice. It may not be the bigest and baddest kid on the block, but for all but the most demanding pro-grade work, it is more than enough (and power always comes at the expense of convenience and ease of use). For Synaptic, it's just grace
HomeBank: there are several competing "Quickenesque" personal-finance programs available to Ubuntu users, and each has its adherents. We don't use such things much, but this looks like all in all the best mix of capability, ease of use, and functionality. In this area, you might want to check out several alternatives, but if you want to give this fellow a trial run, in Synaptic he's available as just homebank
Open Clip Art: this is about sixty-seven zillion pieces of free, open-source clipart, especially designed to work into the Openoffice suite for insertion in documents on the fly. If you compose material that can use clip art, it's probably highly valuable; otherwise, not so much. It's a huge download, so use your judgement. In Synaptic, it's simply openclipart
If you do take it, read about this possibly needed tiny post-install fix.Pysol, Fan Club Edition: this is a jillion card and tile games all rolled up in one. People's tastes in computer games vary perhaps more than taste in any other computer use, but this seems a perennial favorite. It is highly customizeable, and there are (for, we suppose, the fanatics) a vast number of extra card sets available, many of which are, to say the least, striking. In Synaptic, it's pysolfc (the "Fan Club" part is because this is a fan-club-supported continuation of the old Pysol program, which its original author had to abandon in 2004 or so). If you feel you just must have all those extra card-face options, also get pysolfc-cardsets though the base games comes with quite a few itself.
Scribus: a desktop-publishing application. Shlock shops that encourage suckers to self-publish books will tell you you're perfectly fine with nothing fancier or more complex than a PDF document as your book: don't believe it. Sure, you can get a book published at places we won't name using nothing more than OpenOffice or any word processor can generate; but if you're serious about making a quality product, you need a serious DTP app, and Scribus is it. Just having the app on your system makes you feel like sitting down and cranking out a book. Available in Synaptic as simply scribus but be sure to also pick up all the documentation files, scribus-doc
Stellarium: this (like Celestia, above) is a planetarium on your computer. Also like Celestia, it is a joy and a wonder to behold. Do not feel as if it's "this or that" as between the two: each has some major functions that the other hasn't, and not by oversight but because they are aimed at somewhat different targets. Celestia is oriented toward exploration of space, and you can take simulated journeys back and foreward in time and space with it; Stellarium is oriented toward display of the skies as we here on Earth see them, and can (like a real, full-blown planetarium you pay to go sit in) progress those views for essentially any location in time or on the earth's surface. Get both. Stellarium is on Synaptic at, yes, stellarium
Outside Synaptic
These are things, as it says, we get other than by use of Synaptic.
Firefox Flash Plugin, 64-Bit
Obviously, you had best have a 64-bit system and the 64-bit version of Ubuntu to use this! If you don't, ignore this whole section on Flash.
Close all instances of Firefox.
Open Synaptic.
Search on flash; we want to locate and Mark for Complete Removal the line for flashplugin-installer; when you have found and marked it, click Apply and answer all Synaptic's nag questions with approvals.
You can then close Synaptic again.
Re-open Firefox and load the web page at http://labs.adobe.com/downloads/flashplayer10_square.html
On that page, click on the option Download plug-in for 64-bit Linux (TAR.GZ, 4.1 MB), which will end up stored in your Downloads directory.
Minimize Firefox.
Open a Root Browser.
- Point the root-Nautilus window to your personal Downloads directory.
Non-root Nautilus always opens in your personal home directory, from which you can navigate down to anything within your personal kingdom of directories and files. A root browser opens at root's personal directory, which is typically almost empty. To navigate as root--or to reach, as non-root, areas outside your files kingdom--first click on File System in the Nautilus left-hand side pane. As root, you progress through the file system to your Downloads directory by going to /home then to your directory--say /you--after which the rest is easy.
Right-click on the file and then click, in the popup menu, on Extract here. That will generate a file named libflashplayer.so
- Move the extracted file to /usr/lib/mozilla/plugins/libflashplayer.so (that requires root authority, hence the root browser).
More Nautilus tutoring: click File in the Nautilus toolbar, then click New Tab; you will now have a second tab in the Nautilus window. You can navigate each tab independently. And you can right- click on a file in one window, then click Copy, then move your cursor into the other window, right-click on any empty space there, and click Paste to paste a copy of the first file, or directory for that matter, into the second window. If instead of Copy you select Cut, the file is not copied but moved. You can also open a completely separate second Nautilus window and do classic drag-and-drop between the windows, but using tabs in the same window is probably easier.
You may now delete the downloaded file (though we recommend keeping a copy of it, say in your .packages directory); in any event, close the root browser. You're done.
Oops, we're ahead of ourselves here. You don't have a .packages directory yet. OK: make one. Just use your file browser, and in your home directory, click (in the file-browser toolbar) File then Create Folder; when the folder pops into existence, your cursor will be in its name field--just type in .packages and press <Enter>. Now you have a place to store packages obtained elsewhere than from repositories.
If ever you want to uninstall the 64-bit Flash plugin, just delete the file /usr/lib/mozilla/plugins/libflashplayer.so and you can then reinstall the old, standard Adobe flash plugin via Synaptic.
In the interests of full disclosure, we repeat the following text from Adobe's download page:
|
The following downloads provide the Flash Player "Square" installers for Linux, Mac and Windows operating systems. This preview release is designed for evaluation purposes only. We do not recommended that this release be used on production systems or for any mission-critical work. Important: Please note that if you install the Flash Player "Square" preview, you will need to keep this version up to date by manually installing updates from the Flash Player "Square" download page on Adobe Labs. You will not receive automatic update notifications for future final releases of Flash Player, and you will need to manually uninstall Flash Player "Square" before installing a final shipping version of Flash Player. |
That is their way of telling you that since this installation did not come in a Debian package (a .deb file), your system package manager knows nothing about it. You cannot upgrade or delete it through Synaptic or any other part of the normal package-management system. That makes this item the one rare exception to the rule we gave you earlier: never just add program (non-data) files to your system outside of package management. But if you want it, this is, for now, the only way to get it. Just keep it in mind.
Actually Install Google Earth
In our last thrilling episode, we installed, via Synaptic, a package intended for later use in actually getting Google Earth; that later time is now. We assume here that you also installed, as specified above, the ancillary packages (such as lsb-core); if you didn't, this won't work, as many have found to their consternation. Please note carefully that this install assumes that you have 64-bit Linux, and have added the extras specified earlier; what will happen if you do this on a 32-bit Ubuntu we can't say--probably it would all work the same, but as we can't be sure, we caution you.
- Make sure Synaptic is closed.
- Open a terminal.
- Execute cd ~/Downloads
- Execute make-googleearth-package --force
- Be patient: this will take some while; and ignore the endless "warning" messages. Eventually, in the fullness of time, the screen will stop scrolling text up and announce that the package has been built and return you to the terminal prompt.
- Now execute sudo dpkg -i googleearth*.deb
- When that process finishes, Google Earth is installed.
- You could now delete that .deb package, but we recommend you store it in, say, your .packages directory.
On our system, all worked well after that, but some people have had the app crash on startup. A fix for that is described here (it involves turning off startup "Tips" from Google Earth by changing a configuration file.)
Time Synchronization
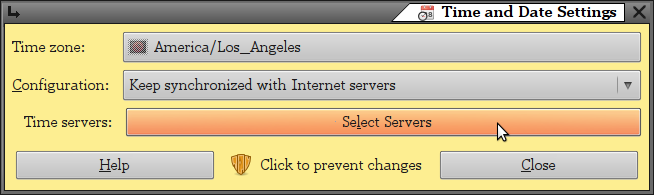
We need to assure that your system is setting its internal clocks from some reliable source, which by default it is not. (Curiously.)
- Make sure Synaptic is closed.
- Do System - Administration - Time and Date
- Click on the lock icon (clicking on the "Click to make changes" text doesn't work).
- Give it your password.
- Verify that the Time Zone setting is correct (if it is not, make it so).
- Click where it says Manual to get the dropdown menu, then click on Keep synchronized with internet servers
- When the popup tells you it needs to install NTP support, allow it to do so (why this is not integral with the base install surpasses comprehension).
- When the install is complete, click the Select Servers bar, which will bring up a servers list.
- Make sure that at least one server is ticked as selected; you can tick more than one, but two is probably enough.
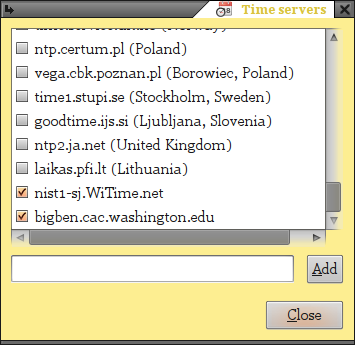
If you are a fastidious sort, you can do some research on the many, many time servers available to you in your locale--only a very few are on the list--and see which deliver the best service to you, by means we won't go into here; you can then manually add those servers to the list with, rather obviously, the entry box and Add button on the server-list window. Just remember to unselect the prior choices when you add new ones, so you don't end up with too many ticked.
- Close the windows when done.
Some resources you can look into for more on this topic are using the NTP Pool project (for possible servers to use), and the NTP Support Web, most especially their "quick start" page (which includes the remark "choosing an appropriate remote server is somewhat of a black art"). Using, in a terminal, the command ntpq -p will give you some arcane but useful data about the servers you're currently using.
Activate the Nautilus Sound-Convert Script
To activate this script, just open a terminal and execute:
nautilus-scripts-manager enable ConvertAudioFile
(Or you can just do System - Preferences - Nautilus scripts manager and tick the box.)
Set Your System Gamma
First, if you know how to adjust your monitor (no easy thing these days, with arcane controls and menus), set it as best you can before going on here. (There is a very nice page of adjustment test patterns available at The Lagom LCD monitor test pages.)
Next, point your browser to The Monitor calibration and Gamma assessment page. The adjustment we are concerned with here is "gamma", a technical term you can also read about at the link in this sentence. Now that you have set your monitor's controls as best you can, it is time to turn to software adjustment of gamma.
The tool we use is called xgamma, and it is already installed. To use it, open a terminal and, to begin, just execute xgamma; that reads out the current system gamma settings for Red, Green, and Blue (which can be set individually); presumably, they will all be at 1.0. (Note well that those are relative values, not the actual net gamma.) To adjust overall gamma, execute xgamma -gamma x.y, where "x.y" is some decimal number between 0.1 and 10.0. Once you execute the command, it will take immediate effect, so you can see what it does. If you are on the Calibration web page we linked above, you can select a gamma test pattern for whatever gamma you choose to target; the norm is 2.2, but the author of the Calibration page recommends 1.8, for reasons he explains there. You can try whatever values you like--even make separate adjustments of the Red, Green, or Blue values--and you are always safe because at worst, you just fall back to issuing xgamma -gamma 1 and you're back where you started from.
If you end up, after all your tuning, with xgamma settings not all equal to 1.0, then you need to make them permanent--else they'll be lost at every reboot. The way you will do that is to put an xgamma command in your startup-apps menu, which we will come to in a moment. The general form of the command will be simple enough:
xgamma -gamma x.y
If you ended up with separate adjustments for the RGB values (and you had best be sure you're confident about those), the full form would be--
xgamma -rgamma a.b -ggamma m.n -bgamma x.y
--where a.b is the Red gamma level, m.n is the Green gamma level, and x.y is the Blue gamma level.
Don't do anything with that command yet, just have it ready for the next procedure, below.
Customize the Startup-Apps Menu
The system auto-starts a number of applications, commands, and daemon processes at bootup. These need customization, and this is a good time to do it.
Do System - Preferences - Startup Applications; that will bring up a window with a list of the apps available for system startup. We'll begin by adding a few to the list. You add by the obvious expedient of clicking the Add button on the list window; thast brings up an entry box that wants a Name, a Command, and a Comment for the item you want to add (only the Command is critical--the others are just what will show on the list). Add these entries:
- DPMS: (only for non-battery-powered systems!)
Name: DPMS Kill
Command: xset -dpms
Comment: Stop your monitor's being powered down - Volume Control:
Name: Volume Control
Command: gnome-volume-control-applet
Comment: Toolbar applet for volume control - Firefox:
Name: Firefox
Command: firefox
Comment: Web browser - Thunderbird:
Name: Thunderbird
Command: thunderbird
Comment: eMail - Gamma Set (not needed if optimum system gamma is simply 1):
Name: Gamma Set
Command: xgamma -gamma x.y (where x.y is as determined in the procedure just prior to this)
Comment: Adjust system gamma values to optimum
Now run down the list and see what you can or should uncheck. If you don't have Bluetooth on this computer, uncheck that. Uncheck anything with the word "Evolution" in it (we're using Thunderbird). If you're not on a laptop, uncheck "Power Manager". If you're running Ubuntu and not Kubuntu (as we presume), uncheck anything with "KDE" in it. If you're not using, or going to use, "Remote Desktop" connections (if you are, you'll well know it), uncheck that. If "social networking" does not loom large in your life, uncheck "Ubuntu One". If you are not making use of aids for the visually impaired, uncheck "Visual Assistance". In general, use your head (and look things up on Google if you're not sure what they are or mean). Close the window when you're done.
Get Desktop Search
About Desktop Search
Ubuntu comes with a search tool that is satisfactory for searching for files anywhere on your system based on file name. What is needed instead is full "desktop search": the ability to locate files based on content (as well as just file name if that's all you want). For text files, that means strings of text appearing within the file; but true "desktop search" goes beyond that, and can find image files, audio files, and much more, based on identifying "meta-information" contained within such files.
Desktop-search tools work by scanning all files in whichever directories they are indexing, and building a database, which they then access to find results when you do a search with them. There are several packages available in Ubuntu offering desktop-search capability; their important differences include size of database, speed of indexing, whether indexing runs continually in the background (as a so-called "daemon process") or is done at set intervals, how effectively they discover data and return results, and processor load while they are indexing. Those things can be hard to evaluate, because they can vary significantly depending on how a particular system is laid out.
Ubuntu used to include the Beagle DTS; then they switched to Tracker; now they include none in the default install. Beagle, though many people still use it, is a defunct project, and not suited for a fresh system install. The chief remaining contenders just now would seem to be (in no special order): Tracker (technically "Meta-Tracker", but rarely so identified), Recoll, Pinot, and Strigi. Choosing from among the rest requires considerable homework, and you can and should do your own, but with this caveat: a lot of "evaluations" to be found on the web were done either for systems whose owners had very particularized, unusual needs (for example, running wholly from the command line), or by folk who did not quite understand--and that's putting it very charitably--how to fully and properly install the packages (some require ancillary "helper" apps to "see inside" various kinds of non-text files). Our choice is Recoll, for a variety of reasons, no one dominant but the sum of the small "wins" edging out the competition (among other things, Recoll has a lengthy, detailed, and pleasingly clear User Manual). But whichever you choose, get it from the Ubuntu repositories, and make sure you learn how to configure it properly.
Installing Recoll
Get it by using Synaptic. While you're about it, you might as well also pick up these "helper" packages (listed below by their Synaptic package names), which the great majority of systems will, now or eventually, want:
- antiword
- catdoc
- libid3-3.8.3-dev (or whatever version is most recent)
- libimage-exiftool-perl
- pstotext
- unrtf
Your system may require yet others, which Recoll will very politely list for you on its first indexing run. The names it uses are somewhat generic, so if you don't find a required package listed in Synaptic by the name Recoll uses for it, Google on the name plus the term Recoll. (Indeed, some of the helpers listed above required such research.)
After installation, Recoll will appear on the Accessories sub-menu of Applications. Here's how to get started with it:
Do Applications - Accessories
Click on Recoll
When the Recoll window opens, do not allow it begin indexing at once.
That will present you the Indexing configuration window.
Under the Skipped paths: heading, click the plus + button.
In the data-entry popup window, type in ~/.gvfs
Click on the data-entry window's OK button (not the Preferences window's main button).
If you want any system directories indexed, use the same method in the Top directories area (we add /etc/ and /boot/).
Now click on the Preference window's main OK button--initial indexing will at once begin.
In the bottom Recoll window line will appear Indexing in progress: and some progress data.
Wait till the indexing-progress line goes completely blank (normally just a few minutes): indexing is now complete.
You may now either close Recoll, or do some test sample searches. Refer to the manual for details, but in essence, Recoll can search for files either by simple filename criteria or by content (including "metacontent"--non-text files typically have invisible "meta-data" stored in them, such as their title, format, and often much more, and Recoll searches meta-data as well as file names). Most standard search patterning will work in Recoll, but, again, RTFM.
You should set Recoll up to do upkeep indexing on at least a daily basis, preferably at some time when you are highly unlikely to be using the system. Use the Scheduler interface available under the System Tools submenu of Applications. The command you are scheduling is recollindex. It is possible to set the Recoll indexer up as a daemon process--seee the Recoll manual--but for the vast majority of users a simple daily run of the indexer will suffice. (And, if you are looking for something made or modified since the last daily indexing run, just force a run ad hoc from the Recoll toolbar File menu.)
At any time after the first indexing run, you can click on Recoll's File - Show missing helpers option to see if your system requires any "helper" apps besides the ones already downloaded.
Get a Clipboard Manager
A clipboard manager is vital. It is not only ineffably convenient to be able to grab the contents from several clipboard entries past, it is essential when one realizes that the clipboard itself will "lose" entries if the source app shuts down. (That is, copy a URL from Firefox, shut down Firefox, then try to paste that URL--you can't, it's gone from the clipboard.)
Regrettably, the optimum CM choice is not obvious; once it was Glipper pretty much by default, but suddenly there are quite a few choices, each with its partisans. The chief candidates are (in random order):
- Glipper
- Pastie
- Glippy
- Parcellite
- Anamnesis
- Clipboard Viewer (no installable binaries--you need to compile it yourself)
Some of these are being developed so fast that it's hard to keep track of which can do what (and which bugs have been squashed), so you probably should give at least a few a trial spin. (We have long used Glipper, but we will be taking a look at the others and revising here if we find out anything notable.) You can try any of them, but Glipper and Parcellite have the advantage of being in the regular Ubuntu repositories, making loading and unloading via Synaptic a breeze.
For those using or moving to the Glipper applet, be aware that ther is a well-known problem, not Glipper's fault but rather that of the basic GNOME desktop manager, that results in a popup error message for Glipper (The panel encountered a problem while loading OAFIID:Glipper) at every reboot. It seems that Glipper loads so fast that GNOME is not ready for it when GNOME comes up, and mistakenly thinks there's something wrong. The fix can't stop the error message, but it can set things so that once you dismiss the error message (which asks whether you want to delete Glipper from the panel, and you dismiss it by clicking No--there regrettably being no option for No, you brain-dead duckheads), Glipper loads OK; as is, Glipper may not show on the panel, requiring you to re-add it--which sometimes ends up with two Glippers there later on. All very silly, all a long-standing well-known issue, all very easily repaired.
The fix is easy:
- Open the Root Editor.
- Once the editor opens, with it open the file /usr/lib/glipper/glipper
- Near the top of the file, right after the opening comments (the text block at the top in which every line starts with a # hash sign), add just three lines (all flush left):
# Fix startup problem by waiting:
(You can, if you like, add blank lines to set off your addition--they will be ignored by the script.)
import time
time.sleep(8)
- Save the changed file.
- Exit the editor.
If perchance that does not reliably fix the problem, try increasing that number 8 to 20, or 30, or even 90.
Get a Temperature Monitor
Certainly for any laptop, but arguably also even for desktops, some sort of sensor or monitor of at least the CPU temperature is advisable (fans do occasionally fail!), and also monitoring video-chip or hard-drive temperatures can't hurt. There are several packages that undertake to monitor temperatures--and, in some, to also set off an alarm of some sort if the monitored temperatures get out of some range you can set. (Indeed, it is possible that your computer motherboard's BIOS also has such a fuction, but don't count on it). Some also monitor, beyond just temperatures, voltage levels and fan speeds.
Choosing one (or more) can get confusing because some are intended to, or at least can, work with others, while some conflict with others. The underlying sensor-interface packages that you should get, via Synaptic, are hddtemp (interfaces with hard-drive sensors) and lm-sensors (interfaces with motherboard sensors, and probably installed by default). The hddtemp package will ask questions during the Synaptic install: we suggest answering all of them with the supplied default answers. Then, when both are installed, you need to set up the motherboard sensing; the easy way is to open a terminal, execute sudo sensors-detect and answer all questions with their default answers (that is, just press <Enter> at every question) except at the last question, which asks Do you want to add these lines automatically to /etc/modules? (yes/NO)--for that one, answer Yes, to enable the monitoring.
Monitoring will not be enabled till you reboot.
If you want to see monitoring in effect right away, before doing a reboot, make note of the module name that sensors-detect found: it will have been shown (you may need to scroll up your terminal screen to find it again) in this form--
#----cut here----
# Chip drivers
it87
#----cut here----
--where, in this case, the module name was it87 (yours may well be different). Now, with that module name, in the terminal execute sudo modprobe it87 (or whatever it showed for the module) and you're set. To prove it, next execute simply sensors and you should see the sensor data. (You may need to look in your motherboard manual, or consult with their tech-support people, to find out which sensor is monitoring which temperature--all the software can do is report what the motherboard tells it, and that is typically something semi-cryptic, such as temp2.)
To check your hard-drive temperatures, execute the terminal command sudo hddtemp /dev/sda, which will show you the result for, duh, drive sda; if you have more than one, check the next with sudo hddtemp /dev/sdb, and so on.
But you're not done yet. Yes, you can now read the temps on a terminal screen, but we want them a deal more visible. You need to add a panel applet. You have your choice of two: computertemp and sensors-applet; you can load either via Synaptic. There seems to be something of a preference in the Ubuntu community for sensors-applet, but you can try them both in turn--just install one, try it, then uninstall it (all via Synaptic). Do remember that once you have installed an applet, you need to reboot to be able to find it in the Add to Panel... menu. Each has some "alarm" features that you can explore in the applet's documentation. (The one drawback to these monitors is that as applets, their readings can consume a lot of toolbar real estate: stick to monitoring your CPU cores and your hard drive or drives--indeed, on a multi-core CPU, any one core is probably enough.)
Restore shutdown system sound
A notorious glitch in GNOME will result in the "shutdown" system sound not being played when you log out of Ubuntu. But there is a fix:
- Open a Root Editor
- You are creating a new file; type into the editor (or copy-and-paste this), flush left:
#!/bin/sh
play /usr/share/sounds/ubuntu/stereo/desktop-logout.ogg
exit 0 - Save this new file as:
/etc/init.d/logout-sound
- Close the editor.
- Open a Root Browser.
- Point the browser at the directory
/etc/init.d/
- Right-click there on the new file you just made (logout-sound).
- In the resultant dropdown menu, click on Properties
- In the Properties window, select the tab Permissions
- On the Permissions tab, click the box that says Allow executing file as program
- Close the Permissions window, then the file browser.
- Open a root terminal.
- Execute these commands, in the order given (you can copy-and-paste them from here):
cd /etc/rc0.d
ln -s ../init.d/logout-sound S05logout-sound
cd /etc/rc6.d
ln -s ../init.d/logout-sound S05logout-sound - Close the terminal.
(There are several other fixes for this problem to be found around the web, but no others work reliably or, often, at all.) Remember that this fix hard-wires the Ubuntu sound-theme logout sound; if you later set up a new theme of your own, you will need to change the file above to point to your theme (normally, that's just by changing the word ubuntu to the directory name for your new theme).
Reboot
So that our changes can take full effect before we proceed, we need to now do a reboot. As before, click on the universal logo for "power" in the far upper right, then click on Restart, confirming as necessary. When your system finishes rebooting, continue below. By the way, you should hear the system logout sound as it shuts down. (Later we can customize that and other system sounds.)
Phase 4
Now that we have our wanted extra software on board, let's get on with some setups tasks and some important customization.
Toolbar Applets and Launchers
Some introductory comments
For most users, the toolbar is a very important part of their computing experience. It is important that your toolbar contain access to virtually everything that you use frequently, and virtually nothing that you don't. It is, or should be, your front-line command-and-control center. While there is an awful lot of personal choice and taste involved here, there are also some important basics, some technique-learning, and a few--yes--"tips & tricks".
There are three somewhat different kinds of things that can appear in your toolbar. First is application launchers, such as the firefox launcher that was put there in the original installation. Second is menus, such as that Applications Places System monster. Third is applets: some applets do something, while others are mini-monitors of some sort, displaying some system datum or data. Generally, you want launchers for particular applications you launch often, menus for things you use less often but occasionally, and those action and monitor applets as seem to you useful (or entertaining). You don't want to add everything in sight, because you don't want to clutter up the toolbar with extraneous junk, making it hard to fluidly find and click on what you want at any given moment.
Put your cursor in any empty space on the toolbar. Right-click in that space; then, on the resultant popup menu, click on Add to panel (you might, at some time, also check out the other options on that popup menu). That will open a popup window showing you a long laundry list of applets that you can add to your toolbar (a few will already be there, like the main Ubuntu menu--that big, wide thing that says Applications Places System, which we will soon cut down to size, literally). Note well that the titles in that popup window often do not equate to the titles of the applets as those applets themselves render them, which just adds to the jollity. (Also note that for no very clear reason, the standalone volume-control applet--a very useful thing--is not included in the addable-applets list.) One other thing you can add from the applets menu is a "separator", which is just a vertical line with no function save easing visual review of the toolbar; it's up to you, but we think just using spacing intelligently is superior to adding yet more junk to the toolbar to be tossed about if you add or subtract something later. (As we discuss in a moment.)
Next, put your cursor over some icon already present in the toolbar, say the Firefox one, then right-click. The resultant dropdown menu will be in three segments; the top one is particular to the icon in question, and is typically blindingly self-evident. The next two sections are constant over almost all toolbar objects: Remove from Panel and Move, then Lock to Panel. The first of those is just what it says; the other two are not. A toolbar icon can supposedly be "locked" to the panel, meaning--one would think--it cannot be moved from the exact spot it occupies. If an icon is not locked, one moves it by clicking the Move option, then sliding it back and forth till the wanted position is reached, then clicking anywhere; when Move is selected, your cursor becomes a "hand" image and does nothing except slide the icon in question left or right till the next click. (Icons being Moved can and will slide over existing icons.) What you need to realize, to save yourself massive amounts of annoyance and redoing of finicky icon placement, is that "Locked" is rather a lie: it means that you can't fiddle a locked icon, not that the icon is truly nailed to its spot. The typical scream-out-loud scenario is your spending quite some good time painstakingly arranging the icons exactly as you want them, nice, neat spacings and all, then deciding you want to add one more; you add the new applet or whatever, and discover that ka-boom, the system has plunked it down somewhere arbitrary and shoved all your existing icons around to "make room". The order of the existing icons (probably) won't have changed, but all your nice fine-tuning of their spacing has. The moral is to not invest time in anything but the simplest, crudest arranging--just setting a left-to-right order--till you are comfortably sure that you have exactly the toolbar items you finally want--no more, no less. Then do the nice spacings (but don't bother to lock any).
Some applets of non-obvious use but that you might well want are the Drawer, a customizeable micro-menu (handy for conserving toolbar space by allowing several things--presumably somewhat related conceptually--to be accessed from one icon) and the Custom Application Launcher and the Application Launcher, both of which we will use for a few things in a bit, but which can start up any app or utility on your system (those "launchers" are templates, and become new things in each use of them). There are also, as you see, many other toys that might be of use or amusement to you. If you have a widescreen monitor, and end up with some space to spare in your toolbar, why not add Wanda the Fish, who looks cute and delivers pithy apothegms when clicked on?
Remember that adding or removing things from the toolbar is no big deal, because whatever you add you can as easily remove later, and vice-versa. The most you can ever lose by removing something you later want back might, in a few instances, be some brief, simple customization (few applets take any customization at all). So feel free to play around.
Choosing applets
Your toolbar may--almost surely will--end up looking very different from ours, but just of applets per se (as opposed to launchers and dropdown menus), the ones we think important to have are (in alphabetic order, as they appear in the popup window):
- Audio Recorder Applet
- Clipboard Manager [Glipper]
- * Clock
- Gnote
- Network Monitor
- * Notification Area
- Search For Files
- Shut Down
- Sticky Notes
- System Monitor
The two with asterisks are placed in the toolbar by the original install. You will also now have--though it's not listed in the applet menu--a volume-control applet (looks like a tiny loudspeaker), which was added in at reboot by the addition we earlier made to the Startup Apps menu. Besides those three, there are several items of fluff/crud (or so we think it) that were put on by default. You now can--and, we think, should--remove that crud. Start from the left and move rightward: right-click on and remove everything but (for now) that Applications Places System ugliness, the Clock (showing the time & date, over at the right), the Notification Area (this can look different from system to system: go by the name shown by the About choice in the right-click dropdown menu), and the Volume Control. Note that the Notification Area (and some few other toolbar icons) can seem at first not to have the usual toolbar-icon dropdown menu available at a right-click; but if you eyeball the toolbar very close up and carefully, you will find, at the left edge of such icons, a thin, almost invisible vertical strip (or column of dots). It is there that you need to put your cursor before right-clicking.
Now, with lots of open real estate available, add the applets you want from the Add to Panel... dropdown menu. If you don't have any strong convictions about wants and don't-wants, try the list just above. You add each item by selecting it from the menu window listing the lot, then clicking on the Add button that appears at the bottom of that window when an applet is selected. (You can only add one at a time, but the window stays open till explicitly closed.) Incidentally, there is nothing to stop you from adding multiple copies of any applet, but that would be quite silly except for customizeable things like Drawers.
Customizing your applets
The Preferences for each applet are something you should check and, as taste and need suggest, modify as may be appropriate (though usually the default settings suffice). Don't be afraid to play around and try things out: you're not likely to do anything vile with just these toys. About the only applet possibly wanting comment is the System Monitor; with it, you can monitor anything from two to six system activities. If you have lots of spare toolbar space (something you don't know yet, because you have yet to add app icons), set the preferences options to show all six (Processor, Memory, Network, Swap Space, Load, & Hard Disk); if you are cramped, just display CPU and Network. Keep in mind, if you end up cramped for toolbar real estate, that the time display can be a 24-hour one, clipping the AM/PM characters off; it could even, in bad cases, leave off the seconds part of the time (this is all settable from the icon's Preferences menu).
Some sidebar information. One, on a modern system, it is normal for Memory--meaning RAM--to be in close to 100% use all the time, and seeing it so is no cause for panic; that's what the stuff is there for, to be used. Heavy use does not signify that your system is teetering on the edge of using disk swap space. Two, disk swap space will normally not get--especially after the tuning we did earlier--much use, so watching it is not of much avail. Three, if "system load" brings a twinkle to your eye, swell: most people have zero idea just what it is measuring, beyond what its name suggests (see if this helps--bet it doesn't). The only reasons to use System Monitor to look at disk usage and network usage--which you can monitor elsewhere--are to see the pretty time-track of it, rather than an instantaneous reading. Also, note that clicking on any part of the System Monitor applet display will bring up the actual system application System Monitor, which is to the applet as a battleship to a canoe.
Adding menus
Obviously, your toolbar needs and tastes will not be the same as ours. But bear with us and step through the instructions below, because each is also a learning process for how to do some particular thing in creating and adding icons to the toolbar. When you have completed it all, you can then set about changing it--if you feel you want to--with clear knowledge of how to do each sort of thing.
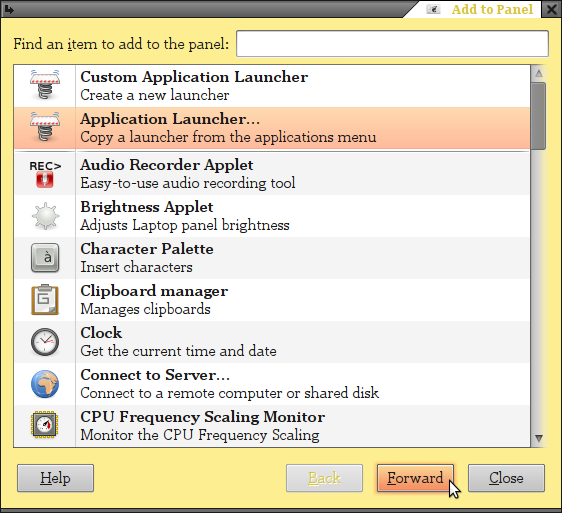
First, here's where we get rid of that sprawling three-word monster:
- Right-click on an empty toolbar area to bring up the Add to Panel... list (unless you still have it open).
- Click on the entry Main Menu, then on the Add button, which will add a new icon to the toolbar.
- Move the new icon over to the far left of the toolbar.
- From the Add to Panel... list, click on Application Launcher (being sure not to mistakenly click the Custom app launcher).
- A Forward button will pop into existence at the bottom of the list window: click on it.
- You will then see a list duplicating the main system menus. Down at the bottom is Preferences: click on it, then click Add.
- Move the new icon over to just to the right of the one you previously added.
- From the Add to Panel... list, click on Application Launcher (being sure not to mistakenly click the Custom app launcher).
- A Forward button will pop into existence at the bottom of the list window: click on it.
- You will then see a list duplicating the main system menus. Down at the bottom is Administration: click on it, then click Add.
- Move the new icon over to just to the right of the one you previously added.
- In the toolbar, right-click on that Applications Places System thing and remove it from the toolbar.
The leftmost new icon you added is direct access to the Applications menu; the next over is direct access to the former System - Preferences menu; and the third is direct access to the former System - Administration menu. What about Places? All that ever did was call up a file browser, something we'll now be adding to the toolbar anyway (plus, you can get at Places from the bottom of the Applications menu). Much cleaner, prettier, and space-saving.
Now, because one needs them so often, let's put the Root Tools submenu up on the toolbar:
- Right-click on an empty toolbar area to bring up the Add to Panel... list (unless you still have it open).
- From the Add to Panel... list, click on Application Launcher (being sure not to mistakenly click the Custom app launcher).
- A Forward button will pop into existence at the bottom of the list window: click on it.
- You will then see a list duplicating the main system menus. From that list, click on Root Tools, then click Add.
- Move the new icon over to just to the right of the three new icons you just made.
Next, let's put some key utility tools on the toolbar:
- Right-click on an empty toolbar area to bring up the Add to Panel... list (unless you still have it open).
- From the Add to Panel... list, click on Application Launcher (being sure not to mistakenly click the Custom app launcher).
- A Forward button will pop into existence at the bottom of the list window: click on it.
- You will then see a list duplicating the main system menus. At the Accessories listing, click on the little triangle at the left of the line.
- You will now have a dropped-down list of all the "Accessories" applications; click on Terminal, then Add to add a Terminal icon to the toolbar.
- Move the new icon over somewhere a bit to the right of the ones you previously added.
Now you should repeat the routine above so as to also add icons for a number of other apps, listed below (in parentheses after each is the submenu in which that app is to be found); you can string these icons out in the order we list the apps, moving left to right from the icons you have already added.
- the File Browser (Other)
- the system Text Editor (Accessories)
- the Synaptic Package Manager (Administration)
- Thunderbird (Internet)
- Firefox (Internet)
- Filezilla (Internet)
- Pan (Internet)
- OpenOffice.org Word Processor (Office)
- gThumb image viewer (Graphics)
Now we need to add a couple of apps that don't have menu entries, so we do it a little differently. First:
- Right-click on an empty toolbar area to bring up the Add to Panel... list (unless you still have it open).
- From the Add to Panel... list, click on Custom Application Launcher (being sure not to mistakenly click the plain app launcher).
- An Add button will pop into existence at the bottom of the list window: click on it.
- A data entry window will pop open, calling for three data, and showing an icon image. Enter the data thus:
- Name: Evince
- Command: evince
- Comment: PDF & PS file viewer
- Click on OK to add the Evince icon to the toolbar.
- Move the new icon just to the left of the OpenOffice word-processor icon.
And now:
- Right-click on an empty toolbar area to bring up the Add to Panel... list (unless you still have it open).
- From the Add to Panel... list, click on Custom Application Launcher (being sure not to mistakenly click the plain app launcher).
- An Add button will pop into existence at the bottom of the list window: click on it.
- A data entry window will pop open, calling for three data, and showing an icon image. Enter the data thus:
- Name: Address Book
- Command: thunderbird -addressbook
- Comment: Thunderbird's address book
- Click on the icon image, which will bring up a directory search; the icon to specify is: /usr/share/pixmaps/gdict.xpm
- Click on OK to add the Evince icon to the toolbar.
- Move the new icon just to the left of the OpenOffice word-processor icon.
If you occasionally relax with some games--who doesn't?--you should also add the Games submenu:
- Right-click on an empty toolbar area to bring up the Add to Panel... list (unless you still have it open).
- From the Add to Panel... list, click on Application Launcher (being sure not to mistakenly click the Custom app launcher).
- A Forward button will pop into existence at the bottom of the list window: click on it.
- You will then see a list duplicating the main system menus. From that list, click on Games, then click Add.
- Move the new icon over just to the left of the gThumb icon.
As you saw above, when making custom app launchers, the system is in some cases able to automagically locate the corresponding icon iamge; but sometimes it's not, and then you have to search for something suitable--either the actual icon for that app/utility, or--if it is a custom action instead of an installed program--something reasonably representative. (Or, as a last, desperate alternative, just leave the ugly generic icon in place.) Unfortunately, the system does not keep all its icons in one neat central place (for many reasons, not the least of which is the numbers of icons, that is impracticable). Places to search when you don't get one inserted automagically are listed below. Note that you are best off to search by opening a Nautilus window, inasmuch as the displays on the selector window are miniscule, whereas Nautilus shows the icon images at a fair size.
- /usr/share/pixmaps and its subdirectories
- /usr/share/icons and its subdirectories
Note that for panel icons, you should probably restrict your search to subdirectories containing either scalable or 48x48 in their names, else you'll likely get funny looking results.
To see if a given app or utility has an actual icon specific to it, so you don't have to seek our some generic one that seems relevant, use the Search icon already in your toolbar. Let's say the app is called elephant; click on the search icon (the magnifying glass) and, at Name contains, type in elephant, then press the <Enter> key. If you get a very long list of things, scroll down it looking in the right column for locations beginning /usr/share/pixmaps/ or /usr/share/icons/, because (as we just noted) those are where icons are kept. You should try that with a real app--say nautilus--to see how it works.
So, if you have followed along diligently, you would now have a toolbarful of useful icons. The way we would arrange-cluster them (by using a little extra space between clusters) is this (where the dotted line just signifies an extra-wide spacing):
Applications
Preferences
Administration
Root Tools
-------
gnome-sensors (see farther below)
-------
Terminal
Nautilus
gEdit
Synaptic
Sticky Notes
gNotes
Glipper
-------
Thunderbird
Firefox
Filezilla
Pan
-------
gThumb
Address Book
Envision
Open Office WP
Games
-------
Network Speed System Monitor
Recoll (see farther below)
rec-applet
Notification Area
(blank space for more notification sub-icons)
Shut Down
Date/Time
OK. Now it's time for you to think long and hard about exactly how you want your tool bar to lay out. Look through all the items on all the menus under Applications (the most likely source), under Preferences (few if any of those need panel icons), and under Administration (fewer yet are likely to need icons). Look at the rest of the available applets. Think about apps or utilities not in the main menus. Think, think, think. Then add. (Or subtract, if you don't need or like or want anything you have there now.)
When you are quite sure you have it all in place (and maybe you should wait a few days or weeks to be sure), you can invest some time in micro-arranging everything to your pleasure.
The Taskbar
The taskbar is dominated by the display of running applications in the "Window List" applet running there by default, but we can do a bit to clean it up.
At the extreme right of the taskbar is a small trashcan; it represents your "Trash" directory, and there is zero reason for cluttering up your screen real estate with it (unless, perhaps, you are one of those poor souls who is constantly trashing stuff without thought, and thus and constantly needing it back soon thereafter). Right-click on that trashcan icon and then click Remove From Panel. (That has no effect on your actual "Trash" directory--it just removes that click-on icon as an access point. You normally get to Trash through your file browser.)
If you often throw things into Trash (instead of truly Deleting them), it's a wise idea to remember periodically to empty your Trash folder: in a file browser, click on Trash, then on the Empty Trash button.
Next: now in the extreme right the taskbar are four little boxes in a row; those are the access to your "Workspaces". A "Workspace" is a handy conceptual display tool. If you have a lot of application windows open, and some are unrelated to others, you can put them on different "Workspaces". Think of it as sitting in an office in the center of four separate deks arranged around you in a square; you might have the Smith company files and a calculator on Desk #1, and a jigsaw puzzle on Desk #2, and a typewriter and the pages of your work-in-progress book on Desk #3, and Desk #4 empty. The four windows down in your screen corner are how you switch from one "Workspace" (conceptual desk) to another.
You can switch to a new empty Workspace (but your toolbar and app bars will always carry across) and open apps there, or you can move already-open apps by right-clicking on their markers in the bottom-of-your-screen app bar and making an appropriate selection from the several Workspace options there.
We customize by reducing the available number of Workspaces to 2, which is as much as we ever use, but you can have an awfully large number if that's to your tastes. You alter the number of Workspaces available by right-clicking on the Workspace marker and then clicking on Preferences.
Phase 5
Now that we have our toolbar arranged usefully, it's time to start customizing our system and our apps. It would be folly (not to speak of supererogation) for us to try to tell you how to customize every major app or utility on your system. We will, though, try to bring out some critical gotcha's to look out for and avoid, and a few, yes, "tips & tricks".
Customizing the System
Administrative Customization
Click on the System Administration menu icon in your toolbar. Go down it item by item, customizing as you feel appropriate. Have a care, as this is the part of the world where you can really do yourself a mischief (which is why virtually every option here requires a password). If you are not 117% sure you know what you're doing at any point, don't do it.
Let's look at a few pointers. We will only touch on a few high spots, not everything you might see:
Additional Drivers: Click on that and wait a while for the system to search. If it eventually reports back with a blank list screen, there's nothing to do: close the window and move on. If, on the other hand, it does report the presence of one or more proprietary drivers (most likely video drivers), it is up to you to decide whether to use them. (Note that having no drivers in use is not the same as having no drivers!) Our firm recommendation, though, is that you first continue on as you are, without installing anything proprietary, till you are fully satisfied with your system setup, and have used it for some little while--a minimum of a week or two; then, if you want, you can experiment with the proprietary drivers. Keep complications to a minimum while completing new installs.
Login Screen: uncheck the "play login sound"--that is really controlled elsewhere, and we want to avoid conflicts.
If you're in an essentially single-user environment (it's at home on your desk), click Log in as ---- automatically (making sure it's you that's selected for login--there should be no other choices).
If others use the same computer with their own logins and sessions, be sure instead to click Show the screen for who will log in and select some reasonable time for users to see what's what and start logging in (say, 10 seconds).Printing: this wants a separate discussion, which comes later on; skip it for now unless you already know what you're about.
Update manager: click the Settings button and, we suggest, set it up this way:
- Under Ubuntu updates check the first two boxes but not the last two.
- Under Automatic updates, click Check for updates and make sure it's set for daily;
also click Only notify about available updates (you'll install them manually when you're ready). - For Release upgrade, select Normal releases
By those choices, you'll be notified soon after any important package upgrades become available, but won't have them being upgraded in the background without your knowledge; Debian Linux systems are very good at doing such stuff without disrupting any on-going activity, but we feel it's always better to have personal charge of what's going on when.
Preference Customization
Click on the System Preferences menu icon in your toolbar. Go down it item by item, customizing as you feel appropriate. This is all stuff personal to you and your tastes, and it's pretty safe to play with any or all of these settings. Most of them are fairly obvious, but we offer these few comments to, we hope, help out a bit.
About me: these data are sometimes used by applications to speed up filling out of entry boxes--but they are not disseminated promiscuously, so have no fears about filling in the information. One point to especially note is that it is here that you can change your login password--something we think you should not fiddle with unless you are prepared to undo and redo all the SSH (and perhaps other) setups you have already created. But it's nice to know it's there if you want it.
- Appearance: this is where people can really go crazy with wasting time. As to the individual tabs available for appearance choices:
"Theme": make a new one for yourself--click on anything you see, then click the Customize button; that will pop up a new window in which you can make some selections. The only choice not entirely a matter of taste is the "Window Border" one, for which it seems folly to take any but Esco, which very helpfully puts the highly useful fact of what each window is up in the window's border (in a rather pleasing way).
"Background": you will be offered a variety of images, and scads more are available all over the place--in fact, any image can be used, though it will look somewhere from a little odd to downright awful if it is not of the same resolution as your monitor runs in. Our own feeling is that while showy images are, well, showy, they are no help and maybe some hinderance to effective computer use. If the thing is not completely covered by open application windows (in which case it doesn't matter what is showing), it is just a background against which you are trying to make out things like icons or messages. We thus use and recommend a solid-color background, ideally of some fairly dark color (so your monitor doesn't dazzle your eyes).
To find your monitor's resolution, if you don't already know it, do Preferences - Monitors and you will see it. Potential background images look best when they're that size.
"Fonts": while this is again a matter of taste, we agree with many that the best serif font is Georgia (though Bitstream Vera Serif is very close competition), the best sans-serif is Trebuchet, and the best monospaced is Bitstream Vera Mono; you can use the Specimen Font Previewer (under Applications - Accessories) to compare various fonts to make choices. Be sure to click the Details button on the fonts page, and verify (and correct, if necessary) that the Smoothing is appropriately set (if, as is likely, you have an LCD display, make sure that is checked), and that the Hinting is set for Full.
"Visual Effects": as we said at the very outset of this document, we very strenuously recommend setting it to None. Yes, that turns off "compiz", which can enable all sorts of dazzling (and rather goofy) special visual effects--but there have been just altogether too many reports of problems, some severe, owing to interactions of other software with the rather complex innards of compiz. If you want games, play games on your computer: don't turn your computer itself into a game.
Keyboard: it's worth taking a moment to be sure you're happy with the "repeat" delay and especially rate. Some find the default too fast, others too slow. Experiment in the test area provided on the customizer screen.
Keyboard Shortcuts: we'd leave this strictly alone unless you have very good, clear, definite reasons not to.
Main Menu: you now know pretty well how this gadget works. Later there will be more discussion focussed on how to optimize it. We suggest not playing with it piecemeal.
Messaging and VoIP Accounts: if these matter to you, you should know what is wanted and needed here.
Monitors: it is worth verifying that the resolution is correctly set. The monitor may be mis-identified as to brand, but that's not the concern: the resolution and refresh rates are. LCD monitors especially have a "native" resolution that is really what you want to be running at (and they very much dislike refresh rates over 60 Hz). If you're unsure, check your monitor manual for the correct data. Generally, though, this is a good one to leave alone unless you are quite sure you know what you want to change and why.
Nautilus Scripts Manager: this is one of the things we added on. It should need no changes.
Passwords and Encryption keys: leave this strictly alone unless you have expertise.
Power management: we already set these way back at "screensavers".
Preferred Applications: At the "Internet" tab, Firefox will be preset as the default web browser, with open link with web browser default selected, all of which is fine. But you need to now set your default mail reader as Thunderbird. The other tabs can be left alone, unless you have definite reasons to make a change somewhere (notably in the multimedia player).
Screensavers: been there, done that. Later, we'll see how to cull the massive list down to a manageable few especial favorites.
Sound: there are tons of misunderstandings about the settings here. Ubuntu now has sound "themes", which are collections of sounds used for system effects. You can substitute one of your own making for the Ubuntu default, but that's a big enough topic to warrant a separate discussion later. (We've already shown you how to get logoff sounds, whose absence people have been griping about for years now.) If, like us, you find sounds for computer-related actions distracting, annoying, and downright silly, select No sounds instead of the Ubuntu theme. As we say, we'll return to sound issues later.
Startup Applications: been there, done that, with one exception: if you have installed efax-gtk, you should also add (and have checked) an entry for that: the command is simply efax-gtk.
Windows: best left as is--again, as always, unless you have a compelling reason to make some change.
Customizing the Applications
Nautilus
First, at Edit - Preferences - Behavior, enable Include a Delete command that bypasses Trash - the system "trash can" has its adherents, who do not number us among them; "Delete" should mean delete, not save away to clutter up our drive. (end rant) Next, at Edit - Preferences - Preview - Sound Files change the setting to Never to avoid those annoying snippets of noise whenever you run your cursor through a directory with sound files in it. Finally, we suggest enhancing your pleasure in this tool by going to Edit - Backgrounds and Emblems..., choosing a pleasing background pattern, and installing it (you just drag and drop it onto the display area). You can undo and redo this forever if you don't like the look you get.
It is a very wise move to use different backgrounds for your normal file browser and for a root browser, so you always know for sure which kind you're using. Because a root tool is owned by root, not you, it has its own set of stored preferences unrelated to those you use in your normal versions of those tools, allowing such differing appearances.
Terminal
- Open a terminal.
- Click in its toolbar on Edit, then Profile Preferences. (Note that you can have more than one profile, but few people need that feature.)
- On the "General" tab, unclick use of the default font and select Bitstream Vera Monospaced. If you happen not to like its look, play around with others (just be sure you end up with a monospaced font).
- On the "Colors" tab, unclick the "system scheme" choice. You can try some of the preset themes, but will probably get better results from rolling your own. Click on the little color box, then, in the resultant window, spin the color wheels to whatever is your pleasure. (Use your cursor to first drag the pointer in the outer color circle, then drag the dot within to the tint you want.) Full white text on dark-chocolate background looks-- literally--delicious, but pick yer poison.
- Close the terminal.
As with the Nautilus file browser, it makes good sense to customize your root terminal to a quite different color scheme than your ordinary one uses, so you are always sure what kind of terminal you're in.
Text Editor
This, too, can be customized in many ways, through the usual Edit -> Preferences route. The only thing worth comment is that we again recommend Bitstream Vera Monospaced for the font, and again suggest that your regular and your root editor have different color schemes.
The usefulness of gedit can be substantially augmented by the use of various plugins. As shipped, it has many useful ones (do Edit - Preferences then select the Plugins Tab--you need to tickbox-enable those you want to make use of), plus we downloaded an "extras" package in the procedures earlier in this document. Lots more candidates can be seen at the gedit plugins page at the gnome web site. Of all those, there are a few in particular that we strongly recommend, because between them they repair gedit's most conspicuous lacks: an on-the-fly programmable macro key, and line bookmarking (and the other allows one-click shifting of line-wrapping).
Note that the installation instructions below will make the added plugins available only to the user who downloads and installs them; other users logging in under their own userids will not see those new plugins, because they are--in the instructions below--stored within the user's home directory. You can, if you choose, easily make each plugin available systemwide instead: using root privileges, copy or move the contents of your /.gnome2/gedit/plugins/ directory (which is where the instructions below say to put things) to the /usr/lib/gedit-2/plugins/ directory; or just install them there to begin with (there will already be other plugins in that directory)--but we remind yoyu again that you need root privileges to work in system directories.
"Macro" Text-Editor Plugin
This plugin allows you to "record" any arbitrary sequence of keypresses, then "play back" that sequence as often as you like. It obviates the tedium, which can at times be severe, of having to do some series of keystrokes over and over again. (For example--because gedit still has no "block-edit" capability, if you have a long column of indented text you want to move left, you could record a macro to go to the start of the line, delete three spaces, then drop to the next line down--then replay that for every line in the column.) Here's how to install the needed plugin:
- Point your browser at the Macro page
- On that page, over at the right side, click on gedit-macro-plugin-1.2_x86_64.tar.gz (assuming you have a 64-bit Ubuntu)
- That will take you to the download page; click on the filename link to download the tar.gz file
- For a download target, use your Downloads directory
- When the download finishes (it is very fast), open a file-browser (Nautilus) window in your Downloads directory
- Right-click on the downloaded file
- Click on Extract Here
- Delete the original downloaded gedit-macro-plugin-1.2_x86_64.tar.gz file
- In the file-browser, double-click on the new gedit-macro-plugin-1.2 directory to enter it
- Double-click on the README file; that will explain what you need to do to complete the plugin install
- After moving the operative files to there they need to be, as explained in the README, delete the gedit-macro-plugin-1.2 directory from your Downloads directory
After the install and activation, you will find, under the gedit Tools header, a new menu entry, Macro, with Start - Stop - Playback options available. Much more useful, you will also now find in the gedit toolbar a set of three click-on icons for the same purposes: a ball, a square, and a triangle. The ball, when red, starts recording; during recording, the square turns red (and the ball neutral), signifying that clicking the square will stop recording. The green arrow is for playback, or--more convenient--you can use the keyboard combination Ctrl-M (for "Macro") for playback.
"Line Edit" Text-Editor Plugin
This plugin brings two distinct and useful capabilities. The plugin's name comes from a laundry list of operations it enables for convenient editing of text lines (these are explained on the package's home page). Those are worth adding in themselves, but what really sparkles in this plugin is the capability it adds for placing up to ten different bookmarks within a document, to any of which you can fly back at a keypress. Time and again, one finds oneself wanting to go from where one is to another far-off place within a document under editing, or maybe two or three or more such places, then return to whence one started--or perhaps to one of the other places. Normally, that is a great nuisance, involving recording on a piece of scrap paper the line numbers. Now, just set some bookmarks, then jump between them arbitrarily at will.
To install the plugin:
- Point your browser at the Line Tools page
- On that page, down at the bottom (under Download), click on line_tools.gedit-plugin
- That will take you to the download page, from which you need two files
- Click on get for the line that includes attachment:line_tools.gedit-plugin
- Use your Downloads directory for the download target
- Click on get for the line that includes attachment:line_tools.py
- Again use your Downloads directory for the download target
- When the download finishes (it is very fast), open a file-browser (Nautilus) window in your Downloads directory
- Using your file browser, move (not copy) both newly downloaded files to your ~/.gnome2/gedit/plugins directory
- Open an instance of gedit and do Edit - Preferences then click the Plugins tab
- Activate the new Line Tools plugin (tick the corresponding checkbox)
You will now have new editing capabilities under gedit's Edit menu and under its Search menu; their use should be self-evident (but note that once you have set one of the bookmarks via the menu, the keyboard combination Ctrl-n, where n is the bookmark number, will jump you there without use of the mouse or trackball).
TextWrap Toggle-Linewrap Text-Editor Plugin
This plugin allows you to turn line-wrapping on or off with a single click, avoiding the need to go through the tedious Edit-Preference-Text Wrapping sequence. Text-wrapping is fine for many documents, such as simple plain text, or even HTML; but often, as in programming work, one wants it off. This toy makes switching modes as simple as it gets. Here's how to install the needed plugin:
- Point your browser at the TextWrap page
- On that page, find the heading Downloads
- Under that heading, right-click on the link TextWrap.gedit-plugin
- On the resultant popup menu, click Save Link As...
- Choose to save it in your Downloads directory, accepting the file name as given
- Repeat that procedure for the TextWrap.py link in the same page locale
- Using your file browser, move (not copy) both newly downloaded files to your ~/.gnome2/gedit/plugins directory
- Open an instance of gedit and do Edit - Preferences then click the Plugins tab
- Activate the new Line Tools plugin (tick the corresponding checkbox)
After the install and activation, you will find, in the gedit toolbar, a new icon (a square with a green checkmark in it); clicking that will toggle line wrapping (On to Off or vice-versa). There is also a menu entry, under View, and a hot-key combintion, Shift-Ctrl-B.
Firefox
A very useful site specifically about optimizing your Firefox web browser is available from "lovinglinux". It includes some particular procedures for speeding up response, but the entire thing is rewarding reading. Here, however, are some essential points.
Restoring backed-up stuff
If you had Firefox as your browser on a prior system, you may have backed it up in either of two ways: you saved a copy of the whole "profile" folder, or you backed up and saved your bookmarks (to a so-called .json file). If you just backed up your bookmarks, you already know how to re-import them back into Firefox. But if you saved your whole profile folder, you should be able to restore everything in one pass. We are not expert enough to swear that this will work across operating systems--though it should, because so fas as we know there is nothing OS-dependent within that profile folder--but it should certainly work across Linux systems. In Ubuntu Linux, Firefox stores all your personal stuff--bookmarks, add-ins, preferences, and so on--in one folder, which will be found within the .mozilla hidden folder in your home directory. Within that folder is another titled Firefox, and within that is a folder whose name begins with an alphanumeric scramble followed by .default. For safety's sake, make a copy of that folder, adding, say, a .OLD to its original name (we assume you can by now readily copy a folder). Then--making sure, of course, that Firefox is closed--go into that folder and delete everything. Then, from your saved backup copy of your original profile folder (similar name structure, but different alphanumeric scramble), copy everything in it into the folder you just emptied. Now fire up Firefox and see if everything looks as it used to, and works as you expect it to. In the quite unlikely but not impossible case that too many things seem screwed up, just close Firefox, delete the just-refilled folder, and rename its safety-backup copy back to the original name (that is, drop the .OLD tag, or whatever you used).
General Firefox stuff
First, at View - Zoom, tick the Zoom Text Only line; that way, if you enlarge text for readability, the images are not also zoomed (which usually seriously degrades their appearance). Next, if you--like, apparently, every Firefox user in the known universe--abhor the recent change to opening tabs beside the active tab instead of at the end of the existing row, you can revert that easily enough: type into the location bar (the place where URLs usually go) about:config and press <Enter>; accept the snappy warning message, then, at the real screen that follows, in the Filter box at the very top, type in browser.tabs.insertRelatedAfterCurrent (or, easier, copy-and-paste it from here); that will reduce the screen display to a single line, the one you want to change. Make the change by simply double-clicking on the line, which will change the value (shown at the right) from true to false, which is how we want it. Close the tab, or go somewhere else with it, and you're done with that.
You might also want to use the smaller Firefox toolbar icons, both for looks and to save a mite of screen real estate. Right click in the toolbar (anywhere, even over a button), select Customize..., and click the Use Small Icons checkbox. If you don't like the look, you can easily undo it.
If you didn't successfully restore fully a backed-up prior Firefox profile (as described above), most of what you need to do now is to customize things under Edit - Preferences. Here are a few suggestions:
- On the General tab, at Downloads, check Always ask me, which stops Firefox from dumping everything, willy-nilly, into Downloads.
- On the Tabs tab, click Open new windows in a new tab instead--that's what tabs are for.
- On the Content tab, don't bother blocking popup windows--get some Firefox extension that does a more sophisticated job with those. And at Fonts and colors, click, in turn, both the Advanced and the
Colors buttons and adjust the things you find so as to have real control over your viewing experience. (Remember our earlier thoughts about fonts, too: try Georgia, Trebuchet, and Bitstream Vera Monospaced; and be sure
to tick the box so as to allow pages to set their own fonts.
(Somebody, somewhere, sometime, somehow concluded that sans-serif fonts are "better" for on-screen reading; maybe you agree, and love sans-serif, but you should at least try viewing with a nice serif font, such as Georgia or Times New Roman, to find out how you like it. Monitor screens these days are big and bright. You don't find books or magazines or newspapers printed in sans-serif. Just sayin'...)
- Settings on the Privacy and Security tabs can be complicated. We recommend not relying on Firefox's built-in controls, which are necessarily somewhat constricted in functionality, and instead getting some good add-ons to help with privacy and security. You should evaluate the whole topic thoroughly for yourself, but add-ons we find useful in this area include (alphabetically) "Better Privacy", "Cookie Culler", and "Ghostery". When you have add-ons installed, the correct Firefox settings for Privacy and Security will depend on which add-ons and how those add-ons are ste up, so we give no advice here.
- On the Advanced tab, at the Update sub-tab, we advise checking both entries.
Firefox Add-ons
(You may, of course, have restored a backed-up Firefox version, which would give you back whatever add-ons you've been accustomed to, but you might want to read this part over anyway.)
The topic of Firefox add-ons is fraught with personal-preference matters, not to speak of specialized wants or needs. The number of available add-ons is now staggering. Many are superb, but regrettably not a few are garbage or even dangerous. There are, however, a few that we feel can rightly be labelled with the (much over-used) term "must have". Of the Extensions ("Add-ons" is the overall category, and it includes Extensions--often mistakenly called "add-ons" or "add-ins" and Plugins and Themes), those include:
- Adblock Plus - block most of those horrid, horrid web-page ads.
- BetterPrivacy - control the little-known "super-cookies".
- ColorfulTabs - makes tab use vastly more pleasant and convenient.
- CookieCuller - one of the better of the numerous cookie-control Extensions, because it allows "protecting" wanted cookies.
- Download Statusbar - can anyone live with Firefox's clunky, gaudy download manager? We think not.
- Duplicate This Tab - makes cloning tabs--which can be quite useful--much more convenient.
- Ghostery - another privacy-related one: it tells you what web-page build-ins are spying on you, and allows some control of them.
- New Tab Homepage - shouldn't be necessary, but it is: makes a new tab or window initially open to your home page instead of a blank one.
- PasswordMaker - in close competition with AdBlock for greatest Extension ever: generates long, arbitrary passwords that you don't have to remember because they're auto-filled-in for you.
- PrefBar - a separate toolbar for Firefox that includes countless extremely useful extra function buttons (with yet more available at the thing's home site).
- Unhide Passwords - shows you what you're typing in to those protected fields that otherwise show dots (or nothing) so you can see any mistakes.
- View About - adds a number of important "About" menus to the Firefox View function.
- View Source Chart - if you know HTML (or are learning it), this shows a wonderfully clear chart of the HTML of whatever page you're viewing.
That is by no means all we use, but it includes the ones we think any user would much benefit from. As someone once wisely said, this is a web browser, not a Christmas tree: don't adorn it with everything you can find to hang on it. But needs is as needs must. (Note that the presence or absence of blank spaces in a name above is as the product is actually identified; have a care about that, because Mozilla's search facility isn't real smart.)
(Later, on the ensuing Maintenance page of these documents, we discuss using certain of those extensions to optimize browsing privacy.)
Of the much smaller class of Plugins, we have already gotten the 64-bit Flash plugin. For those with the specialized need of reading TIFF documents online, there is a Firefox/Linux plugin, but it's hard to find--for some reason, it's not in the repositories. You can, however, get it from the tif-plugin page at SourceForge. Confusingly, there are two 64-bit versions offered; the one you want is mozilla-tiff-plugin-0.4_amd64.deb (the other one would not install, even on an Intel-based 64-bit system). We recommend that you save the file mozilla-tiff-plugin-0.4_amd64.deb somewhere (such as in the .packages directory we suggested you make).
A final thought on Plugins: by default, Ubuntu installs the totem-based multimedia plugin; some people have a preference for the gecko-based one. We have no authoritative position, but did switch to gecko. If you want to do that, it's quite easy:
- Close all Firefox instances.
- Open Synaptic.
- Find totem-mozilla package and remove it completely.
- Find the gecko-mediaplayer package and install it.
- Re-open Firefox.
Thunderbird
Restoring backed-up Thunderbird stuff
If you had Thunderbird as your emailer on a prior system, you may have backed it up in either of two ways: you saved a copy of the whole "profile" folder, or you backed up and saved just your Mail folder). If you just backed up your Mail, you can simply drop the old Mail folder over the new one (but back up the new one first!). But if you saved your whole profile folder, you should be able to restore everything in one pass. We are not expert enough to swear that this will work across operating systems--though it should, because so fas as wek know there is nothing OS-dependent within that profile folder--but it should certainly work across Linux systems. In Ubuntu Linux, Thunderbird stores all your personal stuff--actual mail, add-ins, preferences, and so on--in one folder, which will be found within the .thunderbird hidden folder in your home directory. Within that folder is another folder whose name begins with an alphanumeric scramble followed by .default. For safety's sake, make a copy of that folder, adding, say, a .OLD to its original name (we assume you can by now readily copy a folder). Then--making sure, of course, that Thunderbird is closed--go into that folder and delete everything. Then, from your saved backup copy of your original profile folder (similar name structure, but different alphanumeric scramble), copy everything in it into the folder you just emptied. Now fire up Thunderbird and see if everything looks as it used to, and works as you expect it to. In the quite unlikely but not imposible case that too many things seem screwed up, just close Thunderbird, delete the just-refilled folder, and rename its safety-backup copy back to the original name (that is, drop the .OLD tag, or whatever you used).
(Importing email files from other email software packages is beyond the scope of these procedures, but Google Is Your Friend.)
A crucial Thunderbird setting
Whatever else, we need to fix a potential disaster:
- Open Thunderbird (if it isn't already open).
- Click on, in turn (as dropdown menus and windows appear): Edit - Preferences - Advanced - Network & Disk Space
- Check "on" for automatic folder compacting.
You can now, if you like, close Thunderbird: your work here is done.
This procedure is crucial: if you don't enable this, Thunderbird will keep each and every single email you receive or send forever, even if you junk, trash, delete, or perform an exorcism on it--you won't see it anywhere, but your mail files will swell to the many-gigabyte range, and your backups no longer fit on your thumb drive, till you figure out that you forgot to do this. So don't forget it.
Phase 6
The end is in sight, really. Here we will take up a few of those topics deferred earlier: tweaking the Main menu, adjusting system Sounds, installing Printers, and selecting prefered Screensavers. There are also a few miscellaneous small things that didn't fit anywhere else (like using a scanner).
Your directories
A thought about your home directory structure: it is, of course, just what its name says: your home directory, as personal as it gets. But one thing we suggest is making a hidden directory named .packages (the dot "hides" the directory), into which you put those odd packages--mostly .deb packages--that you have manually installed. It's nice to have them to hand if you ever feel a need to uninstall one. You could put the GoogleEarth package here, the Mozilla-Tiff plugin (if you got that), and that sort of thing. Don't leave junk lying about in your Downloads directory. (Actually, we discussed earlier the making of this directory.)
Another thing we like to do is to create a master DATA folder, within which we keep whatever of ours is actually data--that keeps data per se isolated, for clarity purposes, from other things like program configuration settings, or faxes, or whatever. Within that DATA folder, we then create other categorical folders; our own set comprises:
- Audio
- DBs (databases)
- eBooks
- Graphs
- HTML
- Images
- Java
- other (a catchall for oddities like .json files)
- PDFs
- PHP (code)
- Spreadsheets
- Texts
- Videos
- WP documents (word-processor files)
We also have each of those type folders bookmarked in our file browser.
If you do something like that, clean up by deleting the few similar folders the Ubuntu install put in your home directory at the top level (if you have perchance put some things into those already, obviously you first move those things out into the appropriate new folder). Those old folders include (we forget exactly) things like Pictures (we suppose "images" was too technical) and the like--you'll see them.
Your hardware
A nice little thing to do now is to open a terminal and issue this command:
sudo lshw -html > ~/DATA/HTML/hardware.html
Obviously, if you have set your directories up differently than what we suggested, you need to change the target specification. (We should note, which we haven't before, that a tilde ~ as the beginning of a location specification is shorthand for "this user's home directory", so that spec above is the same as /home/myusername/DATA/HTML/hardware.html)
You now have a nice file, viewable in Firefox, recording all of your computer's hardware, so you never have to paw through old invoices or crack open the case if you need to know what your video card or your audio chip happens to be.
Restore "Kill X"
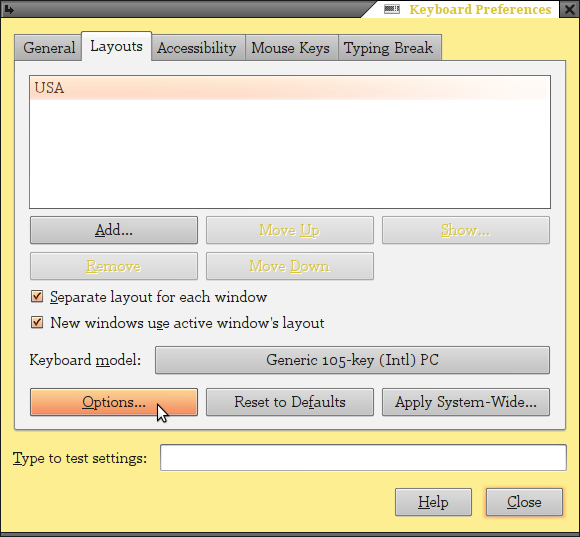
Here's another little thing worth doing: restoring the "Kill X" key combination. This is one of those panic three-finger salutes, only it doesn't shut you down but only restarts the "X" video server. (If you don't know about such stuff, just take it as read that it is not impossible that in some screwed-up situation on your computer, you may someday find advice that includes "restart the X server".) It's trivially easy:
- Click on Preferences.
- Click on Keyboard.
- Click on the Layouts tab of the resultant window.
- Click on the Options button of that tab.
- Click on the line Key sequence to kill the X server.
- Click-check the Control+Alt+Backspace checkbox offered you.
- Close the Options window, then the Keyboard window.
Terminal aliases
Here's another nice little convenience: terminal aliases. In a terminal session, there are numerous commands that you find yourself typing again and again. You can assign to any command an "alias"; if you execute the alias, the actual command is executed--thus, you can use a few, or even one, keypress for a long string, which is a vast convenience. Here's how to make an aliases file, and a few basics to include in it as starters. In your home directory, create a new file named .bash-aliases (you can create a blank file in Nautilus, then double-click it to edit, or you can open the editor, create a new file, and save it as that filename). In that file, type in the following, flush left, then save the file and close the editor:
alias x='exit'
alias 0='clear'
alias 1='clear && ls -l'
alias bu='cd ~/backup'
alias data='cd ~/DATA'
Now, if you are in a terminal, typing just 0 (and, of course, pressing <Enter>) will clear the terminal screen; executing 1 will give you a columnar, colorized list of files in whatever directory you're in. Executing x will close the terminal. Executing data will take you to the top of your data-files folder list. And executing bu will take you to your backups folder (of which more anon). Easy and most pleasant. If you ever forget your alias list, just execute alias in a terminal to see it. You can add (or remove) aliases as you please by just adding (or removing) lines in that file along the obvious pattern shown.
Scanner fixes
If you have a scanner attached to your computer, you may well find some problems getting your scanner software, whether SimpleScan or Sane, to recognize that scanner. If so, the problem is probably in the "permissions" associated with the scanner: it is likely set for root-access only, whereas you are, well, you. (One other thing to check first: some scanners have to be "on" at boot-up time--you can't just turn them on when you need them. Turn your scanner on, do a reboot, and see if it is recognized then. If so, all you have to do is remember to have it on whenever you boot or reboot.)
If you do have a scanner that you just can't seem to get recognized, first try this to diagnose the problem:
- Make sure the scanner is turned on. If you're just turning it on, give it a few seconds to start up.
- In a terminal, execute sane-find-scanner
- See a scanner is found. If so, it will be reported as being at something like /dev/sg3.
- If no scanner is found, try running instead sudo sane-find-scanner
- If even sudo sane-find-scanner can't find it, abort here and start doing homework; if it was found, carry on here.
- Execute sudo chgrp scanner /dev/sg3
- Next, execute sudo chmod 660 /dev/sg3
- Now try the scanner in the ordinary way from your scanner software.
- Whether it runs or not, exit the terminal sesion.
If those last couple of steps did indeed render the scanner usable, the fix is simple; if they did not, back to the drawing board for you. Here's how the fix goes:
- In your home directory, creat a hidden directory named .specials (which you can later also use for any other special scripts you may some day turn out to need).
- In that directory, create a file with these contents, flush left:
#!/bin/sh
chgrp scanner /dev/sg3
sleep 1
chmod 660 /dev/sg3
- Using Nautilus, change the file's Properties - Permisions so that Allow executing file as program is checked.
- In a root editor, open the file /etc/rc.local (be careful editing this!)
- Add to that file, just before the line that reads Exit 0, these lines, flush left:
# Change Scanner Permissions:
sh /home/myhome/.specials/scanner_fix
#
# Get out: - Exit the editor; next time you boot or reboot, the scanner will be usable (again: remember to have the scanner "on" while booting).
(You could replace those last three steps by putting the command /home/yourname/.specials/scanner_fix in your Startup menu, but this is a system-level problem and, we think, best fixed at the system level.)
Installing printers
Supported printers
By and large, installing a printer is very easy. Where it gets to be a bitch is when the maker does not support Linux (can you spell C-A-N-O-N?) and drivers are hard to find and dicey to install. For supported types, here's the method:
- Do Administration - Printing
- In the little popup window's toolbar, click on Add+
- Another popup window will appear; in a pane at the left should be a list of printers connected to the system.
- Select the printer you want to set up, then click the Forward button.
- If the printer is indeed supported in Linux, the system will, after a few seconds of searching, locate the appropriate drivers and aks you to fill in some data, none of which is crucial because it's just for display purposes; answer as seems to you appropriate.
- Reply as done and you are: the printer should now show in the Printers window, and be available to any app with printing capabilities. (Select Print from the Firefox window and see if that printer is shown as available.)
- Close the Printers window--or, if you have multiple printers, add the others now.
If you are using the efax software, its documentation will tell you how to set up the fax queue as a "printer" to which apps can send output as if to a real printer, which output then gets converted to a fax ready to send, as per that documentation.
If you have an HP printer that happens to be so new that its support is not yet included in Ubuntu, you can go over to HP's Linux-support web site and grab up-to-date drivers.
Unsupported printers
Particular printers not recognized can often be installed using instructions found at the Linux Foundation OpenPrinting database:
http://www.openprinting.org/printer_list.cgi
We have had experience with getting a Canon PIXMA iP1800 installed. It should have been easy, but it was needlessly complicated because certain elementary points were not fully grasped by the folk who made the packages for Linux use. Because others may have similar experiences with Canon printers, we will go into a little detail.
The process has three distinct steps:
- Locate and download the actual drivers.
- Locate and download a suitable so-called PPD (driver-configuration) file.
- Get those things installed and--the trick, here--supplied with the Linux support they need. to work.
Parts 1 and 2 are usually not too difficult. Canon divisions outside North America, in places where That Other Operating System is not so ubiquitous as to undermine sanity, have written Linux drivers for most or all of their printers because their customers demand them. Such drivers can usually be located somewhere on line as installable .deb packages. (Canon drivers seem to come as a pair: one general to a class of their printers, the other specific to a particular one of that class). There are also PPD files around, often in the same place (or even the same file package) as the actual drivers; be aware that some PPDs are more complete than others, and an incomplete PPD may not give you access to all the features of the printer (but should basically work).
Installation of the drivers onto your system is nothing: you double-click on the downloaded .deb packages and answer all ensuing queries with "Yes" or some variant thereof. The only key with Canon stuff is to be sure to install the generic driver before the particular driver. The PPD file needs to be copied (with root privileges for the copy) into the directory /usr/share/cups/model/; make sure first that there is no like-named file already present there--if there is, re-name the older one to a backup, but don't delete it. If there was an extant like-named PPD file, then--after copying the new PPD file in--use a file-comparison tool (like the excellent Meld app you should have installed well upstream in this document) to compare the old and the new one. Renaming as needful, keep and use the more complete of the two.
And, as always with things imported from elsewhere than a repository, we recommend that you keep a copy of the downloaded stuff--at least the two driver .deb files--somewhere for future reference--in, say, the .packages directory we earlier recommended you make.
So much is common knowledge, and many packages of drivers and PPD file also come with an installer script that automates doing all that. Now for the non-tricky tricky part. Folk who so install the drivers then fire up their printer-install, just as we described above for supported printers (because the Canon now is supported, by the new drivers and PPD just installed) and all seems to go well--till the first time they actually try to print a page. The web is full of the wailings and tooth-gnashings of such poor souls.
The problem is very simple: many Canon drivers are not very up-to-date, and are looking for certain support files in Linux that now have different version numbers and file names. All we need to is alias the new resources as the old sort and the Canon drivers will be happy. We do that very easily:
- Open a root terminal.
- Execute:
ln -s /usr/lib32/libtiff.so.4 /usr/lib32/libtiff.so.3
- Execute:
ln -s /usr/lib32/libpng.so /usr/lib32/libpng.so.3
- Close the terminal.
And the printer will work. As old Jimmy the Dispatcher used to say, "There: wasn't that easy?"
For the very model iP1800, you can download an archive file with the drivers and a good PPD file here. Once you have the downloaded package, right-click on it and click on Extract here; it will make a subdirectory for itself in whatever directory (presumably Donloads) you had it in. In that subdirectory will be an installation script and a further folder; in that further folder will be the two .deb packages you need and the good PPD file. You can do manually all the things described above, or just run the install script--but, remember, that install script will not correctly fix the symlinks as decscribed above--you need to do that part by hand. (And again: save the downloaded package for future reference.)
On a 64-bit system, the success of all this depends on your having installed certain files we listed for installation on that long laundry list some ways back. You have been warned.
Tidying the main menus
First, some philosophy. The Applications menu has a number of sub-menus, and you can make more as it may please you. The question that arises over and over is under which sub-menu does a given app/utility belong? Moreover, is it good or bad to have the same app appear in more than one sub-menu? And should apps with icons in the toolbar also appear in one (or more) sub-menus? There are no set answers to those questions. Our own philosophy is that apps or utilities should not appear in any menu if there is already an icon in the toolbar, and that if there is not, they should only be in some one menu. The idea behind that is to keep the individual sub-menus as brief as reasonably possible, so finding the thing you want is simple and fluid. You may feel very differently.
In any event, you should know how to make entries visible or invisible, how to copy entries from one menu to another, and how to delete entries altogether. (A menu can have many entries that are not visible--you don't see them when you look at the menu, but they remain only an activating click away from reappearing, the idea being to not throw away the entry information.) Deactivation is very simple: you just untick the little "Show" box at the left of the subject entry; to re-activate an invisible entry, tick the box. Note that menus with no entries are automagically hidden (and cannot be activated).
(There is something weird that we frankly do not understand about the Games menu, in that entries there not clicked as active display anyway. Perhaps that is because those entries are part of some one package or something, but it's weird and it's a pain in the elbow to those of us who like our menus to only show things we might be interested in using.)
Begin by going to Preferences - Main menu. As an example of how to copy an entry from one menu to another, do this:
- Select the Accessories sub-menu.
- Move your cursor over till it's on the Byobu window manager line.
- Click on that line and hold the mouse button down; drag the entry till your cursor is over the System Tools sub-menu entry in the left panel.
- Make sure that the System Tools line is highlighted--you may have to slightly move the cursor about till it is.
- Release the button, dropping the entry.
You now have two entries for that app: the original in Accessories, and the new, copied-in one in System Tools. Now put your cursor over the newly made entry in System Tools and click on it; from the buttons arrayed down the right of the window, click on the one that says Delete. Voila: the duplicate entry has indeed been deleted.
Now you know how to copy and how to delete entries. You are thus free to remake any and all of the menus to your heart's desire. But here are a few things we would do. First, deactivate every menu entry duplicating an icon in the toolbar. Then move (copy, then delete the original) till your menus end up like this:
- Accessories:
- Archive Manager
- Calculator
- Character Map
- Disk-Usage Analyzer
- Take Screenshot
- Games: this one is entirely up to you.
- Graphics:
- Grace
- gv
- LRF Viewer
- OpenOffice.org Drawing
- Shotwell Photo Manager
- Internet:
- Empathy
- Google earth
- Networking Tools
- Transmission BitTorrent Client
- Office:
- Efax-gtk (if you installed it)
- HomeBank (if you installed it)
- OpenOffice.org Database
- OpenOffice.org Presentation
- OpenOffice.org Spreadsheet
- OpenOffice.org Database
- Scribus (if you installed it)
- Simple Scan (if you have a scanner)
- Other:
- BitPim (if you installed it)
- calibre (if you installed it)
- Celestia (if you installed it)
- DOSbox (if you installed it)
- Stellarium (if you installed it)
- Programming:
- Meld Diff Viewer
- Root Tools:
- Root Browser
- Root Editor
- Root Terminal
- Sound & Video:
- Brasero
- Cheese
- DeaDBeeF
- GNOME MPlayer
- Pitivi
- Rhythmbox
- SM Player
- Sound Recorder
- Totem
- VLC media player
- System Tools:
- APCUPSD Monitor (if you installed it)
- Configuration Editor
- Manage print Jobs
- Scheduler
- Search for Files
- System Profiler and Benchmark
That's not to say that that list is magic and perfectly optimum. But it gives you an idea of how things can be arranged. But that's not all yet: we need to look at the Preferences and Administration menus., too. Certain items in those menus are best clicked display-off, for various reasons.
In the Preferences menu, consider--depending on your needs and your system setup--disabling:
- Assistive Technologies (unless you are using them)
- Bluetooth (if you're not using it on this computer)
- Broadcast Accounts (as with the next, keep only if you're into this foofaraw)
- Broadcast Preferences (see the above)
- Email Settings (this is only for the Evolution client, which we are not using)
- File Management (just Nautilus' preference settings)
- Input Method Switcher (if you happen to need this, you'll know it)
- Keyboard Input Methods (ditto the above)
- Multimedia Systems Selector (only for special, complex problems)
- Network Proxy (if you happen to need this, you'll know it)
- Open JDK Java 6 Policy Tool (again: if you happen to need this, you'll know it)
- Remote Desktop (yes, if you happen to need this, you'll know it)
- Ubuntu One (keep only if you're into this foofaraw)
In the Administration menu, consider--depending on your needs and your system setup--disabling:
- Computer Janitor (a bad idea: not to be used)
- Language Support (unless you need it)
- Shared Folders (irrelevant--we aren't using Samba of NFS)
- Software Sources (just duplicates a Synaptic setting window)
- Startup Disk Creator (there are much better ways of doing what this does)
- Synaptic Package Manager (in the toolbar)
Tidying your packages lists
We want to emphasize yet again that the way to add (and subtract) packages to your system is by use of the package manager. Ideally that means either using the Synaptic GUI interface to it (or, now, the Software Center interface), or--if you are sufficiently familiar with its working--invoking it on the command line. You can also, when it is the only method available to get some certain item, use the .deb Debian package method, because such packages inform (or are supposed to inform) the package manager of what they are doing as they do it. What you should never do is use toys that purport to "clean up" your system for you; while they might work fine, we advise against such things as "Computer Janitor" (which comes installed by default) or "Ubuntu Tweak" or their many cousins. Indeed, we recommend deactivating "Computer Janitor" from the System Administration menu.
The better way to look for things wanting cleaning up is with Synaptic itself. Open Synaptic; down in the lower left of its window, click Status. Look on the list of categories in the left-hand display pane for any categories that seem to want weeding out. (But don't be fooled by the category name Installed (local or obsolete): mostly it's "local"--meaning something you installed outside Synaptic--and not "obsolete", but take a look anyway.) Also note that in the toolbar Edit submenu is an option to Fix all broken packages. You should rarely if ever find yourself with either "orphan" or "broken" packages, but it can happen. If you find categories in the left-hand display pane that you don't understand, remember that Google Is Your Friend.
For further reading we suggest this SynapticHowTo from the Ubuntu documentation.
Canonical, Ltd., who maintain Ubuntu, are slowly, release by release, increasing the role of the Software Center application as an eventual "one-stop shopping center" total replacement for Synaptic, Update Manager, and other related tools for package management. But it will be a while before the old tools cease being the preferred method for package management.
System sounds
Just as there are appearance themes available, so also are there system-sound themes, though Ubuntu right now only ships with one theme (which is perforce the default), cleverly named Ubuntu. "System sounds" are those occasional twicks and bweeps and tings that the system generates to alert you to something, from an attempt to Backspace when you're already at the left of an entry box to incoming chat messages. As you might expect, the default sounds are pretty "vanilla", and often annoying. You can see what the sounds are, and hear each, easily enough: open Nautilus and cruise to this directory:
/usr/share/sounds/ubuntu/stereo/
The names of the files (all of which are in the .ogg format) suggest--often inaccurately--what they are supposed to signify: "bell", "dialog-question", "button-pressed", it all looks obvious. You can hear each such sound by simply double-clicking on it (that opens a window within which a sound app plays it). Two especially important ones (to most users) are the desktop-login and (now that we have fixed it for you so it plays) the desktop-logout.
If you do Preferences - Sound, the first tab on the resultant window has all sorts of stuff on it. We are even less expert than usual on the interactions of all this, but here's the basic idea. The volume slider at the top is the overall system volume, and it tracks the volume-control applet in your toolbar (play with the applet and you'll see the Sounds slider move). The "Sound theme" can right now be the default Ubuntu or simply "No sounds", which is what it says (more or less). As best we can tell, the "Enable window and button sounds" is meaningless if "No sounds" has been chosen, but otherwise acts to block some particular sounds from being played from the chosen sound theme--presumably those the designers thought of as "window and button" sounds: we suppose a sufficiently patient soul could determine by trial and error which sounds are what in this classification scheme, but patient is not us. The "alert" sound is apparently a third category yet; the default is to use the alphabetically first sound file from the chosen theme; for the Ubuntu theme, that is the "bell" sound. But you can also choose special alert sounds from outside any theme (these are kept in the directory /usr/share/sounds/gnome/defaults/alert/, but adding more sounds there does not seem to cause them to appear on the "alerts" menu of the Sounds window--go figure).
If you want to construct a new custom sound theme, it's not hard:
- Open a root terminal.
- Execute: cd /usr/share/sounds
- Execute: mkdir MyCustom (where "MyCustom" is whatever name you want for your new theme)
- Execute: cd MyCustom
- Execute: cp ../ubuntu/index.theme index.theme
- Execute: gedit index.theme
- When the editor window opens, change Ubuntu to MyCustom (or whatever you're using).
- Save the file and exit the editor.
- Execute: mkdir stereo
- Execute: cd ../ubuntu/stereo
- Execute: cp * ../../MyCustom/stereo
- Exit the terminal.
That has created the new sound theme MyCustom; that theme is pre-populated with all the same original Ubuntu-theme sound files, so you have something to start from. Now what you have to do is to replace the contents of the directory /usr/share/sounds/MySounds/stereo one by one with sound files (also in the .ogg file format) that you think more appropriate for the action denoted by the sound's name. You can take your time, because you always have the default sounds for everything in place. To activate your new theme, in the Sounds Preferences window select MyCustom (or, again, whatever you called it) from the dropdown "Sound theme" selector. (You may have to close the Sounds window then re-open it to see your new theme appear.)
|
Regrettably, if you design a wholly new sound theme, you still--owing, we would say, to poor system design--have to manually fix two things, else both the logon and the logoff sounds will be from the default Ubuntu theme, not your new one. |
The reason for that is that the sound file played in each case is "hard-wired"--that is, its name and location are explicitly encoded in a control. In fact, the logout encoding we did ourselves earlier on, when we restored that functionality. Here's how you you would switch logon and logoff sounds from the Ubuntu theme to a new one, say for this example one called MyCustom:
- Do Preferences - Startup Applications.
- Highlight the line labelled GNOME Login Sound by clicking on it.
- Click the Edit button; an entry window will pop up.
- Edit the "Command" in that entry window to point to the correct login sound--that should only require changing Ubuntu to MyCustom (or whatever).
- Click the Save button.
- Click the Close button; that fixes the logon sound.
- Open a root editor.
- Open the file /etc/init.d/logout-sound
- Change the pointer there from the Ubuntu theme location to your new theme location--as with the logon sound, that should only require changing Ubuntu to MyCustom (or whatever).
- Save the changed file.
- Close the editor; that fixes the logoff sound.
The rest of the tabs on the Sounds preferences window are best left alone unless you know your way about your hardware.
A note on converting files in the .wav sound format to the .ogg format: all you need do, if the files are within your home directory (as, for example, in a subfolder of your DATA/Audio folder) is open a Nutilus file browser, go to where the .wav file in question is, right-click on it, select Scripts then click on Convert audio file: the ogg format will be Hobson's choice. Select ogg and click OK; at the next choice box, just click OK; then, at the next, click the button for 10 (best-quality conversion) and yet again click OK. There: it's done, and in the same directory you now have an .ogg version of the .wav file (which remains in place). Remember that to move files into your theme directory, you need root authority, so use a root browser for the move. (We only equipped the conversion script to do wav to ogg because most effects files not already in ogg format are likely to be wav files, but you can augment the converter script--explaining how is beyond our scope here, but you can Google it up.)
If you would like to fool around with a replacement sound theme we use on one of our systems, click the link in this sentence and download the file to your Downloads directory. In it are just the sound files, so you need to make the new folders and script:
- Open a root terminal.
- Execute: cd /usr/share/sounds
- Execute: mkdir Owlcroft
- Execute: cd Owlcroft
- Execute: cp ../ubuntu/index.theme index.theme
- Execute: gedit index.theme
- When the editor window opens, change Ubuntu to Owlcroft
- Save the file and exit the editor.
- Execute: mkdir stereo
- Exit the terminal.
- Open a root browser.
- In the browser, open two tabs: one at your Downloads directory, the other at your new /usr/share/sounds/Owlcroft/stereo directory.
- Move the downloaded NewSoundTheme.tar.gz file from Downloads to the new directory.
- Close the Downloads tab.
- Right-click on the downloaded file and then click on Extract here.
- Verify that 17 .ogg files have been created in that directory.
- Delete the downloaded tar.gz file.
The new theme, named (vainly) "Owlcroft", is ready for selection in the Sounds preference window. If you want to spoil the anticipation, you can click on the individual sounds; or you can just wait and see how it--literally--plays out. (The login sound will please some and mystify others.) Anyway, this is an example of the sorts of things you can easily do.
Selecting screensavers
The Synaptic downloads will have given you a wealth of screensavers. Indeed, that wealth is probably altogether too much. Do Preferences - Screensavers and look at the list of availables. Long, isn't it? And, if you review them by clicking on one or another in the list column, you'll find that while some are breathtaking, others are humdrum or at any event not appealing to you. Can we cull this list down? Yes.
- Open a root browser.
- Go to the directory /usr/lib/gnome-screensaver/gnome-screensaver
- There create a new folder, and name it Unused.
- The two files showing in that directory (floaters and sideshow) control more than two screensavers. The "floaters" one is used for all the "floating X" stuff (floating gnome logos, for example). It's unlikely that you'll find any of them worth keeping, so move both of those files into the new "Unused" folder.
- To check, close and re-open the Screensaver window; you should find those few screensavers no longer there. (If you desperately miss any that went, just move the files back out of the Unused folder to where they were.
- Go to the directory /usr/lib/xscreensaver
- There create a new folder, and name it Unused.
- Create another new folder, and name it InUse.
- In the Screensavers window, go through them one by one and list all the ones you want to "retire".
- Close the Screensavers options window (this is probably not really necessary, but do it anyway).
- Using the root browser, move the files corresponding to your "retirement list" into your new Unused folder there. Mostly the file names will be exactly or about the same as the nominal screensaver name, so you should have no trouble identifying the wanted files.
- Re-open the Screensavers window and see if everything went according to plan.
(You might want to do this in stages: in the first round, cull the obvious losers; then, in the next round, be more discriminating; you might even go a third or fourth round to really focus in on the goodies you most want. After every round of choice, just move the newest losers into that Unwanted folder.
- When you are sure you have completely culled the field, copy everything remaining in the directory into the previously unused new InUse folder; that is not really necessary, but it's nice to know that all your originals are preserved outside the active directory.
And that's that. Set the screensaver display on Random and enjoy it. If you ever change your mind on any, just move them back out of the Unused folder (and put a copy into the Inuse folder).
Replacing Network Manager
The network-interface manager that comes with Ubuntu by default is called Network Manager. There is a somewhat better product available, named Wicd. Here is how to replace Network Manager with Wicd.
First, as a super-caution safety measure, let's assure that we have re-installable copies of Network Manager on our system, lest something bizarre blow up on us. Open a root terminal and execute:
apt-get install -d --reinstall network-manager network-manager-gnome
Now we begin:
- Do Applications - Software Center
- In the search bar, type in Network Manager
- In the results display, select, by clicking on it, Network Manager
- Click the Remove button and wait till the process completes.
- In the search bar, type in Wicd
- In the results display, select, byclicking on it, Wicd
- Click the Install button and wait till the process completes.
Wicd is now installed. To verify, do Applications - Internet - Wicd Network Manager or just click the toolbar button for it (in the tray near the right side). Wicd will auto-configure for wired connections. If your connection is wireless:
- Open Wicd as just described above.
- See if the wireless network you're looking for shows on the list shown.
- If not--if it is a "hidden" network--click the down arrow next to the Network button then enter the ESSID of the hidden network; otherwise, just press the Connect button for the wanted network.
- If you get the message "This network requires encryption to be enabled":
- click OK to dismiss the warning
- click the arrow next to the network name
- click the "Advanced Settings" button
- check the "Use Encryption" checkbox
- choose your encryption type
- type in the key (you may also assign a static IP or DNS in here, but most users will not need to)
- click OK
- Click Connect again--the connection should come up relatively quickly
- If you plan to use this connection all the time, consider the "Automatically connect to this network" checkbox. (You have to open the arrow next to the network name to choose it.)
Once set up, Wicd rarely if ever needs a thought again, unless you need to set up a new wireless connection. Unlike Network Manager, Wicd will connect to the net as soon as it can--it does not wait for the desktop GUI to be established--and so will normally be connected even before the desktop had loaded.
Once you are comfortable that Wicd is doing everything you need done satisfactorily, you can purge your syetem of the remains of network manager. Open Synaptic and search for network manager; you will probably find several "Network Manager"-related files in place; do a Complete Removal of all of them (every package whose name begins with (or is) network-manager).
Customizing Bootup/Shutdown Screens
Bootup and shutdown are handled by a system called "Plymouth"; do not think of Plymouth as just some pretty (supposedly pretty) screens: Plymouth is deeply embedded in a number of things that go on in your system, at bootup, at shutdown, and--if you have them enabled--hibernate and suspend. Plymouth is thus somewhere from very difficult to impossible to actually remove or disable, it being "a dependency of mountall". You can see more information about Plymouth at the Edububntu Wiki.
A couple of bootup "tricks":
To get to the GRUB boot menu, as soon as the boot/reboot process starts, press (and hold down) the <Shift> key (you can release it once the menu appears). This is useful if you want or need to boot something besides the full graphical desktop of the current kernel--you can get to the maintenance version, or to any other installed kernel, through the boot menu).
To see all text messages during bootup, press <Esc> at any point while Plymouth is running; the <Esc> key acts as a toggle, so you can keep switching between graphical and text modes as you please.
Plymouth Problems
On some people's hardware, Plymouth works as intended; on many others', however, it has defects ranging from poor resolution or other distortions of its display screens up to (or down to) severely slowing bootup and shutdown or even blocking them from proper completion. You can get some flavor of many users' experiences with and thoughts about Plymouth here and here. It is far beyond our scope here to try to suggest fixes for actual problems--for those, Google Is Your Friend. (There is some advice in the Plymouth information file at--
/usr/share/doc/plymouth/README.Debian
--which probably should be your first resort for problem-solving.)
Customizing the Default Screen
While there are several alternative themes (see farther below) quite different from the default one, the default has the virtue of a clean simplicity of appearance. If, however, you would like to keep that clean look but with something other than that shriekingly bilious purple for a color, that's easy enough to do. First, though, you need to know what color you do want the background to be, and you need to know it as an RGB number set (red-green-blue, with values for each from 0 to 255).
There are various ways to fiddle with colors and get their RGB values. Here's the easiest (if you have, pursuant to our earlier advice, installed the gedit-plugins extras package):
- open the text editor (gedit)
- check that at the Edit - Preferences window's "Plugins" tab the "Color Picker" plugin is checked
- at Tools in the gedit toolbar, select Pick color...
- fool with the color spinner wheel till the right half of the color strip below it shows the color you want
(use your mouse to grab and spin the line in the outer color circle, then click in the colors triangle to fine-tune)- record the Red, Green, Blue numbers (upper right of the color-picker window) for your final color choice
- click Close in the color-picker window
- close the text editor
Once you have determined an RGB color-values set, take a calculator (or pencil and paper) and divided each color value by 255, rounding to two decimal places. That will give you a set of values each between 0 and 1--something like, say, 0.13, 0.29, 0.48; make a note of those values where you can read it while editing a file.
- Open a root browser.
- In the file browser, go to lib/plymouth/themes/ubuntu-logo
- Make a backup copy of the file ubuntu-logo.script (right-click, select Copy, right-click on an open area in the window, click Paste).
- Open the file ubuntu-logo.script with the text editor (just double-click on it).
- Search for the two lines that begin with Window.SetBackground
- Just above them, insert a line (flush left) reading: # ORIGINAL COLORS:
- In the start of each of the two lines, insert # (a hash sign followed by a blank space).
- Just below those lines, insert (flush left) four new lines like this:
#
(except, of course, using the RGB values for your preferred color, and revising the description comments as you please).
# NEW COLORS:
Window.SetBackgroundTopColor (0.13, 0.29, 0.48); # Color is electric blue...
Window.SetBackgroundBottomColor (0.13, 0.29, 0.48); # ...matches user screen background
- Save the changed file.
- Close the editor.
- Close the file browser.
If you ever change your mind, you can just as well substitute a new RGB color-values set, or just revert to the originals.
Minimal Plymouth Screens
Even with a properly working Plymouth, many users are unhappy with the loss of the bootup text-information display seen in pre-Plymouth versions of Ubuntu, and don't want to have to press keys (see the notes above) to get what they consider "normal" bootup behavior. That, at least, can be dealt with. There are two stages you can try: text-only themes, and no themes.
Plymouth works like this: if one or more graphical themes are installed, it will use the selected (or default) one; if no graphical themes are installed, it will use the selected (or default) text theme. There are two text themes available, and both come pre-installed: plymouth-theme-text and plymouth-theme-ubuntu-text. To try one or both of the text themes, you need to first remove all graphical themes you may have installed, then select the text theme to use as the bootup default:
- Use Synaptic to remove the package plymouth-theme-ubuntu-logo
- Likewise remove any other graphical Plymouth themes you may have installed with Synaptic.
- In a root terminal, execute: update-alternatives --config text.plymouth
- From the list displayed in the terminal, identify the number assigned to the Plymouth text theme you want to try.
- Key in that numeral, then press <Enter> (which will drop you back to the terminal prompt).
- Still in the terminal, execute: update-initramfs -u
- Close the terminal.
The new text theme will be used when next you boot up.
To try removing splash screens altogether (but, remember, without disabling Plymouth itself):
- Open Synaptic.
- Search for plymouth-theme-
- In the results list, click all currently installed Plymouth themes for removal.
- Perform the removals.
- Close Synaptic.
The new splashless Plymouth will be used when next you boot up. Actually, it isn't splashless: there is a sort of "super-default" theme called details that operates when all the Synaptic-named ones are absent; it presents a bootup display that looks like the good/bad (take your pick) old days: a black screen with messages in white text scrolling down the screen. Our experience of the two text modes was rather dreadful, and we see no use to either: if you want messages during boot, remove everything but details. (We did not bother to experiment with removing details, as that seemed far enough to go.) Our reckoning is that unless you feel you have some urgent need to see the bootup messages, you might as well go with one of the graphic themes--we saw no difference in bootup times.
Alternative Plymouth Screens
It is astounding the amount of time and effort people will expend on a snippet of eye candy seen for a few seconds every once in a while (we run everything except our laptops on a 24/7 basis, so bootup screens, and even times, are not of much concern to us). But they do. If you want to try some alternatives--not a few rather jazzy--to the default Plymouth theme, here's how:
- Open Synaptic.
- Search for plymouth-theme-
- In the results list, click whatever theme you want to try.
- Install the theme package.
- Close Synaptic.
- In a root terminal, execute: update-alternatives --config default.plymouth
- From the list displayed in the terminal, identify the number assigned to the new Plymouth text theme.
- Key in that numeral, then press <Enter> (which will drop you back to the terminal prompt).
- Still in the terminal, execute: update-initramfs -u
- Close the terminal.
The new theme will be used at the next bootup. You can try as many themes as you like. There is no harm in leaving old themes on the system if you feel you might want to re-install one or more some time; but if there are any you feel sure you won't ever want to use, remove them with Synaptic. (We removed both of the text themes--the remaining "details" theme is the best non-graphic choice.) You can choose from among a number of installed themes using the second half of the procedure just described. After all, variety is the spice &c &c.
There are several alternative themes in the Ubuntu repositories, and quite a many more outside them; as always, use discretion when addding anything from anywhere except one of the mainstream repositories.
Augmenting Synaptic
New Custom Filters
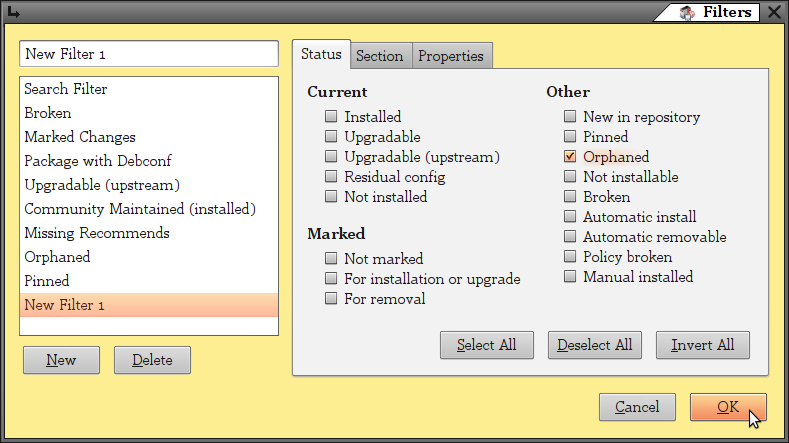
Many users fail to use the full capabilities of Synaptic. To begin with, let's set up a "filter" that will show us any "orphaned" packages (an orphan package is one that was needed to support some other package that has since been removed; the now-unneeded support "dependency" is, however, left on the system to no useful end.) Here's how:
- Open Synaptic.
- In the Synaptic toolbar, do Settings - Filters
- In the popup Filters window, click the New button.
- In the (unlabelled) name field at the upper left, replace New Filter 1 with Orphaned
- Click the Deselect All button.
- Tick the Orphaned tickbox, and no other.
- Click the OK button.
Now we have the filter, how to use it? In the lower left of the Synaptic screen is a column of clickable buttons; click the one labelled Custom Filters; the column listing above the buttons will (probably, depending on what you last were doing) change. Click in that column on the Orphaned entry. The main display window will now show you all your "orphan" packages (you may well have none--though if you followed all the instructions in these pages, you should at least have the libpng3 package sometimes useful in installing some older device drivers).
Following the same procedures, you might also add a "Pinned" filter (the tickbox says Pinned instead of Orphaned. That will normally be empty, but it's handy to have for checking. (A "pinned" package is one you have marked to not be signalled for or allowed to upgrade--on very rare occasions, you may need to keep using an older version of a package if something in the newer versions wouldn't work as you want.)
You might well take this occasion to see what the other custom filters show you. Search Filter is a sort of "master" filter that can be used, if for some reason you want to, to limit the scope of package searching done by the main Synaptic Search facility. Missing Recommends is packages not actually required by some already-installed package, but "recommended" by one or more; you don't need anything listed there, but it's something to look at. (But with care; for example, if you install--as we recommend--the Wicd network-connections manager in place of the default GNOME Network Manager, NM and several associated files will show up here.)
Remember that you can always make any ad hoc filter you can dream up to do some specialized search. Notice that there are tabs on the filter-set window, and you can further restrict searching by use of what is on those other tabs, the investigating of which is an exercise left for the student.
Other interesting things can be found by clicking some of the other possibilities down in that lower-left corner. Sections carves up the maga-list of packages into a large number of sub-categories, which helps make looking for interesting new toys easier. Origin lets you see from which repositories you got what (or vice-versa). And Search results shows you, yes, the results of your recent searches (so you don't have to repeat them to see those results.)
And under File in the toolbar are the useful "Markings" commands, which let you save (in a file you specify) whatever packages are currently marked, and also to read back any such file to restore the markings. You can, for example, select the "Installed" filter list, select "mark all", then save those markings as a file. You can then at a later time--say in a fresh install--read that file and have all your installs pre-marked for you. Do some homework on this feature: it can be a big time saver down the road.
Using "Quick Search" Properly
The Quick Search facility of Synaptic is widely misunderstood. It is not intended as just a substitute for the standard Search (as invoked by clicking that icon or by <Ctrl>-F); rather, it is intended to search within a given set of results--which is to say, within whatever currently appears on the main listing-display screen. Often when you do a standard Synaptic search, if you weren't using the exact name of some one package, you will get a fair-sized screenful of results, some not terribly relevant. The purpose of Quick Search is to get what you want from that list; you will notice, if you try it, that it works as you type, rather than waiting for a press of <Enter>. Try it: do a full search for network manager, which will produce dozens of listings; now, start typing into the Quick Search box the phrase rekonq, but go very slowly, a character at a time, and watch the display list. When you get just to the second letter---that is, have re typed in--the display will jump down in the list to roughly center up (vertically) the first package whose exact name starts with re. Note also that if you Backspace over what you have typed, the listing reverts, ending up at the top again if you erase all the letters. Trying that sort of thing a few times will show you what Quick Search is for and how it can best be used.
Mind, if you have All displayed in Synaptic, Quick Search can be used to locate a particular package; but it is more efficient to use standard search if you already know the exact name of the package you want (which is what Quick Search looks for). Use Quick Search when you don't know the exact name: use Search for some relevant term, then Quick Search to try to pick out the right one. (As you see, it's not a terrifically useful adjunct, but now at least you know what it was meant for.)
You now have a fully functional and decently tuned Ubuntu installation. But every system requires some ongoing maintenance, from backing up to updating. Those topics have a page of their own here, called simply Ongoing Maintenance; click that link to get to it.
|
Comments? Criticisms? Questions? Please, e-mail us by clicking here. All content copyright 2010 Owlcroft House |
|
This web page is strictly compliant with the W3C (World Wide Web Consortium) Extensible HyperText Markup Language (XHTML) Protocol v1.0 (Transitional). Click on the logo below to test us! You loaded this page on Tuesday, 28 July 2026, at 09:06 EDT.; it was last modified on Tuesday, 18 January 2011, at 02:39 EST. |
---=== end of page ===---